Kushal Das

FOSS and life. Kushal Das talks here.

kushal76uaid62oup5774umh654scnu5dwzh4u2534qxhcbi4wbab3ad.onion

Podman on Debian Buster

I use podman on all of my production servers, and also inside of the Qubes system in Fedora VMs. A few days ago I saw this post and thought of trying out the steps on my Debian Buster system.

But, it seems it requires one more installation step, so I am adding the updated installation steps for Debian Buster here.

Install all build dependencies

sudo apt -y install \
  gcc \
  make \
  cmake \
  git \
  btrfs-progs \
  golang-go \
  go-md2man \
  iptables \
  libassuan-dev \
  libc6-dev \
  libdevmapper-dev \
  libglib2.0-dev \
  libgpgme-dev \
  libgpg-error-dev \
  libostree-dev \
  libprotobuf-dev \
  libprotobuf-c-dev \
  libseccomp-dev \
  libselinux1-dev \
  libsystemd-dev \
  pkg-config \
  runc \
  uidmap \
  libapparmor-dev \
  libglib2.0-dev \
  libcap-dev \
  libseccomp-dev

Install latest Golang

Download and install latest golang and also make sure that you have a proper $GOPATH variable. You can read more here.

Install conmon

conmon is the OCI container runtime monitor. Install it via the following steps:

git clone https://github.com/containers/conmon
cd conmon
make
sudo make podman
sudo cp /usr/local/libexec/podman/conmon  /usr/local/bin/

Install CNI plugins

git clone https://github.com/containernetworking/plugins.git $GOPATH/src/github.com/containernetworking/plugins
cd $GOPATH/src/github.com/containernetworking/plugins
./build_linux.sh
sudo mkdir -p /usr/libexec/cni
sudo cp bin/* /usr/libexec/cni

Setup the bridge

sudo mkdir -p /etc/cni/net.d
curl -qsSL https://raw.githubusercontent.com/containers/libpod/master/cni/87-podman-bridge.conflist | sudo tee /etc/cni/net.d/99-loopback.conf

Create the configuration files

Next, we need configuration files for the registries and also the policy file.

sudo mkdir -p /etc/containers
sudo curl https://raw.githubusercontent.com/projectatomic/registries/master/registries.fedora -o /etc/containers/registries.conf
sudo curl https://raw.githubusercontent.com/containers/skopeo/master/default-policy.json -o /etc/containers/policy.json

Installing slirp4netns

slirp4netns is used for user-mode networking for unprivileged network namespaces. At the time of the writing this blog post, the latest release is 0.4.2.

git clone https://github.com/rootless-containers/slirp4netns
cd slirp4netns
./autogen.sh
./configure --prefix=/usr
make
sudo make install

Installing podman

Finally we are going to install podman.

git clone https://github.com/containers/libpod/ $GOPATH/src/github.com/containers/libpod
cd $GOPATH/src/github.com/containers/libpod
make
sudo make install

Testing podman

Now you can test podman on your Debian system.

podman pull fedora:latest
podman run -it --rm /usr/bin/bash fedora:latest
PoC to auto attach USB devices in Qubes

Here is PoC based on qubesadmin API which can auto attach USB devices to any VM as required. By default Qubes auto attaches any device to the sys-usb VM, that helps with bad/malware full USB devices. But, in special cases, we may want to select special devices to be auto attached to certain VMs. In this PoC example, we are attaching any USB storage device, but, we can add some checks to mark only selected devices (by adding more checks), or we can mark few vms where no device can be attached.

I would love to see what all magical ideas you all come up with. Have fun with the code.

Btw, you can execute it in dom0 by

python3 autoattach.py

oqubeslogging, a PoC for centralized logging in Qubes OS

oqubeslogging is a proof of concept project for Qubes OS. This includes a qrexec service, which allows one AppVM (we will call it logging VM for the rest of the blog post) to have all the logs from different select VMs. This enables central logging among QubesOS land.

The second part is a Python logging handler, which if configured correctly, will allow to pass the logging lines to the logging VM

import logging
from oqubeslogging import OQubesLog

def main():
    handler = OQubesLog("workvm", "loggingvm")
    logging.basicConfig(level=logging.DEBUG, handlers=[handler])
    logger = logging.getLogger("example")

    logger.info("kushal says it works")


if __name__ == "__main__":
    main()

Third, is another example code, which if run as root user in any VM, will collect all logs from journald and pass them to the logging VM.

Why is this useful?

The same reason we use central logging in every place. This will enable us to check only one VM to find the correct log. QubesOS is designed for single user in mind, and instead many random AppVM, we will be able to read and parse logs in that one special logging VM.

Announcing lymworkbook project

In 2017, I started working on a new book to teach Linux command line in our online summer training. The goal was to have the basics covered in the book, and the same time not to try to explain things which can be learned better via man pages (yes, we encourage people to read man pages).

Where to practice

This one question always came up, many times, the students managed to destroy their systems by doing random things. rm -rf is always one of the various commands in this regard.

Introducing lymworkbook

Now, the book has a new chapter, LYM Workbook, where the reader can set up VMs in the local machine via Vagrant, and go through a series of problems in those machines. One can then verify if the solution they worked on is correct or not. For example:

sudo lymsetup copypaste
sudo lymverify copypaste

We are starting with only a few problems, but I (and a group of volunteers) will slowly add many more problems. We will also increase the complexity by increasing the number of machines and having setup more difficult systems. This will include the basic system administration related tasks.

How can you help

Have a look at the issues, feel free to pick up any open issue or create issues with various problems which you think are good to learn. Things can be as easy as rsync a directory to another system, or setting up Tor Project and use it as a system proxy.

Just adding one problem as an issue is also a big help, so please spend 5 minutes of your free time, and add any problem you like.

Running Ubiquity controller on a Raspberry Pi

I got a few new Raspberry Pi(s) with 4GB RAM. I used them as a full scale desktop for some time, and was happy with the performance.

I used to run the Ubiquity controller for the home network in a full-size desktop. Looking at the performance of this RPI model, I thought of moving it out to this machine.

I am using Debian Buster based image here. The first step is to create a new source list file at /etc/apt/sources.list.d/ubnt.list

deb https://www.ubnt.com/downloads/unifi/debian unifi5 ubiquiti

Then, install the software, and also openjdk-8-jdk, remember that the controller works only with that particular version of Java.

apt-get update
apt-get install openjdk-8-jdk unifi

We will also have to update the JAVE_HOME variable in /usr/lib/unifi/bin/unifi.init file.

JAVA_HOME=/usr/lib/jvm/java-8-openjdk-armhf/

Then, we can enable and start the service.

systemctl enable unifi
systemctl start unifi

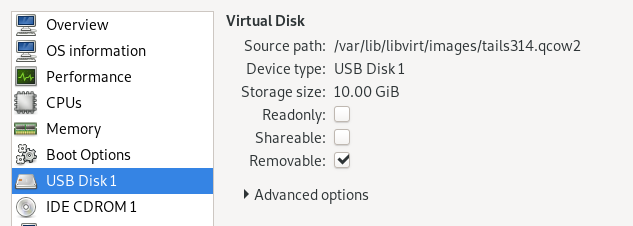
Remember to mark drive as removable for tails vm install

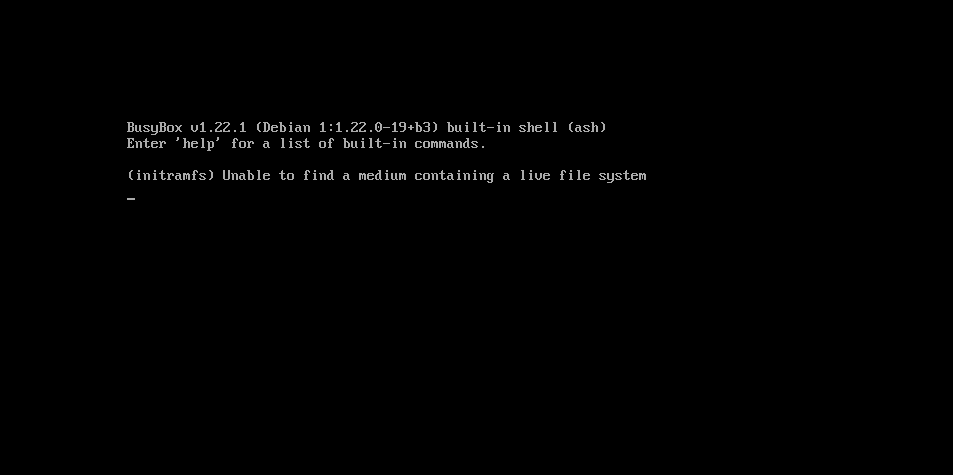
If you are installing Tails into a VM for testing or anything else, always remember to mark the drive as a removable USB drive. Otherwise, the installation step will finish properly, but, you will get errors like the following screenshot while booting from the drive.

Tails error while booting

The option to do so is available in the details section for the vm in virt-manager.

Where in libvirt

I wasted a few hours today while trying to get a new VM for the SecureDrop admin setup tests.

Using signify tool for sign and verification

We generally use GNUPG for sign and verify files on our systems. There are other tools available to do so; some tools are particularly written only for this purpose. signify is one such tool from the OpenBSD land.

How to install signify?

pkg install signify

I used the above command to install the tool on my FreeBSD system, and you can install it in your Debian system too, the tool is called signify-openbsd as Debian already has another tool with the same name. signify is yet to be packaged for Fedora, if you are Fedora packager, you may want to package this one for all of us.

Creating a public/private key pair

signify -G -s atest.sec -p atest.pub -c "Test key for blog post"

The command will also ask for a password for the secret key. -c allows us to add a comment in our key files. The following is the content of the public keyfile.

untrusted comment: Test key for blog post public key 
RWRjWJ28QRKKQCXxYPqwbnOqgsLYQSwvqfa2WDpp0dRDQX2Ht6Xl4Vz4

As it is very small in size, you can even create a QR code for the same.

Signing a file

In our demo directory, we have a hello.txt file, and we can use the newly generated key to create a signature.

signify -S -s atest.sec -m hello.txt

This will create a hello.txt.sig file as the signature.

Verifying the signature

$ signify -V -p atest.pub -m hello.txt
Signature Verified

This assumes the signature file in the same directory. You can find the OpenBSD signature files under /usr/local/etc/signify (or in /etc/signify/ if you are on Debian).

To know more about the tool, read this paper.

My talk at PyCon US 2019

A couple of weeks back, I gave a talk at PyCon US 2019, "Building reproducible Python applications for secured environments".

The main idea behind the talk is about the different kind of threats in an application which has dependencies (with regular updates) coming from various upstream projects, and also the final deployable artifact (Debian package in this case) needs to audit-able, and reproducible.

Before my talk on Saturday, I went through the whole idea and different steps we are following, with many of the PyPA (Python Packaging Authority) and other security leads in various organizations.

You can view the talk on Youtube. Feel free to give any feedback over email or Twitter.

Building wheels and Debian packages for SecureDrop on Qubes OS

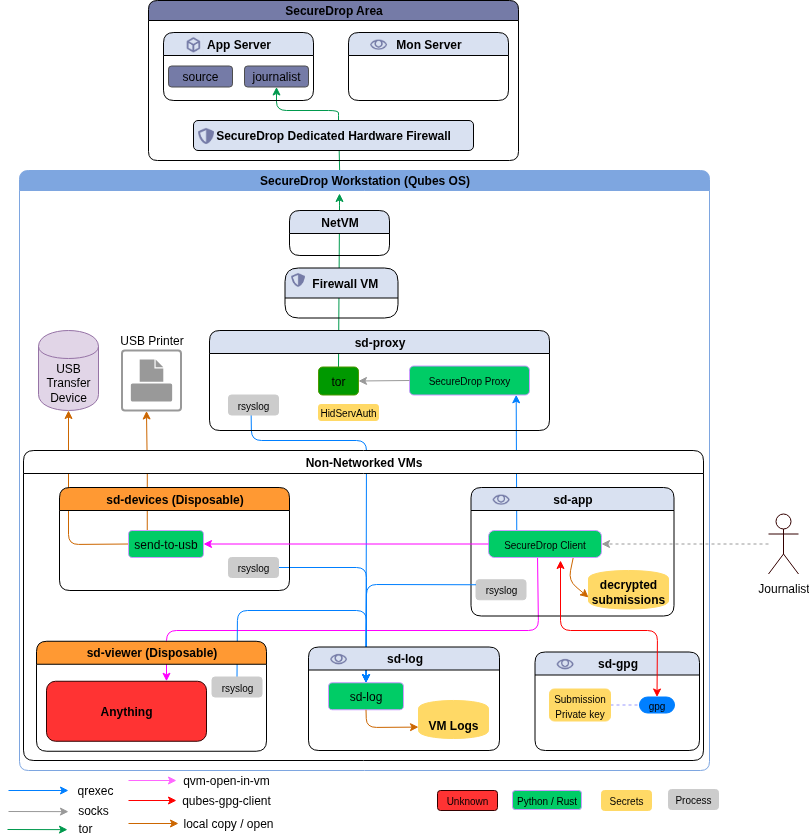
For the last couple of months, the SecureDrop team is working on a new set of applications + system for the journalists, which are based on Qubes OS, and desktop application written particularly for Qubes. A major portion of the work is on the Qubes OS part, where we are setting up the right templateVMs and AppVMs on top of those templateVMs, setting up the qrexec services and right configuration to allow/deny services as required.

The other major work was to develop a proxy service (on top of Qubes qrexec service) which will allow our desktop application (written in PyQt) to talk to a SecureDrop server. This part finally gets into two different Debian packages.

  1. The securedrop-proxy package: which contains only the proxy tool
  2. The securedrop-client: which contains the Python SDK (to talk to the server using proxy) and desktop client tool

The way to build SecureDrop server packages

The legacy way of building SecureDrop server side has many steps and also installs wheels into the main Python site-packages. Which is something we plan to remove in future. While discussing about this during PyCon this year, Donald Stufft suggested to use dh-virtualenv. It allows to package a virtualenv for the application along with the actual application code into a Debian pacakge.

The new way of building Debian packages for the SecureDrop on Qubes OS

Creating requirements.txt file for the projects

We use pipenv for the development of the projects. pipenv lock -r can create a requirements.txt, but, it does not content any sha256sums. We also wanted to make sure that doing these steps become much easier. We have added a makefile target in our new packaging repo, which will first create the standard requirements.txt and then it will try to find the corresponding binary wheel sha256sums from a list of wheels+sha256sums, and before anything else, it verifies the list (signed with developers' gpg keys).

PKG_DIR=~/code/securedrop-proxy make requirements

If it finds any missing wheels (say new dependency or updated package version), it informs the developer, the developer then can use another makefile target to build the new wheels, the new wheels+sources do get synced to our simple index hosted on s3. The hashes of the wheels+sources also get signed and committed into the repository. Then, the developer retries to create the requirements.txt for the project.

Building the package

We also have makefile targets to build the Debian package. It actually creates a directory structure (only in parts) like rpmbuild does in home directory, and then copies over the source tarball, untars, copies the debian directory from the packaging repository, and then reverifies each hashes in the project requirements file with the current signed (and also verified) list of hashes. If everything looks good, then it goes to build the final Debian package. This happens by the following environment variable exported in the above mention script.

DH_PIP_EXTRA_ARGS="--no-cache-dir --require-hashes"

Our debian/rules files make sure that we use our own packaging index for building the Debian package.

#!/usr/bin/make -f

%:
	dh $@ --with python-virtualenv --python /usr/bin/python3.5 --setuptools --index-url https://dev-bin.ops.securedrop.org/simple

For example, the following command will build the package securedrop-proxy version 0.0.1.

PKG_PATH=~/code/securedrop-proxy/dist/securedrop-proxy-0.0.1.tar.gz PKG_VERSION=0.0.1 make securedrop-proxy

The following image describes the whole process.

We would love to get your feedback and any suggestions to improve the whole process. Feel free to comment in this post, or by creating issues in the corresponding Github project.

Running Tor relay inside a docker container

The latest Tor project release is 0.3.2.10. But, that is not available on all the different versions of different Linux distributions. For example, CentOS 7 has tor-0.2.9.14-1.el7, and only Fedora 28 has the latest Tor.

This is where a container can help. The official builds from Tor Project are for Debian, means we can build and use a Debian based container.

The Dockerfile

FROM debian:stretch
LABEL MAINTAINER Kushal Das <mail@kushaldas.in>

RUN apt-get update
RUN apt install vim gpg -y


RUN echo "deb http://deb.torproject.org/torproject.org stretch main\ndeb-src http://deb.torproject.org/torproject.org stretch main" > /etc/apt/sources.list.d/tor.list

# Let us get the key for Tor
RUN gpg --keyserver keys.gnupg.net --recv A3C4F0F979CAA22CDBA8F512EE8CBC9E886DDD89
RUN gpg --export A3C4F0F979CAA22CDBA8F512EE8CBC9E886DDD89 > tor.gpg
RUN apt-key add tor.gpg

# Finally install Tor
RUN apt update
RUN apt install tor deb.torproject.org-keyring -y
ADD ./torrc /etc/tor/torrc

# Add the tor user
RUN groupadd -g 1000 tor && useradd -m -d /home/tor -g 1000 tor


# Now drop to the actual user
USER tor
RUN mkdir -p /home/tor/.tor/keys

VOLUME ["/home/tor/.tor"]

EXPOSE 9001 9051

ENTRYPOINT ["tor"]

I have a configuration file named torrc, you can copy the sample configuration and edit as required. I have the following entries there.

SOCKSPort 0

ORPort 9001

Nickname NICKNAME_FOR_THE_RELAY

ContactInfo  <YOUR_EMAIL_ADDRESS>

ExitRelay 0

Next, we will create a directory in the host system to keep the keys, and other files. We want to restart the container and still have the same details, mounting a directory from the host system into the container will help us in that.

mkdir /mnt/tor
chcon -R -t svirt_sandbox_file_t /mnt/tor

Please also make sure that you have correct ownership of that directory.

Running the container

docker run -d -v /etc/localtime:/etc/localtime -v /mnt/tor:/home/tor/.tor --restart always -p 9001:9001 -name relay kushaldas/tor:0.3.2.10

After starting the container, you can check the logs for any error. If you can see the following message in the log, then it means that you configured the relay properly.

# docker logs -f relay

Self-testing indicates your ORPort is reachable from the outside.

The official relay guide

Tor project recently published an updated relay guide for anyone new to running a relay. Please go through that document first. If you need help, there is a mailing list of Tor relay operators, and #tor channel on OFTC IRC server is also very welcoming.