Kushal Das

FOSS and life. Kushal Das talks here.

kushal76uaid62oup5774umh654scnu5dwzh4u2534qxhcbi4wbab3ad.onion

How to get a TLS certificate for a domain in your local network?

How to get a TLS certificate for a domain inside of my local network? This was a question for me for a long time. I thought of creating a real subdomain, getting the certificate, and copying over the files locally, and then enforcing local domain names via the DNS or /etc/hosts. But, during the TLS training from Scott Helme, I learned about getting certificates via DNS challenge using acme.sh.

I use DreamHost nameservers for most of m domains. I got an API_KEY from them for only DNS manipulation.

Next, I just had to execute one single command along with the API_KEY to fetch fresh and hot certificate from Let's Encrypt.

The following command fetches for fire.das.community subdomain.

DH_API_KEY=MYAPIKEY acme.sh --issue --dns dns_dreamhost -d fire.das.community

There is a wiki page listing how to use acme.sh tool for various DNS providers.

Use DoH over Tor for your Qubes system

I was using my dns-tor-proxy tool in the AppVMs in my QubesOS system. But, at the same time I was trying to figure out how to make it the default DNS system for the whole Qubes.

ahf provided me a shell script showing how he is forwarding the DNS requests to a VPN interface. I modified the same so that all of standard DNS queries become DoH queries over the Tor network.

Setting up sys-firewall

In the following example, I am setting up the sys-firewall service VM. All other AppVMs connected to this VM as netvm will be use dns-tor-proxy without any modification.

Make sure that the template for sys-firewall has the latest Tor installed. You can get it from the official Tor repository.

Download (or build) the latest dns-tor-proxy 0.3.0 release, and put the file (as executable) in /rw/config/ directory.

Next, modify the /rw/config/rc.local file & add the following lines.

systemctl start tor
sh /rw/config/dns.sh
/rw/config/dns-tor-proxy --doh &

As you can see, we are executing another script at /rw/config/dns.sh, which has the following content. Remember to modify the DNS value to the right IP for your sys-firewall vm.


#!/bin/sh

QUBES_DNS_SERVERS="10.139.1.1 10.139.1.2"
DNS=10.137.0.x

# accept DNS requests from the other vms

iptables -I INPUT -i vif+ -p udp --dport 53 -j ACCEPT
iptables -I INPUT -i vif+ -p tcp --dport 53 -j ACCEPT

# Clean up our NAT firewall rules.
iptables --flush PR-QBS --table nat

# We take incoming traffic on TCP and UDP port 53 and forward to
# our DNS server.
for QUBES_DNS_SERVER in ${QUBES_DNS_SERVERS} ; do
    iptables --append PR-QBS --table nat --in-interface vif+ --protocol tcp --destination "${QUBES_DNS_SERVER}" --dport 53 --jump DNAT --to-destination "${DNS}":53
    iptables --append PR-QBS --table nat --in-interface vif+ --protocol udp --destination "${QUBES_DNS_SERVER}" --dport 53 --jump DNAT --to-destination "${DNS}":53
done

# Log *other* DNS service connections. This part is optional, but ensures that
# you can monitor if one of your VM's is making any traffic on port 53 with
# either TCP or UDP. If you want to log *every* DNS "connection", including the
# ones to QUBES_DNS_SERVERS, you can either move these commands up before the
# for-loop in this file or change the --apend option to be an --insert instead.
iptables --append PR-QBS --table nat --in-interface vif+ --protocol tcp --dport 53 --jump LOG --log-level 1 --log-prefix 'DNS Query: '
iptables --append PR-QBS --table nat --in-interface vif+ --protocol udp --dport 53 --jump LOG --log-level 1 --log-prefix 'DNS Query: '

Now, restart your sys-firewall vm. And you are all set for your DNS queries.

dns-tor-proxy 0.2.0 aka DoH release

I just now released 0.2.0 of the dns-tor-proxy tool. The main feature of this release is DNS over HTTPS support. At first I started writing it from scratch, and then decided to use modified code from the amazing dns-over-https project instead.

Demo

demo of the DoH support in the tool

✦ ❯ ./dns-tor-proxy -h
Usage of ./dns-tor-proxy:
      --doh                 Use DoH servers as upstream.
      --dohaddress string   The DoH server address. (default "https://mozilla.cloudflare-dns.com/dns-query")
  -h, --help                Prints the help message and exists.
      --port int            Port on which the tool will listen. (default 53)
      --proxy string        The Tor SOCKS5 proxy to connect locally, IP:PORT format. (default "127.0.0.1:9050")
      --server string       The DNS server to connect IP:PORT format. (default "1.1.1.1:53")
  -v, --version             Prints the version and exists.
Make sure that your Tor process is running and has a SOCKS proxy enabled.

Now you can pass --doh flag to enable DoH server usage, by default it will use https://mozilla.cloudflare-dns.com/dns-query. But you can pass any server using --dohaddress flag. I found the following servers are working well over Tor.

  • https://doh.libredns.gr/dns-query
  • https://doh.powerdns.org
  • https://dns4torpnlfs2ifuz2s2yf3fc7rdmsbhm6rw75euj35pac6ap25zgqad.onion/dns-query
  • https://dnsforge.de/dns-query

The release also has a binary executable for Linux x86_64. You can verify the executable using the signature file available in the release page.

Introducing dns-tor-proxy, a new way to do all of your DNS calls over Tor

dns-tor-proxy is a small DNS server which you can run in your local system along with the Tor process. It will use the SOCKS5 proxy provided from Tor, and route all of your DNS queries over encrypted connections via Tor.

By default the tool will use 1.1.1.1 (from Cloudflare) as the upstream server, but as the network calls will happen over Tor, this will provide you better privacy than using directly.

In this first release I am only providing source packages, maybe in future I will add binaries so that people can download and use them directly.

Demo

In the following demo I am building the tool, running it at port 5300, and then using dig to find the IP addresses for mirrors.fedoraproject.org and python.org.

demo of dns tor proxy

The -h flag will show you all the available configurable options.

./dns-tor-proxy -h

Usage of ./dns-tor-proxy:
  -h, --help            Prints the help message and exists.
      --port int        Port on which the tool will listen. (default 53)
      --proxy string    The Tor SOCKS5 proxy to connect locally,  IP:PORT format. (default "127.0.0.1:9050")
      --server string   The DNS server to connect IP:PORT format. (default "1.1.1.1:53")
  -v, --version         Prints the version and exists.
Make sure that your Tor process is running and has a SOCKS proxy enabled.

Setting up a personal DoH server

DoH is a hot discussion point in both the privacy and DNS people. There are many criticisms, including encryption support of the clients or still trusting a third party. There is an excellent talk from Bert Hubert on this topic.

In this post, we will learn how to set up our own personal DoH server. I am not posting any tips on the IPTABLES rules, you should be able to add those based on what all services you run on the server.

We will use unbound as the recursive DNS server in our setup. In the server, we can easily install it via the OS package management (apt/dnf).

Getting the root name servers' details

We should get a fresh copy of the root name servers' details, and then you can have a cron job every six months to get a fresh copy.

curl --output /etc/unbound/root.hints https://www.internic.net/domain/named.cache

Setting up unbound

I am using the following configuration

# Unbound configuration file for Debian.
#
# See the unbound.conf(5) man page.
#
# See /usr/share/doc/unbound/examples/unbound.conf for a commented
# reference config file.
#
# The following line includes additional configuration files from the
# /etc/unbound/unbound.conf.d directory.
include: "/etc/unbound/unbound.conf.d/*.conf"
server:
        root-hints: "/etc/unbound/root.hints"
        interface: 127.0.0.1
        access-control: 0.0.0.0/0 allow
        use-syslog: yes

Then you can get the configuration checked via the unbound-checkconf command.

# unbound-checkconf
unbound-checkconf: no errors in /etc/unbound/unbound.conf
systemctl enable unbound
systemctl start unbound  

Setup Nginx along with certbot

Setup Nginx and use the certbot tool to get the SSL certificate. Here is the configuration I am using, the main point to notice the upstream section.

upstream dns-backend {
    server 127.0.0.1:8053;
    keepalive 30;
}
server {
    listen 80;
    listen [::]:80;

    location /.well-known/acme-challenge {
        alias /var/www/leftover;
    }
    root /var/www/html;

    server_name yourdomain;
    return 301 https://$host;
}

server {
    listen 443 ssl http2;

    # if you wish, you can use the below line for listen instead
    # which enables HTTP/2
    # requires nginx version >= 1.9.5
    # listen 443 ssl http2;

    server_name yourdomain;
    index index.html;

    ssl_certificate /etc/letsencrypt/live/yourdomain/fullchain.pem;
    ssl_certificate_key /etc/letsencrypt/live/yourdomain/privkey.pem;

    # Turn on OCSP stapling as recommended at
    # https://community.letsencrypt.org/t/integration-guide/13123
    # requires nginx version >= 1.3.7
    ssl_stapling on;
    ssl_stapling_verify on;

    # modern configuration. tweak to your needs.
    ssl_protocols TLSv1.2 TLSv1.3;
    ssl_ciphers 'ECDHE-ECDSA-AES256-GCM-SHA384:ECDHE-RSA-AES256-GCM-SHA384:ECDHE-ECDSA-CHACHA20-POLY1305:ECDHE-RSA-CHACHA20-POLY1305:ECDHE-ECDSA-AES128-GCM-SHA256:ECDHE-RSA-AES128-GCM-SHA256:ECDHE-ECDSA-AES256-SHA384:ECDHE-RSA-AES256-SHA384:ECDHE-ECDSA-AES128-SHA256:ECDHE-RSA-AES128-SHA256';
    ssl_prefer_server_ciphers on;


    # Uncomment this line only after testing in browsers,
    # as it commits you to continuing to serve your site over HTTPS
    # in future
    # add_header Strict-Transport-Security "max-age=31536000";

    rewrite ^(.*).php https://www.youtube.com/watch?v=dQw4w9WgXcQ last;
    # maintain the .well-known directory alias for renewals
    location /.well-known {

        alias /var/www/yourdomain/.well-known;
    }

        location / {
            root   /var/www/html;
            index  index.html;
        }
    location /dns-query {
        proxy_set_header X-Real-IP $remote_addr;
        proxy_set_header X-Forwarded-For $proxy_add_x_forwarded_for;
        proxy_set_header Host $http_host;
        proxy_set_header X-NginX-Proxy true;
        proxy_set_header Connection "";
        proxy_http_version 1.1;
        proxy_set_header Upgrade $http_upgrade;
        proxy_redirect off;
        proxy_set_header        X-Forwarded-Proto $scheme;
        proxy_read_timeout 86400;
        proxy_pass http://dns-backend/dns-query;
    }

}

Then start the Nginx server.

Setting up the DoH server

You will have to setup golang as we will have to compile the project. First step is always the git clone :)

git clone https://github.com/m13253/dns-over-https.git
cd dns-over-https
make
make install 

As next step we will modify the configuration file of the dns-over-https tool at /etc/dns-over-https/doh-server.conf. Now, there are many different configuration options available, I am using only a small part of it. Check the github repo for an uptodate commented configuration example.

listen = [
    "127.0.0.1:8053",
    "[::1]:8053"
]
local_addr = ""
cert = ""
key = ""
path = "/dns-query"
upstream = [
        "udp:127.0.0.1:53"
]
timeout = 10
tries = 3
verbose = false
log_guessed_client_ip = false

We are asking the tool to talk to the unbound running on the same server. Next, we can start and enable the service. Remember to check the logs for any errors due to typos.

systemctl restart doh-server
systemctl enable doh-server

Testing the setup

You can test the setup by making a call using curl command and using Python's json module to give you a readable output.

curl -s "https://yourdomain/dns-query?name=dgplug.org.org&type=A" | python3 -m json.tool

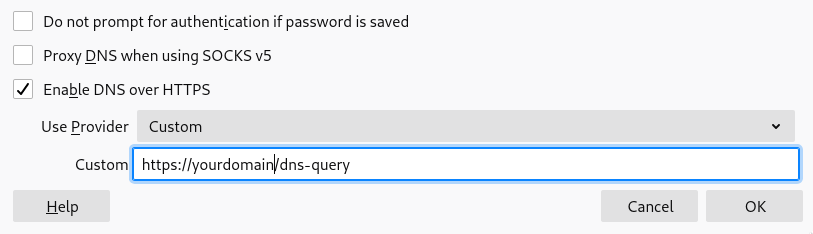
You can now use the server in the General -> Network Settings section of Firefox.

setting up firefox