Kushal Das

FOSS and life. Kushal Das talks here.

kushal76uaid62oup5774umh654scnu5dwzh4u2534qxhcbi4wbab3ad.onion

Using sops with Ansible for vars encryption

Sops is a secret management tool from Mozilla. According to the official Github page, it is defined as:

sops is an editor of encrypted files that supports YAML, JSON, ENV, INI and BINARY formats and encrypts with AWS KMS, GCP KMS, Azure Key Vault and PGP.

In this blog post, I am going to show you how you can use it along with GPG to encrypt secrets in YAML files for your Ansible roles/playbooks.

Installation

Download the official binary from the release page, or you can build and install from the source code.

Basic usage (manual)

First let us create a .sops.yaml in the git repository root directory. In this example, I am saying that I can encrypt any .yml using the two given GPG fingerprints.

creation_rules:
  # If vars file matchs "*.yml", then encrypt it more permissively.
    - path_regex: \.yml$
      pgp: "A85FF376759C994A8A1168D8D8219C8C43F6C5E1,2871635BE3B4E5C04F02B848C353BFE051D06C33"

Now to encrypt a file in place, I can use the following command:

sops -e -i host_vars/stg.dgplug.org.yml

If we open the file afterward, we will see something like below.

mysql_root_password: ENC[AES256_GCM,data:732TA7ps+qE=,iv:3azuZg4tqsLfe5IHDLJDKSUHmVk2c0g1Nl+oIcKOXRw=,tag:yD8iwmxmENww+waTs5Kzxw==,type:str]
mysql_user_password: ENC[AES256_GCM,data:YXBpO54=,iv:fQYATEWw4pv4lW5Ht8xiaBCliat8xdje5qdmb0Sff4Y=,tag:cncwg2Ops35l0lWegCSEJQ==,type:str]
mysql_user: ENC[AES256_GCM,data:cq/VgDlpRBxuHKM+cw==,iv:K+v6fkCIucMrMJ7pDRxFS/aHh0OCxqUcLJhZIgCsfA0=,tag:BD7l662OVOWRaHi2Rtw37g==,type:str]
mysql_db_name: ENC[AES256_GCM,data:hCgrKmU=,iv:/jnypeWdqUbIRy75q7OIODgZnaDpR3oTa0G/L8MRiZA=,tag:0k6cGNoDajUuKpKzrwQBaw==,type:str]
sops:
    kms: []
    gcp_kms: []
    azure_kv: []
    lastmodified: '2019-07-29T04:05:09Z'
    mac: ENC[AES256_GCM,data:qp9yV3qj0tYf/EaO0Q3JdlpPvm5WY4ev1zGCVNoo+Anm/esj0WHlR7M7SNg54xRTUwMhRRnirx7IsEC8EZW1lE+8DObnskemcXm93CJOBfVzQOX/RvCSR4rMp2FgBEPZADCDiba1X2K/9myU96lADME0nkdmX9YjhOLMFJ6ll4o=,iv:2WNKhl81FI/qw6mRKpK5wRYjqK16q1ASeCJYpEeuhj4=,tag:v4PlGT4ZmPUxj7aYIendVg==,type:str]
    pgp:
    -   created_at: '2019-07-29T04:05:06Z'
        enc: |-
            -----BEGIN PGP MESSAGE-----


            wcFMA/uCql0ybaddARAADkHqV/mEgVoTxVHkRKW3mjajReKaQ5Mz/VwMal3GsjKr
            8aGnghCjtgJE01wCBjrTfNKKmlf5JjMSFufy9pG0xE+OFOXt+pnJFDSro26QnPFG
            VlvkvnjTxw4gV/mIvxUXTT6rmijvQSHMXdyEGmyHu3kNprKuuN37xZ4SYSWg7pdO
            vee4DSOaw+XfdgYUF+YSEjKMZ+qevRtzJL4hg9SZvEsHMQObueMBywAc5pyR6LvS
            ZuAS5SS+cPXnyMJLemqfU7L+XMw2NMrmNYFXOWnMMny1Hez5fcmebJp+wjDqWJTX
            j9vJvXLuNAglFvL1yz2rNJYTb0mC9chLT7YxEa9Z9JHWezUB8ZYuOC6vRf18/Hz8
            e6Gd2sncl4rleCxvKZF9qECsmFzs4p7H5M+O31jnjWdnPBD8a84Du3wdeWiI5cRF
            d7/aUXEdGJQy7OVbzGE1alDOSIyDD2S73ou2du7s/79Wb11RwQV898OyGgmjWm0Y
            7hTsBiBXnayQdjtg6qKlvoWIn79PU0YmDYLujMiXDQPJLV3ta82dcK2B1yTCLuSO
            nGfFzNOSNemmniyEuMI16SrfYDsf9l/K3gec+TRNvEdc1GqO4gFblQWptPE7KIIC
            oBVMDLUJSpOf5yF7Izedy5wBb8ZmzJAvpchvTMUls2+En4ifYh90cauXxiP6edPS
            4AHkZMebg44aCefn4zMdKdUhbOFxbuA/4I3hQWLgmuJMFlcI4Orl5tsRjXwCfQ9S
            jOdGAUJ8usV9gT4IXj73WfN1JJHj7DTgoORXFtDMs2Yy/rPPR4H9msSL4reJGZLh
            dEAA
            =LoMY
            -----END PGP MESSAGE-----
        fp: A85FF376759C994A8A1168D8D8219C8C43F6C5E1
    -   created_at: '2019-07-29T04:05:06Z'
        enc: |-
            -----BEGIN PGP MESSAGE-----


            wcFMA0HZfc7pf7hDARAAX6xF6qP9KQJ5wLn0kv5WVf8HgOkk+2ziIuBH411hVEir
            oN4bwwnL+DEYZm2aFvZl5zQElua7nGkQK041DecPbOCCBqThv3QKVMy2jScG5tTj
            jxGgh8W/KxdwIY7teRaCRNDkT18IhtBc4SO2smJEtPeGIptvDHLjETBFbDnZeo6/
            PG4QIA1Rfvm14n1NR56oibWduwvb1wrm4tGYPDx8mVgfugxeIhoqlZ87VrivrN+2
            40S/rwWQ/aEVM1A8q19DGkXYVBcxQA1dGBrKLDPtiCq/LCSDNY4iuzMjzQuHPjgM
            bS0lWv8fvSp6iIZlB3eSRPW9Ia8tRJpEfTLS8jiHlcCZ4Vy3fW6EijBf00iSy5hP
            Y54TCERscXt1/UOW2ACYTNhMfuiO+WuG6Vjdns1NsSUVazqxmf+kBMwl06/HyUwL
            KAYTOB2hipYUm6mlpSBfDgBKjQq8dgvxlWP0Ay0of0p4ZzFv7MepYkJA+gwb0hUt
            rui9GVE/uys8W8buYqfM2ABzIG4GrH3rELh8eW8oPwlu7rgS7YGhyog2xabJyQnj
            BZ65wwu5TzMq+n5v1+878teOzqqD/F+6X5dw0jF95bDHKdA64JR/Uxlj75sp59GH
            e/+3UDm0UwSILDrYJkcVaTnrt3wPjQAw4ynKZuN+k6KvmDCkGquHNaM+2hqvWq/S
            4AHkgpZHzmU14QmfJy7RN2HPduHhSeCh4LrhMzngJuJyH72G4IPlP4WwPJUhrKMt
            UI+Azl61rIZEm6n82oWbY1gIrrIygWLg1OSD/0Ly6KbO4/W1NipWU53w4nAo7abh
            3gkA
            =YXu1
            -----END PGP MESSAGE-----
        fp: 2871635BE3B4E5C04F02B848C353BFE051D06C33
    unencrypted_suffix: _unencrypted
    version: 3.1.1


If you look closely, we can see that sops only encrypts the values, not the keys in the YAML file.

Decrypting as required on runtime

We can use a small Python script to enable runtime decryption of the file as required in Ansible. Create a vars_plugin directory in the git repository root, and then put the following code in there as sops.py.

from __future__ import (absolute_import, division, print_function)
__metaclass__ = type


DOCUMENTATION = '''
    vars: sops
    version_added: "N/A"
    short_description: In charge of loading SOPS-encrypted vars
    description:
        - Loads SOPS-encrytped YAML vars into corresponding groups/hosts in group_vars/ and host_vars/ directories.
        - Only SOPS-encrypted vars files, with a top-level "sops" key, will be loaded.
        - Extends host/group vars logic from Ansible core.
    notes:
        - SOPS binary must be on path (missing will raise exception).
        - Only supports YAML vars files (JSON files will raise exception).
        - Only host/group vars are supported, other files will not be parsed.
    options: []
'''


import os
import subprocess
import yaml
from ansible.errors import AnsibleError, AnsibleParserError
from ansible.module_utils._text import to_bytes, to_native, to_text
from ansible.inventory.host import Host
from ansible.inventory.group import Group
from ansible.utils.vars import combine_vars


FOUND = {}


# Import host_group_vars logic for file-walking functions.
# We'll still need to copy/paste and modify the `get_vars` function
# and edit below to insert a call to sops cli.
from ansible.plugins.vars.host_group_vars import VarsModule as HostGroupVarsModule


# All SOPS-encrypted vars files will have a top-level key called "sops".
# In order to determine whether a file is SOPS-encrypted, let's inspect
# such a key if it is found, and expect the following subkeys.
SOPS_EXPECTED_SUBKEYS = [
    "lastmodified",
    "mac",
    "version",
]


class AnsibleSopsError(AnsibleError):
    pass


class VarsModule(HostGroupVarsModule):


    def get_vars(self, loader, path, entities, cache=True):
        """
        Parses the inventory file and assembles host/group vars.


        Lifted verbatim from ansible.plugins.vars.host_group_vars, with a single
        in-line edit to support calling out to the SOPS CLI for decryption.
        Only SOPS-encrypted files will be handled.
        """


        if not isinstance(entities, list):
            entities = [entities]


        super(VarsModule, self).get_vars(loader, path, entities)


        data = {}
        for entity in entities:
            if isinstance(entity, Host):
                subdir = 'host_vars'
            elif isinstance(entity, Group):
                subdir = 'group_vars'
            else:
                raise AnsibleParserError("Supplied entity must be Host or Group, got %s instead" % (type(entity)))


            # avoid 'chroot' type inventory hostnames /path/to/chroot
            if not entity.name.startswith(os.path.sep):
                try:
                    found_files = []
                    # load vars
                    b_opath = os.path.realpath(to_bytes(os.path.join(self._basedir, subdir)))
                    opath = to_text(b_opath)
                    key = '%s.%s' % (entity.name, opath)
                    if cache and key in FOUND:
                        found_files = FOUND[key]
                    else:
                        # no need to do much if path does not exist for basedir
                        if os.path.exists(b_opath):
                            if os.path.isdir(b_opath):
                                self._display.debug("\tprocessing dir %s" % opath)
                                found_files = loader.find_vars_files(opath, entity.name)
                                FOUND[key] = found_files
                            else:
                                self._display.warning("Found %s that is not a directory, skipping: %s" % (subdir, opath))


                    for found in found_files:
                        # BEGIN SOPS-specific logic
                        if self._is_encrypted_sops_file(found):
                            new_data = self._decrypt_sops_file(found)


                            if new_data:  # ignore empty files
                                data = combine_vars(data, new_data)
                        # END SOPS-specific logic


                except Exception as e:
                    raise AnsibleParserError(to_native(e))
        return data


    def _is_encrypted_sops_file(self, path):
        """
        Check whether given filename is likely a SOPS-encrypted vars file.
        Determined by presence of top-level 'sops' key in vars file.


        Assumes file is YAML. Does not support JSON files.
        """
        is_sops_file_result = False
        with open(path, 'r') as f:
            y = yaml.safe_load(f)
            if type(y) == dict:
                # All SOPS-encrypted vars files will have top-level "sops" key.
                if 'sops' in y.keys() and type(y['sops'] == dict):
                    if all(k in y['sops'].keys() for k in SOPS_EXPECTED_SUBKEYS):
                        is_sops_file_result = True
            return is_sops_file_result


    def _decrypt_sops_file(self, path):
        """
        Shells out to `sops` binary and reads decrypted vars from stdout.
        Passes back dict to vars loader.


        Assumes that a file is a valid SOPS-encrypted file. Use function
        `is_encrypted_sops_file` to check.


        Assumes file is YAML. Does not support JSON files.
        """
        cmd = ["sops", "--input-type", "yaml", "--decrypt", path]
        real_yaml = None
        try:
            decrypted_yaml = subprocess.check_output(cmd)
        except OSError:
            msg = "Failed to call SOPS to decrypt file at {}".format(path)
            msg += ", ensure sops is installed in PATH."
            raise AnsibleSopsError(msg)
        except subprocess.CalledProcessError:
            msg = "Failed to decrypt SOPS file at {}".format(path)
            raise AnsibleSopsError(msg)
        try:
            real_yaml = yaml.safe_load(decrypted_yaml)
        except yaml.parser.ParserError:
            msg = "Failed to parse YAML from decrypted SOPS file at {},".format(path)
            msg += " confirm file is YAML format."
            raise AnsibleSopsError(msg)
        return real_yaml


From the next you will try to use any of the encrypted vars files in an Ansible run, it will ask for the GPG passphrase to decrypt the file as required.

Thank you Conor Schaefer for the original version of the Python script.
Setting up authorized v3 Onion services

Just like v2 Onion services, we can also set up client authorization for Onion services v3. In simple terms, when you have a client authorization setup on an Onion service, only the Tor clients with the private token can access the service. Using this, you can run services (without opening up any port in your system) and only selected people can access that service, that is also being inside of totally encrypted Tor network. Last month, I did a workshop in Rootconf about the same topic, but, I demoed v2 Onion services. In this blog post, I am going to show you how you can do the same with the latest v3 services.

Setting up the Onion service

We assume that we are already running nginx or apache on port 80 of the server. Add the following two lines at the end of the /etc/tor/torrc file of your server.

HiddenServiceDir /var/lib/tor/hidden_service/
HiddenServicePort 80 127.0.0.1:80

Then, restart the tor service.

systemctl restart tor

The above command will create the onion service at /var/lib/tor/hidden_service/ directory, and we can see the address from the hostname file.

cat /var/lib/tor/hidden_service/hostname 
cz2eqjwrned6s7zy3nrmkk3fjoudzhvu53ynq6gdny5efdj26zxf4bid.onion

It should also create a authorized_clients directory at the service directory.

Next, we will create keys of type x25519, and you can either use any of the following options to create the keys.

I used the Rust implementation, and I got the secret and the public key.

secret: "TIICFSKY2PECECM2LOA7XLKQKJWHYTN4WLRSIIJKQFCCL3K2II2Q"
public: "RO7N45JLVI5UXOLALOK4V22JLMMF5ZDC2W6DXVKIAU3C7FNIVROQ"

Now, we will use the public key to create a clientname.auth file in /var/lib/tor/hidden_service/authorized_clients/ directory, I chose the name kushal.auth.

descriptor:x25519:RO7N45JLVI5UXOLALOK4V22JLMMF5ZDC2W6DXVKIAU3C7FNIVROQ > /var/lib/tor/hidden_service/authorized_clients/kushal.auth

If you look closely, the file format is like below:

descriptor:x25519:public_key

Now, restart the tor service once again in the server.

systemctl restart tor

Setting up client authorization

The first step is to close down my Tor Browser as I will be manually editing the torrc file of the same. Then, I added the following line to the same file tor-browser_en-US/Browser/TorBrowser/Data/Tor/torrc.

ClientOnionAuthDir TorBrowser/Data/Tor/onion_auth

Next, we will create the directory.

mkdir tor-browser_en-US/Browser/TorBrowser/Data/Tor/onion_auth
chmod 0700 tor-browser_en-US/Browser/TorBrowser/Data/Tor/onion_auth

Then, add the following in kushal.auth_private file inside of the onion_auth directory.

cz2eqjwrned6s7zy3nrmkk3fjoudzhvu53ynq6gdny5efdj26zxf4bid:descriptor:x25519:TIICFSKY2PECECM2LOA7XLKQKJWHYTN4WLRSIIJKQFCCL3K2II2Q

The format of the file:

onion_address_56_chars:descriptor:x25519:private_key

Now, start the Tor Browser, and you should be able to visit the authorized Onion service at cz2eqjwrned6s7zy3nrmkk3fjoudzhvu53ynq6gdny5efdj26zxf4bid.onion.

Use case for students

If you want to demo your web project to a selected group of people, but, don't want to spend money to get a web server or VPS, Onion services is a great way to showcase your work to the world. With the authenticated services, you can choose whom all can view the site/service you are running.

Using signify tool for sign and verification

We generally use GNUPG for sign and verify files on our systems. There are other tools available to do so; some tools are particularly written only for this purpose. signify is one such tool from the OpenBSD land.

How to install signify?

pkg install signify

I used the above command to install the tool on my FreeBSD system, and you can install it in your Debian system too, the tool is called signify-openbsd as Debian already has another tool with the same name. signify is yet to be packaged for Fedora, if you are Fedora packager, you may want to package this one for all of us.

Creating a public/private key pair

signify -G -s atest.sec -p atest.pub -c "Test key for blog post"

The command will also ask for a password for the secret key. -c allows us to add a comment in our key files. The following is the content of the public keyfile.

untrusted comment: Test key for blog post public key 
RWRjWJ28QRKKQCXxYPqwbnOqgsLYQSwvqfa2WDpp0dRDQX2Ht6Xl4Vz4

As it is very small in size, you can even create a QR code for the same.

Signing a file

In our demo directory, we have a hello.txt file, and we can use the newly generated key to create a signature.

signify -S -s atest.sec -m hello.txt

This will create a hello.txt.sig file as the signature.

Verifying the signature

$ signify -V -p atest.pub -m hello.txt
Signature Verified

This assumes the signature file in the same directory. You can find the OpenBSD signature files under /usr/local/etc/signify (or in /etc/signify/ if you are on Debian).

To know more about the tool, read this paper.

Setting up WKD

We fetch any GPG public key from the keyservers using the GPG fingerprint (or parts of it). This step is still a problematic one for most of us. As the servers may not be responding, or the key is missing (not pushed) to the server. Also, if we only have the email address, there is no easy way to download the corresponding GPG key.

Web Key Directory to rescue

The Web Key Directory comes to the picture. We use WKD to enable others to get our GPG keys for email addresses very easily. In simple terms:

The Web Key Directory is the HTTPS directory from which keys can be fetched.

Let us first see this in action:

gpg --auto-key-locate clear,wkd --locate-key mail@kushaldas.in

The above will fetch you the key for the email address, and you can also assume the person who owns the key also has access to the https://kushaldas.in server.

There are many available email clients, which will do this for you. For example Thunderbird/Enigmail 2.0 or Kmail version 5.6 onwards.

Setting up WKD for your domain

I was going through the steps mentioned in the GNUPG wiki, while weasel pointed to me to a Makefile to keep things even more straightforward.

all: update install

update:
        rm -rfv openpgpkey
        mkdir -v openpgpkey
        echo 'A85FF376759C994A8A1168D8D8219C8C43F6C5E1 mail@kushaldas.in' | /usr/lib/gnupg/gpg-wks-client -v --install-key
        chmod -v 0711 openpgpkey/kushaldas.in
        chmod -v 0711 openpgpkey/kushaldas.in/hu
        chmod -v 0644 openpgpkey/kushaldas.in/hu/*
        touch openpgpkey/kushaldas.in/policy

        ln -s kushaldas.in/hu openpgpkey/
        ln -s kushaldas.in/policy openpgpkey/

install: update
        rsync -Pravz --delete ./openpgpkey root@kushaldas.in:/usr/local/www/kushaldas.in/.well-known/

.PHONY: all update install

The above Makefile is using gpg-wks-client executable and also pushing the changes to the right directory on the server.

Email providers like protonmail already allow users to publish similar information. I hope this small Makefile will help you to set up your domain.

Highest used Python code in the Pentesting/Security world

python -c 'import pty;pty.spawn("/bin/bash")'

I think this is the highest used Python program in the land of Pentesting/Security, Almost every blog post or tutorial I read, they talk about the above-mentioned line to get a proper terminal after getting access to a minimal shell on a remote Linux server.

What does this code do?

We are calling the Python executable with -c and python statements inside of the double quote. -c executes the Python statements, and as we are running it as non-interactive mode, it parses the entire input before executing it.

The code we pass as the argument of the -c has two statements.

import pty
pty.spawn("/bin/bash")

pty is a Python module which defines operations related to the pseudo-terminal concept, it can create another process, and from the controlling terminal, it can read/write to the new process.

The pty.spawn function spawns a new process (/bin/bash in this case) and then connects IO of the new process to the parent/controlling process.

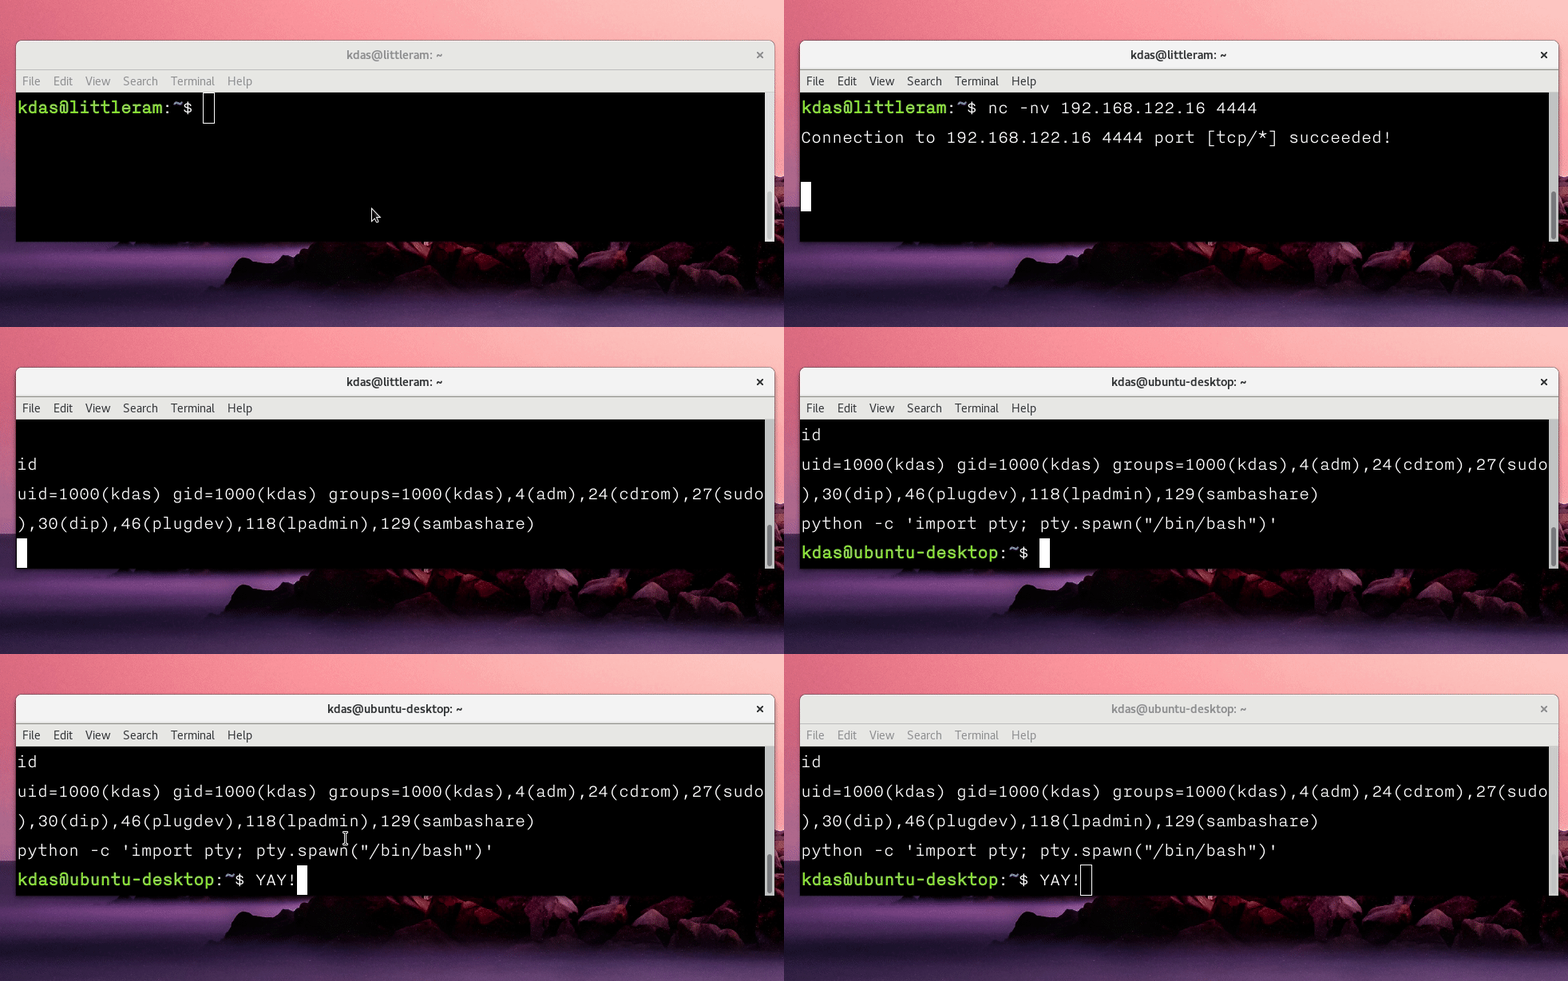
demo of getting bash

In most cases, even though you get access to bash using the way mentioned above, TAB completion is still not working. To enable it, press Ctrl+z to move the process to sleep, and then use the following command on your terminal.

stty raw -echo

stty changes terminal line settings and part of the GNU coreutils package. To read about all the options we set by using raw -echo, read the man page of stty.

Many years ago, I watched a documentary about Security firms showcasing offensive attacks, that was the first I saw them using Python scripts to send in the payload and exploit the remote systems. Now, I am using similar scripts in the lab to learn and having fun with Python. It is a new world for me, but, it also shows the diverse world we serve via Python.

A few bits on tmux

I don’t remember when I started using tmux, but, the move from screen to tmux was quick. I have it installed on all of my systems and VMs. Though I never bothered to have a proper configuration file, it also means that I never used any plugin or other particular configuration. I don’t prefer to use plugins for command line applications much (for example in Vim), as not all systems will have those plugins installed.

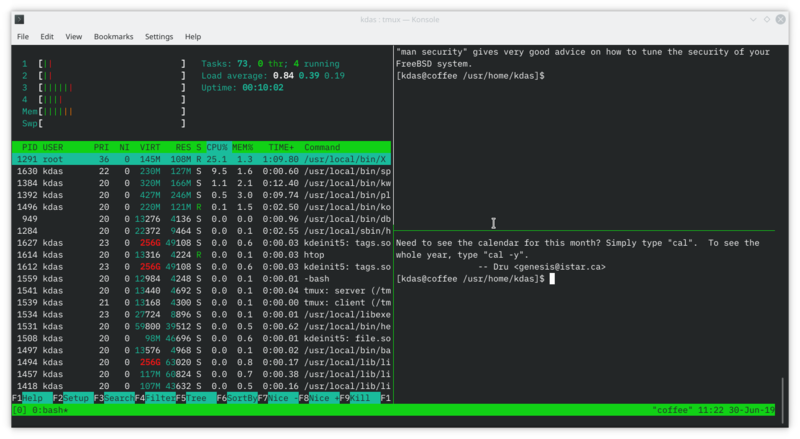
tmux screenshot

While working on OSCP labs, I wished for a way to keep my tmux sessions logged, as that helps to create the report or remember the process in the future. Later, I found IPPSec has a video on their usage of tmux, which includes a plugin to log tmux sessions. I decided to give it a go and created my tmux.conf based on the same.

$ cat ~/.tmux.conf

# Remap prefix to screens
set -g prefix C-a
bind C-a send-prefix
unbind C-b

# Other values
set -g history-limit 100000
set -g allow-rename off

# Join windows
bind-key j command-prompt -p "Join pane from:"  "join-pane -s '%%'"
bind-key s command-prompt -p "Send pane to:"  "join-pane -t '%%'"

# Search mode VI
set-window-option -g mode-keys vi
bind -T copy-mode-vi y send-keys -X copy-pipe-and-cancel 'xclip -in -selection clipboard'

# git clone https://github.com/tmux-plugins/tmux-logging
run-shell /opt/tmux-logging/logging.tmux

Following IPPSec, I have also converted the prefix key to Ctrl+a. This change helps to use another tmux in a remote system, where the default Ctrl+b works as the prefix key. I have also moved the default search to vi mode. You can start selecting text by pressing the spacebar, and then press y to copy text to the primary system clipboard, and helps to copy text easily to any other GUI application. This feature requires xclip tool from the system packages.

I have also cloned the tmux-logging repository under /opt.

On Twitter, Justin Garrison pointed me to his super amazing awesome-tmux repository, which contains many many useful resources on tmux. I spent a good part of reading The Tao of tmux.

Now, my tmux is working the way I want on my Linux systems and also on the FreeBSD laptop (where I am writing this blog post). Btw, if you search tmux cheatsheet on https://duckduckgo.com it provides a lovely view of the cheat sheet in the result page.

Tracking my phone's silent connections

My phone has more friends than me. It talks to more peers (computers) than the number of human beings I talk on an average. In this age of smartphones and mobile apps for A-Z things, we are dependent on these technologies. However, at the same time, we don’t know much of what is going on in the computers equipped with powerful cameras, GPS device, microphone we are carrying all the time. All these apps are talking to their respective servers (or can we call them masters?), but, there is no easy way to track them.

These questions bothered me for a long time: I wanted to see the servers my phone is connecting to, and I want to block those connections as I wish. However, I never managed to work on this. A few weeks ago, I finally sat down to start working to build up a system by reusing already available open source projects and tools to create the system, which will allow me to track what my phone is doing. Maybe not in full details, but, at least shed some light on the network traffic from the phone.

Initial trial

I tried to create a wifi hotspot at home using a Raspberry Pi and then started capturing all the packets from the device using standard tools (dumpcap) and later reading through the logs using Wireshark. This procedure meant that I could only capture when I am connected to the network at home. What about when I am not at home?

Next round

This time I took a bit different approach. I chose algo to create a VPN server. Using WireGuard, it became straightforward to connect my iPhone to the VPN. This process also allows capturing all the traffic from the phone very easily on the VPN server. A few days in the experiment, Kashmir started posting her experiment named Life Without the Tech Giants, where she started blocking all the services from 5 big technology companies. With her help, I contacted Dhruv Mehrotra, who is a technologist behind the story. After talking to him, I felt that I am going in the right direction. He already posted details on how they did the blocking, and you can try that at home :)

Looking at the data after 1 week

After capturing the data for the first week, I moved the captured pcap files into my computer. Wrote some Python code to put the data into a SQLite database, enabling me to query the data much faster.

Domain Name System (DNS) data

The Domain Name System (DNS) is a decentralized system which helps to translate the human memory safe domain names (like kushaldas.in) into Internet Protocol (IP) addresses (like 192.168.1.1 ). Computers talk to each other using these IP addresses, we, don’t have to worry to remember so many names. When the developers develop their applications for the phone, they generally use those domain names to specify where the app should connect.

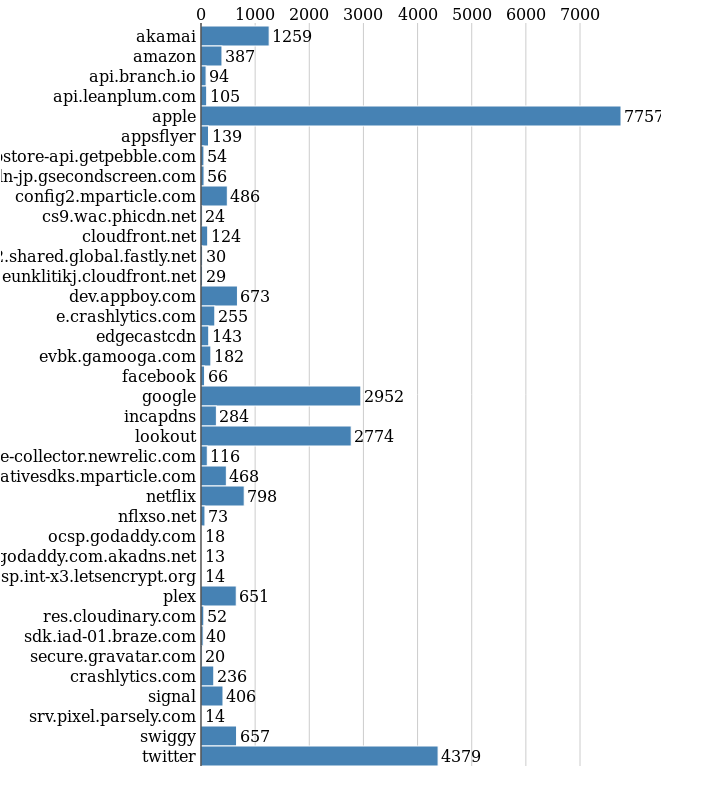
If I plot all the different domains (including any subdomain) which got queried at least 10 times in a week, we see the following graph.

The first thing to notice is how the phone is trying to find servers from Apple, which makes sense as this is an iPhone. I use the mobile Twitter app a lot, so we also see many queries related to Twitter. Lookout is a special mention there, it was suggested to me by my friends who understand these technologies and security better than me. The 3rd position is taken by Google, though sometimes I watch Youtube videos, but, the phone queried for many other Google domains.

There are also many queries to Akamai CDN service, and I could not find any easy way to identify those hosts, the same with Amazon AWS related hosts. If you know any better way, please drop me a note.

You can see a lot of data analytics related companies were also queried. dev.appboy.com is a major one, and thankfully algo already blocked that domain in the DNS level. I don’t know which app is trying to connect to which all servers, I found about a few of the apps in my phone by searching about the client list of the above-mentioned analytics companies. Next, in coming months, I will start blocking those hosts/domains one by one and see which all apps stop working.

Looking at data flow

The number of DNS queries is an easy start, but, next I wanted to learn more about the actual servers my phone is talking to. The paranoid part inside of me was pushing for discovering these servers.

If we put all of the major companies the phone is talking to, we get the following graph.

Apple is leading the chart by taking 44% of all the connections, and the number is 495225 times. Twitter is in the second place, and Edgecastcdn is in the third. My phone talked to Google servers 67344 number of times, which is like 7 times less than the number of times Apple itself.

In the next graph, I removed the big players (including Google and Amazon). Then, I can see that analytics companies like nflxso.net and mparticle.com have 31% of the connections, which is a lot. Most probably I will start with blocking these two first. The 3 other CDN companies, Akamai, Cloudfront, and Cloudflare has 8%, 7%, and 6% respectively. Do I know what all things are these companies tracking? Nope, and that is scary enough that one of my friend commented “It makes me think about throwing my phone in the garbage.”

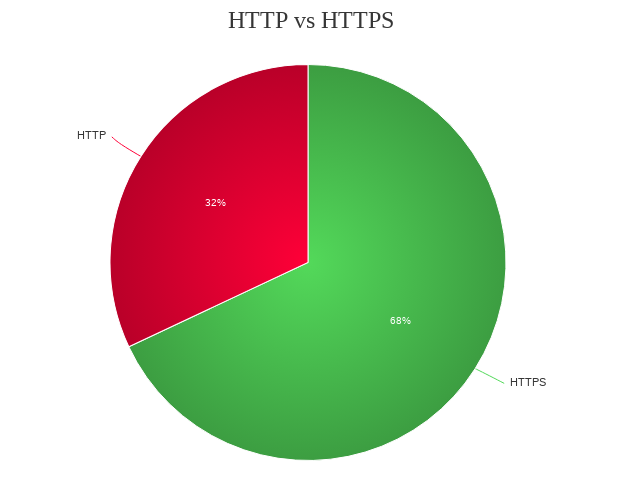
What about encrypted vs unencrypted traffic? What all protocols are being used? I tried to find the answer for the first question, and the answer looks like the following graph. Maybe the number will come down if I try to refine the query and add other parameters, that is a future task.

What next?

As I said earlier, I am working on creating a set of tools, which then can be deployed on the VPN server, that will provide a user-friendly way to monitor, and block/unblock traffic from their phone. The major part of the work is to make sure that the whole thing is easy to deploy, and can be used by someone with less technical knowledge.

How can you help?

The biggest thing we need is the knowledge of “How to analyze the data we are capturing?”. It is one thing to make reports for personal user, but, trying to help others is an entirely different game altogether. We will, of course, need all sorts of contributions to the project. Before anything else, we will have to join the random code we have, into a proper project structure. Keep following this blog for more updates and details about the project.

Note to self

Do not try to read data after midnight, or else I will again think a local address as some random dynamic address in Bangkok and freak out (thank you reverse-dns).

When I was sleepy

Back in 2005 I joined my first job, in a software company in Bangalore. It was a backend of a big foreign bank. We trained heavily on different parts of software development during the first few months. At the same time, I had an altercation with the senior manager (about some Java code) who was in charge of the new joinees and their placement within the company. The result? Everyone else got a team but me, and I had to roam around within the office to find an empty seat and wait there till the actual seat owner came back. I managed to spend a lot of days in the cafeteria on the rooftop. But, then they made new rules that one can not sit there either, other than at lunch time.

So, I went asking around, talking to all the different people in the office (there were 500+ folks iirc) if they know any team who would take on a fresher. I tried to throw in words like Linux, open source to better my chances. And then one day, I heard that the research and development team was looking for someone with Linux and PHP skills. I went in to have a chat with the team, and they told me the problem (it was actually on DSpace, a Java based documentation/content repository system), and after looking at my resume decided to give me a desktop for couple of weeks. I managed to solve the problem in next few days, and after a week or so, I was told that I will join the team. There were couple of super senior managers and I was the only kid on that block. Being part of this team allowed me to explore different technologies and programming languages.

I will later write down my experiences in more detail, but for today, I want to focus on one particular incident. The kind of incident, which all system administrators experience at least once in their life (I guess). I got root access to the production server of the DSpace installation within a few weeks. I had a Windows desktop, and used putty to ssh in to the server. As this company was backend of the big bank, except for a few senior managers, no one else had access to Internet on their systems. There were 2 desktops in the kiosk in the ground floor, and one had to stand in a long queue to get a chance to access Internet.

One day I came back from the lunch (a good one), and was feeling a bit sleepy. I had taken down the tomcat server, pushed the changes to the application, and then wanted to start the server up again. Typed the whole path to startup.sh (I don’t remember the actual name, I’m just guessing it was startup.sh) and hit Enter. I was waiting for the long screens of messages this startup script spewed as it started up, but instead, I got back the prompt quickly. I was wondering what went wrong. Then, looking at the monitor very closely, I suddenly realised that I was planning to delete some other file and I had written rm at the beginning of the command prompt, forgotten it, and then typed the path of the startup.sh. Suddenly I felt the place get very hot and stuffy; I started sweating and all blood drained from my face in the next few moments. I was at panic level 9. I was wondering what to do. I thought about the next steps to follow. I still had a small window of time to fix the service. Suddenly I realized that I can get a copy of the script from the Internet (yay, Open Source!). So, I picked up a pad and a pen, ran down to the ground floor, and stood in the queue to get access to a computer with Internet. After getting the seat, I started writing down the whole startup.sh on the pad and double checked it. Ran right back up to my cubicle, feverishly typed in the script, (somehow miraculously without any typo in one go.) As I executed the script, I saw the familiar output, messages scrolling up, screen after joyful screen. And finally as it started up, I sighed a huge sigh of relief. And after the adrenalin levels came down, I wrote an incident report to my management, and later talked about it during a meeting.

From that day on, before doing any kind of destructive operation, I double check the command prompt for any typo. I make sure, that I don’t remove anything randomly and also make sure that I have my backups is place.

That missing paragraph

In my last blog post, I wrote about a missing paragraph. I did not keep that text anywhere, I just deleted it while reviewing the post. Later Jason asked me in the comments to actually post that paragraph too.

So, I will write about it. 2018 was an amazing year, all told;, good, great, and terrible moments all together. Things were certain highs , and a few really low moments. Some things take time to heal, some moments make a life long impact.

The second part of 2018 went downhill at a pretty alarming rate, personally. Just after coming back from PyCon US 2018, from the end of May to the beginning of December, within 6 months we lost 4 family members. On the night of 30th May, my uncle called, telling me that my dad was admitted to the hospital, and the doctor wanted to talk to me. He told me to come back home as soon as possible. There was a very real chance that I wouldn’t be able to talk to him again. Anwesha and I, managed to reach Durgapur by 9AM and dad passed away within a few hours. From the time of that phone call, my brain suddenly became quite detached, very calm and thinking about next steps. Things to be handled, official documents to be taken care of, what needs to be done next.

I felt a few times that I’dburst into tears, but, the next thing that sprang to mind was that if I started crying, that would affect my mother and rest of the family too. Somehow, I managed not to cry and every time I got emotionally overwhelmed, I started thinking about next logical steps. I actually made sure, I did not talk about the whole incident much, until recently after things settled down. I also spent time in my village and then in Kolkata.

In the next 4 months, there have been 3 more deaths. Every time the news came, I did not show any reaction, but, it hurt.

Our education system is what supposed to help us grow in life. But, I feel it is more likely, that school is just training for the society to work cohesively and to make sure that the machines are well oiled. Nothing prepares us to deal with real life incidents. Moreover, death is a taboo subject with most of us.

Coming back to the effect of these demises, for a moment it created a real panic in my brain. What if I just vanish tomorrow? In my mind, our physical bodies are some amazing complex robots / programs. When one fails, the rest of them try to cope , try to fill in the gaps. But, the nearby endpoints never stay the same. I am working as usual, but, somehow my behavior has changed. I know that I have a long lasting problem with emails, but, that has grown a little out of hand in the last 5 months. I am putting in a lot of extra effort to reply to the emails I actually managed to notice. Before that, I was opening the editor to reply, but my mind blanked, and I could not type anything.

I don’t quite know how to end the post. The lines above are almost like a stream of consciousness in my mind and I don’t even know if they make sense in the order I put them in. But, at the same time, it makes sense to write it down. At the end of the day, we are all human, we make mistakes, we all have emotions, and often times it is okay to let it out.

In a future post, I will surely write another post talking about the changes I am bringing in my life to cope.

Flatpak application shortcuts on Qubes OS

In my last blog post, I wrote about Flatpak applications on Qubes OS AppVMs. Later, Alexander Larsson pointed out that running the actual application from the command line is still not user friendly, and Flatpak already solved it by providing proper desktop files for each of the application installed by Flatpak.

How to enable the Flatpak application shortcut in Qubes OS?

The Qubes documentation has detailed steps on how to add a shortcut only for a given AppVM or make it available from the template to all VMs. I decided to add it from the template, so that I can click on the Qubes Setting menu and add it for the exact AppVM. I did not want to modify the required files in dom0 by hand. The reason: just being lazy.

From my AppVM (where I have the Flatpak application installed), I copied the desktop file and also the icon to the template (Fedora 29 in this case).

qvm-copy /var/lib/flatpak/app/io.github.Hexchat/current/active/export/share/applications/io.github.Hexchat.desktop
qvm-copy /var/lib/flatpa/app/io.github.Hexchat/current/active/export/share/icons/hicolor/48x48/apps/io.github.Hexchat.png

Then in the template, I moved the files to their correct locations. I also modified the desktop file to mark that this is a Flatpak application.

sudo cp ~/QubesIncoming/xchat/io.github.Hexchat.desktop /usr/share/applications/io.github.Hexchat.desktop
sudo cp ~/QubesIncoming/xchat/io.github.Hexchat.png /usr/share/icons/hicolor/48x48/

After this, I refreshed, and then added the entry from the Qubes Settings, and, then the application is available in the menu.