Kushal Das

FOSS and life. Kushal Das talks here.

kushal76uaid62oup5774umh654scnu5dwzh4u2534qxhcbi4wbab3ad.onion

Introducing pyarti, python module for the Tor Project

python3 -m pip install pyarti

pyarti is a Python module written in Rust using Arti from the Tor Project. Right now pyarti is in the initial stage, and you can create a SOCKS5 proxy object, and pass any Python connection via it. The following example creates a default proxy at port 9150 , and then verifies that the connection works. Finally we fetch a web page and print the text.

from pyarti import OnionProxy
import httpx
from httpx_socks import SyncProxyTransport

URL = "https://httpbin.org/get"

p = OnionProxy()
assert p.verify(blocking=True)
# Now we can use the proxy
transport = SyncProxyTransport.from_url("socks5://127.0.0.1:9150")
with httpx.Client(transport=transport) as client:
    res = client.get(URL)
    assert res.status_code == 200
    print(res.text)

In the coming months I am hoping to add more detailed API to the module. For now you can read the documentation.

Johnnycanencrypt 0.9.0 release

3 days ago I released Johnnycanencrypt 0.9.0. Here is the changelog:

- Adds `setuptools-rust` as build system.
- Key.uids now contains the certification details of each user id.
- `merge_keys` in rjce now takes a force boolean argument.
- `certify_key` can sign/certify another key by both card and on disk primary key.

The first biggest change is related to build system, now we are using setuptools-rust to build. This change happened as dkg is working towards packaging the module for Debian.

The other big change is about certifying someone's key. We can use the primary key (either on disk or on Yubikey) to do the signing.

k = ks.certify_key(
    my_key,
    k,
    ["Kushal Das <kushaldas@gmail.com>", "Kushal Das <kushal@fedoraproject.org>"],
    jce.SignatureType.PositiveCertification,
    password=password,
)

In the above example I am signing two user ids of the key k using my_key with a PositiveCertification.

johnnycanencrypt 0.7.0 released

Today I released Johnnycanencrypt 0.7.0. It has breaking change of some function names.

  • create_newkey renamed to create_key
  • import_cert renamed to import_key

But, the major work done are in few different places:

  • Handling errors better, no more normal Rust panics, instead providing better Python exceptions as CryptoError.
  • We can now sign bytes/files in both detached & in normal compressed binary form.
  • Signature can be done via smartcards, and verification works as usual.

In the Github release page you can find an OpenPGP signature, which you can use to verify the release. You can also verify via sigstore.

SIGSTORE_LOGLEVEL=debug python -m sigstore verify --cert-email mail@kushaldas.in --cert-oidc-issuer https://github.com/login/oauth johnnycanencrypt-0.7.0.tar.gz
DEBUG:sigstore._cli:parsed arguments Namespace(subcommand='verify', certificate=None, signature=None, cert_email='mail@kushaldas.in', cert_oidc_issuer='https://github.com/login/oauth', rekor_url='https://rekor.sigstore.dev', staging=False, files=[PosixPath('johnnycanencrypt-0.7.0.tar.gz')])
DEBUG:sigstore._cli:Using certificate from: johnnycanencrypt-0.7.0.tar.gz.crt
DEBUG:sigstore._cli:Using signature from: johnnycanencrypt-0.7.0.tar.gz.sig
DEBUG:sigstore._cli:Verifying contents from: johnnycanencrypt-0.7.0.tar.gz
DEBUG:sigstore._verify:Successfully verified signing certificate validity...
DEBUG:sigstore._verify:Successfully verified signature...
DEBUG:urllib3.connectionpool:Starting new HTTPS connection (1): rekor.sigstore.dev:443
DEBUG:urllib3.connectionpool:https://rekor.sigstore.dev:443 "POST /api/v1/index/retrieve/ HTTP/1.1" 200 85
DEBUG:urllib3.connectionpool:https://rekor.sigstore.dev:443 "GET /api/v1/log/entries/362f8ecba72f4326972bc321d658ba3c9197b29bb8015967e755a97e1fa4758c13222bc07f26d27c HTTP/1.1" 200 None
DEBUG:sigstore._verify:Successfully verified Rekor entry...
OK: johnnycanencrypt-0.7.0.tar.gz

I took 8 months for this release, now time to write some tools to use it in more places :)

dgplug mailing list has a new home

We were using the mailman2 instance provided by Dreamhost for many years as the mailing list for dgplug. But, over the years many participants had trouble with receiving emails. In the last few years, most emails were landing in spam.

So, we took the chance to move to a new mailing list, and also started working on the site to have CoC properly defined. To make things easier, we will just follow the PSF Code of conduct https://www.python.org/psf/conduct/, most of our members are already parts of various upstream communities. So, this will be nothing new for them. We will be also updating our sites to add details of a separate team who will handle CoC violation reports.

Summer Training will start from 25th July, so remember to join in the new mailing list before that. See you all on IRC #dgplug channel on Libera server.

Using sigstore-python to sign and verify your software release

Sigstore allows software developers to quickly sign and verify the software they release. Many of the bigger projects use hardware-based OpenPGP keys to sign and release. But the steps used to make sure that the end-users are correctly verifying those signatures are long, and people make mistakes. Also, not every project has access to hardware smartcards, air-gapped private keys etc. Sigstore solves (or at least makes it way easier) these steps for most developers. It uses existing known (right now only 3) big OIDC providers using which one can sign and verify any data/software.

For this blog post, I will use the python tool called sigstore-python.

The first step is to create a virtual environment and then install the tool.

$ python3 -m venv .venv
$ source .venv/bin/activate
$ python -m pip install -r install/requirements.txt

Next, we create a file called message.txt with the data. This can be our actual release source code tarball.

$ echo "Kushal loves Python!" > message.txt

Signing the data

The next step is to actually sign the file.

$ python -m sigstore sign message.txt 
Waiting for browser interaction...
Using ephemeral certificate:
-----BEGIN CERTIFICATE-----
...
-----END CERTIFICATE-----

Transparency log entry created at index: 2844439
Signature written to file message.txt.sig
Certificate written to file message.txt.crt

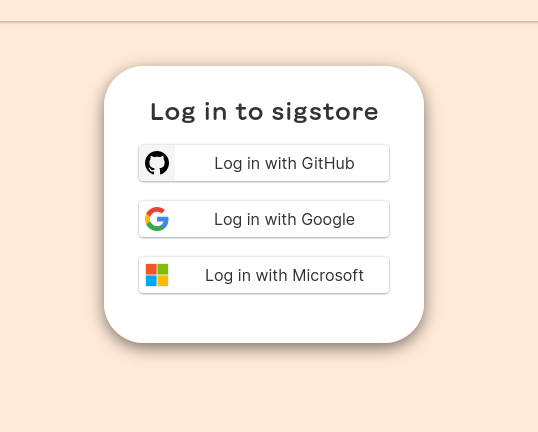
The command will open up the default browser, and we will have the choice to select one of the 3 following OIDC providers.

oidc providers

This will also create message.txt.crt & message.txt.sig files in the same directory.

We can use the openssl command to see the contents of the certificate file.

$ openssl x509 -in message.txt.crt -noout -text
Certificate:
    Data:
        Version: 3 (0x2)
        Serial Number:
            3a:c4:2d:19:20:f0:bf:85:37:a6:01:0f:49:d1:b6:39:20:06:fd:77
        Signature Algorithm: ecdsa-with-SHA384
        Issuer: O = sigstore.dev, CN = sigstore-intermediate
        Validity
            Not Before: Jul  5 14:45:23 2022 GMT
            Not After : Jul  5 14:55:23 2022 GMT
        Subject: 
        Subject Public Key Info:
            Public Key Algorithm: id-ecPublicKey
                Public-Key: (384 bit)
                pub:
                    04:12:aa:88:fd:c7:1f:9e:62:78:46:2a:48:63:d3:
                    b6:92:8b:51:a4:eb:59:18:fb:18:a0:13:54:ac:d0:
                    a4:d8:20:ab:a3:f3:5e:f5:86:aa:34:9b:30:db:59:
                    1b:5c:3d:29:b1:5a:40:ff:55:2c:26:fc:42:58:95:
                    53:d6:23:e5:66:90:3c:32:8c:82:b7:fc:fd:f8:28:
                    2b:53:2d:5c:cb:df:2f:17:d0:f3:bc:26:d2:42:3d:
                    c0:b1:55:61:50:ff:18
                ASN1 OID: secp384r1
                NIST CURVE: P-384
        X509v3 extensions:
            X509v3 Key Usage: critical
                Digital Signature
            X509v3 Extended Key Usage: 
                Code Signing
            X509v3 Subject Key Identifier: 
                6C:F0:C0:63:B8:3D:BB:08:90:C3:03:45:FF:55:92:43:7D:47:19:38
            X509v3 Authority Key Identifier: 
                DF:D3:E9:CF:56:24:11:96:F9:A8:D8:E9:28:55:A2:C6:2E:18:64:3F
            X509v3 Subject Alternative Name: critical
                email:mail@kushaldas.in
            1.3.6.1.4.1.57264.1.1: 
                https://github.com/login/oauth
            CT Precertificate SCTs: 
                Signed Certificate Timestamp:
                    Version   : v1 (0x0)
                    Log ID    : 08:60:92:F0:28:52:FF:68:45:D1:D1:6B:27:84:9C:45:
                                67:18:AC:16:3D:C3:38:D2:6D:E6:BC:22:06:36:6F:72
                    Timestamp : Jul  5 14:45:23.112 2022 GMT
                    Extensions: none
                    Signature : ecdsa-with-SHA256
                                30:46:02:21:00:AB:A6:ED:59:3E:B7:C4:79:11:6A:92:
                                29:92:BF:54:45:6A:B6:1F:6F:1C:63:7C:D9:89:26:D4:
                                6B:EF:E3:3E:9F:02:21:00:AD:87:A7:BA:BA:7C:61:D2:
                                53:34:E0:D0:C4:BF:6A:6E:28:B4:02:82:AA:F8:FD:0B:
                                FB:3A:CD:B9:33:3D:F4:36
    Signature Algorithm: ecdsa-with-SHA384
    Signature Value:
        30:65:02:30:17:89:76:ef:a1:0e:97:5b:a3:fe:c0:34:13:36:
        3f:6f:2a:ba:e9:cd:bd:f2:74:d9:8c:13:2a:88:c9:96:b2:72:
        de:34:44:95:41:f8:b0:69:5b:f0:86:a7:05:cf:81:7f:02:31:
        00:d8:3a:12:89:39:4b:2c:ad:ff:5a:23:85:d9:c0:73:f0:b1:
        db:5c:65:f9:5d:ee:7a:bb:b8:08:01:44:7a:2e:9f:ba:2b:4b:
        df:6a:93:08:e9:44:2c:23:88:66:2c:f7:8f

Verifying the signature

We can verify the signature, just make sure that the certificate & signature files are in the same directory.

$ python -m sigstore verify message.txt 
OK: message.txt

Now, to test this with some real software releases, we will download the cosign RPM package and related certificate & signature files. The certificate in this case, is base64 encoded, so we decode that file first.

$ curl -sOL https://github.com/sigstore/cosign/releases/download/v1.9.0/cosign-1.9.0.x86_64.rpm
$ curl -sOL https://github.com/sigstore/cosign/releases/download/v1.9.0/cosign-1.9.0.x86_64.rpm-keyless.sig
$ curl -sOL https://github.com/sigstore/cosign/releases/download/v1.9.0/cosign-1.9.0.x86_64.rpm-keyless.pem
$ base64 -d cosign-1.9.0.x86_64.rpm-keyless.pem > cosign-1.9.0.x86_64.rpm.pem

Now let us verify the downloaded RPM package along with the email address and signing OIDC issuer URL. We are also printing the debug statements, so that we can see what is actually happening for verification.

$ SIGSTORE_LOGLEVEL=debug python -m sigstore verify --certificate cosign-1.9.0.x86_64.rpm.pem --signature cosign-1.9.0.x86_64.rpm-keyless.sig --cert-email keyless@projectsigstore.iam.gserviceaccount.com --cert-oidc-issuer https://accounts.google.com  cosign-1.9.0.x86_64.rpm

DEBUG:sigstore._cli:parsed arguments Namespace(subcommand='verify', certificate=PosixPath('cosign-1.9.0.x86_64.rpm.pem'), signature=PosixPath('cosign-1.9.0.x86_64.rpm-keyless.sig'), cert_email='keyless@projectsigstore.iam.gserviceaccount.com', cert_oidc_issuer='https://accounts.google.com', rekor_url='https://rekor.sigstore.dev', staging=False, files=[PosixPath('cosign-1.9.0.x86_64.rpm')])
DEBUG:sigstore._cli:Using certificate from: cosign-1.9.0.x86_64.rpm.pem
DEBUG:sigstore._cli:Using signature from: cosign-1.9.0.x86_64.rpm-keyless.sig
DEBUG:sigstore._cli:Verifying contents from: cosign-1.9.0.x86_64.rpm
DEBUG:sigstore._verify:Successfully verified signing certificate validity...
DEBUG:sigstore._verify:Successfully verified signature...
DEBUG:urllib3.connectionpool:Starting new HTTPS connection (1): rekor.sigstore.dev:443
DEBUG:urllib3.connectionpool:https://rekor.sigstore.dev:443 "POST /api/v1/index/retrieve/ HTTP/1.1" 200 69
DEBUG:urllib3.connectionpool:https://rekor.sigstore.dev:443 "GET /api/v1/log/entries/9ee91f2c5444e4ff77a3a18885f46fa2b6f7e629450904d67b5920333327b90d HTTP/1.1" 200 None
DEBUG:sigstore._verify:Successfully verified Rekor entry...
OK: cosign-1.9.0.x86_64.rpm

Oh, one more important thing. The maintainers of the tool are amazing about feedback. I had some trouble initially (a few weeks ago). They sat down with me to make sure that they could understand the problem & also solved the issue I had. You can talk to the team (and other users, including me) in the slack room.

Tor 0.4.7.8 is ready

Last night I built and pushed the Tor RPM(s) for 0.4.7.8. This is a security update, so please make sure that you upgrade your relays and bridges.

You can know more about the Tor's RPM respository at https://support.torproject.org/rpm/

If you have any queries, feel free to find us over #tor channel on OFTC.

Tor sysadmin 101 workshop for new relay operators

Tor log

On 4th June, at 19:00 UTC, we are doing an online workshop to help out new relay operators. If you ever wanted to help the Tor Project, or just curious about what is required to become a relay/bridge operator, you should join into the workshop.

The workshop is specially geared towards folks who are new to the land of Internet facing services. You will get to chat with many other operators and people from the Tor Project, and ask any doubts you have.

Register for the event, and share the news at your local groups/lists. Ask your friends to join :)

Securing verybad web application with only systemd

In my last blog post I talked about verybad web application. It has multiple major security holes, which allows anyone to do remote code execution or read/write files on a server. Look at the source code to see what all you can do.

I am running one instance in public http://verybad.kushaldas.in:8000/, and then I asked twitter to see if anyone can get access. Only difference is that this service has some of the latest security mitigation from systemd on a Fedora 35 box.

The service is up for a few days now, a few people tried for hours. One person managed to read the verybad.service file after a few hours of different tries. This allowed me to look into other available options from systemd. Rest of the major protections are coming from DynamicUser=yes configuration in systemd. This enables multiple other protections (which can not be turned off). Like:

  • SUID/SGID files can not be created or executed
  • Temporary filesystem is private to the service
  • The entire file system hierarchy is mounted read-only except a few places

systemd can also block exec mapping of shared libraries or executables. This way we can block any random command execution, but still allow the date command to execute.

Please have a look at the man page and learn about many options systemd now provides. I am finding this very useful as it takes such small amount of time to learn and use. The credit goes to Lennart and rest of the maintainers.

Oh, just in case you are wondering, for a real service you should enable this along with other existing mechanisms, like SELinux or AppArmor.

Using your OpenPGP key on Yubikey for ssh

Last week I wrote about how you can generate ssh keys on your Yubikeys and use them. There is another way of keeping your ssh keys secure, that is using your already existing OpenPGP key (along with authentication subkey) on a Yubikey and use it for ssh.

In this post I am not going to explain the steps on how to move your key to a Yubikey, but only the steps required to start using it for ssh access. Feel free to have a look at Tumpa if you want an easy way to upload keys to your card.

Enabling gpg-agent for ssh

First we have to add gpg-agent.conf file with correct configuration. Remember to use a different pinentry program if you are on Mac or KDE.

❯ echo "enable-ssh-support" >> ~/.gnupg/gpg-agent.conf
❯ echo "pinentry-program $(which pinentry-gnome)" >> ~/.gnupg/gpg-agent.conf
❯ echo "export SSH_AUTH_SOCK=$(gpgconf --list-dirs agent-ssh-socket)" >> ~/.bash_profile
❯ source ~/.bash_profile 
❯ gpg --export-ssh-key <KEYID> > ~/.ssh/id_rsa_yubikey.pub

At this moment your public key (for ssh usage) is at ~/.ssh/id_rsa_yubikey.pub file. You can use it in the ~/.ssh/authorized_keys file on the servers as required.

We can then restart the gpg-agent using the following command and then also verify that the card is attached and gpg-agent can find it.

❯ gpgconf --kill gpg-agent
❯ gpg --card-status

Enabling touch policy on the card

We should also enable touch policy on the card for authentication operation. This means every time you will try to ssh using the Yubikey, you will have to touch the interface (it will be flashing the light till you touch it).

❯ ykman openpgp keys set-touch aut On
Enter Admin PIN: 
Set touch policy of authentication key to on? [y/N]: y

If you still have servers where you have only the old key, ssh client will be smart enough to ask you the passphrase for those keys.