Kushal Das

FOSS and life. Kushal Das talks here.

kushal76uaid62oup5774umh654scnu5dwzh4u2534qxhcbi4wbab3ad.onion

Do not limit yourself

This post is all about my personal experience in life. The random things I am going to write in this post, I’ve talked about in many 1x1 talks or chats. But, as many people asked for my view, or suggestions on the related topics, I feel I can just write all them down in one single place. If you already get the feeling that this post will be a boring one, please feel free to skip. There is no tl;dr version of it from me.

Why the title?

To explain the title of the post, I will go back a few years in my life. I grew up in a coal mine area of West Bengal, studied in the village’s Bengali medium school. During school days, I was very much interested in learning about Science, and kept doing random experiments in real life to learn things. They were fun. And I learned life lessons from those. Most of my friends, school teachers or folks I knew, kept telling me that those experiments were impossible, or they were beyond my reach. I was never a class topper, but once upon a time I wanted to participate in a science exam, but the school teacher in charge told me that I was not good enough for it. After I kept asking for hours, he finally said he will allow me, but I will have to get the fees within the next hour. Both of my parents were working, so no chance of getting any money from them at that moment. An uncle who used to run one of the local book stores then lent me the money so that I could pay the fees. The amount was very small, but the teacher knew that I didn’t get any pocket money. So, asking for even that much money within an hour was a difficult task. I didn’t get a high score in that examination, but I really enjoyed the process of going to a school far away and taking the exam (I generally don’t like taking written exams).

College days

During college days I spent most of my time in front of my computer at the hostel, or in the college computer labs. People kept laughing at me for the same, batchmates, juniors, seniors, or sometimes even professors. But, at the same time I found a few seniors and friends, and professors who kept encouraging whatever I did. The number of people laughing at me were always higher. Because of the experience during school days, I managed to ignore those.

Coming to the recent years

The trend continued through out my working life. There are always more people who kept laughing at everything I do. They kept telling me that the things I try to do, do not have any value and beyond my limit. I don’t see myself as one of those bright developers I meet out in the world. I kept trying to do things I love, tried to help the community whichever way possible. What ever I know, I learned because someone else took time to teach me, took time to explain it to me. Now, I keep hearing the similar stories from many young contributors, my friends, from India. Many times I saw how people kept laughing at my friends in the same way they do at me. They kept telling my friends that the things they are trying to achieve are beyond their limit. I somehow managed to meet many positive forces in my life, and I keep meeting the new ones. This helped me to put in my mind that we generally bound ourselves in some artificial limits. Most of the folks laughing at us, never tried anything in life. It is okay if we can not write or speak the perfect English like them, English is not our primary language anyway. We can communicate as required. The community out there welcomes everyone as they are. We don’t have to invent the next best programming language, or be the super rich startup person to have good friends in life. One can always push at personal level, to learn new things. To do things which makes sense to each of us. That maybe is totally crazy in other people’s life. But, it is okay to try things as you like. Once upon a time, during a 1x1 with my then manager (and lifelong mentor) Sankarshan Mukhopadhyay, he told me something which remained with me very strong to this day. We were talking about things I can do, or rather try to do. By taking another example of one of my good friends from Red Hat, he explained to me that I may think that my level is nowhere near to this friend. But, if I try to learn and do things like him, I may reach 70% level, or 5% or 50%. Who knows unless I try doing those new things. While talking about hiring for the team, he also told me about how we should always try to get people who are better than us, that way, we always will be in a position to learn from each other I guess those words together changed many things in my life. The world is too large, and we all can do things in our life at certain level. But, what we can do depends on where we draw those non-existing limits in our lives.

The Python community is one such example, when I went to PyCon US for the first time in 2013, the community welcomed me the way I am. Even though almost no one knew me, I never felt that while meeting and talking to my life time heroes. Funny that in the same conference, a certain senior person from India tried to explain that I should start behaving like a senior software engineer. I should stand in the corner with all the world’s ego, and do not talk to everyone the way I do. Later in life, the same person tried to convince me that I should stop doing anything related to community as that will not help me to make any money.

Sorry, but they are wrong in that point. I never saw any of my favorite human beings doing that. Does not matter how senior people are, age or experience wise, they always listen to others, talk nicely with everyone. Money is not everything in life. I kept jumping around in PyCon every year, kept clicking photos or talking with complete strangers about their favorite subjects. Those little conversations later become much stronger bonds, I made new friends whom I generally meet only once in a year. But, the community is still welcoming. No one cared to judge me based on how much money I make. We tried to follow the same in dgplug. The IRC channel #dgplug on Freenode is always filled with folks from all across the world. Some are very experienced contributors, some are just starting. But, it is a friendly place, we try to help each other. The motto of Learn yourself, teach others is still very strong among us. We try to break any such stupid limits others try to force on our lives. We dream, we try to enjoying talking about that book someone just finished. We discuss about our favorite food. I will end this post saying one thing again. Do not bound yourself in some non existing limits. Always remember, What a great teacher, failure is (I hope I quoted Master Yoda properly). Not everything we will try in life will be a super successful thing, but we can always try to learn from those incidents. You don’t have to bow down in front of anyone, you can do things you love in your life without asking for others’ permissions.
How to leak information securely?

There are times when one may have access to the information which can be very important for the world to know. But, sharing any such information safely to journalists is always a risky task. In the modern era of Internet communications, it is, on one hand, very easy to share documents over Internet, and on the other hand, easy for the government/private organizations to track the source using just the metadata. For example, we know that GPG can encrypt our emails properly and no one can read the content, but one can easily figure out when someone mailed a journalist or vice-versa. Often, that information is enough to deanonymize a source.

SecureDrop is a free software project from Freedom of the Press Foundation which helps journalists and whistleblowers by providing an platform to share information anonymously. Read the end of the blog post to find out links to the different news organizations and SecureDrop. You may want to visit the URLs only using Tor browser (explained below). Even if you are just visiting the sites, your network admin can monitor which sites you are visiting, and the same goes for your home ISP (Internet Service Provider).

In this blog post I am going to talk about a few points to keep in mind while thinking/searching or actually leaking the information when using SecureDrop.

  • DO NOT SEARCH OR VIEW anything on your WORK NETWORK This is the most important point to start with. Make sure you are not researching or viewing any website which you want to contact in future while you are on your office network. This also means you are not supposed to use any of the office provided devices. Always use personal devices.

  • Make sure that the documents you want to share does not have anything which can identify you directly. For example if it has your employee code or any such unique number/name written on it.

  • Go to a public wifi place (for example, a coffee shop), and use that network. Once again, please do not use work or home network.

  • Use Tor Browser Download Tor Browser at your home computer and only use that to do any kind of research. Tor browser is a web browser pre-configured with Tor network so that it can make you anonymous. Tor Browser by default uses duckduckgo.com as the search engine. Duckduckgo do not keep track of what are you searching.

  • Download Tails OS, this can be installed on a USB drive. Remember that using Tails is harder than just using Tor browser in your daily computer. So, you will have to go through a few steps to install and use Tails. Tails uses the Tor network for all traffic by default. Use this on a personal laptop, and visit any public network space (for example coffee shop or shopping mall) and use their free wifi to upload the real documents. Now, we do maintain a directory listing of all the SecureDrop instances. Open this URL using Tor browser. The .onion addresses given in the site can only be opened using the Tor browser.

As I mentioned at the beginning of the post, SecureDrop is a free software which is developed by an active community, the source code is hosted at github. The primary application is written in Flask, and various other Python modules. Feel free to look at the issues, and contribute to the project as you wish.

Using split ssh in QubesOS 4.0

The idea behind Qubes OS is known as security by compartmentalization. You create different Qubes (VMs or domains) to compartmentalize your digital data. So that even if one of the VMs is compromised, the attacker will not be able to access data stored in other VMs.

If we look into a typical GNU/Linux user’s daily routine, ssh is a regular tool everyday. We do login to various systems, or access files over ssh. But, if you keep the ssh keys in the place where you are also running the browser, there is a chance that someone will try to access the files by attacking through the browser. Yesterday we all read many things which can be done by attacking through the browsers (Yay! SECURITY!!!).

In this tutorial, we will learn about split-ssh and how we can keep the actual ssh keys safe in QubesOS. At the time of writing this article (2018-01-05), the commit in the master branch is 1b1786f5bac9d06af704b5fb3dd2c59f988767cb.

Modify the template VM

Because we will be adding things to /etc directory of our VMs, we will have to do this in the template VM. Because in the normal VMs the /etc directory will be a fresh copy every time we restart the VM. I modified fedora-26 as that is my default template.

First, add the following code in the /etc/qubes-rpc/qubes.SshAgent file in the template VM and then shut it down.

#!/bin/sh
notify-send "[`qubesdb-read /name`] SSH agent access from: $QREXEC_REMOTE_DOMAIN"
ncat -U $SSH_AUTH_SOCK

Creating the actual ssh-vault VM

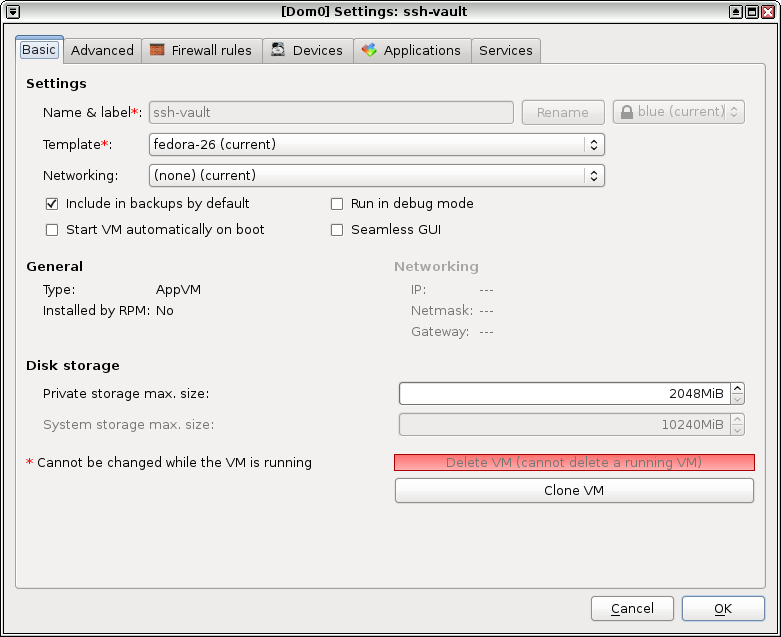
Next task is to create a new VM, I named it ssh-vault. The name is important to remember as the code/configuration will access the ssh keys based on the vault VM name. You can have as many ssh vaults as you want. Remember to open the configuration after creation and set the networking to None.

Start the vault VM, either create a new pair of ssh key, or copy your existing key in there. Remember to use qvm-copy command to copy the files, no network is available.

[Desktop Entry]
Name=ssh-add
Exec=ssh-add
Type=Application

Then add the above content to the ~/.config/autostart/ssh-add.desktop file. You may have to create the autostart directory.

$ mkdir -p .config/autostart
# vim ~/.config/autostart/ssh-add.desktop

Configuring the client VM

Client VM is the VM in which you use the ssh key. Add the following to the /rw/config/rc.local file, and then make the file executable. Remember to use sudo for the same.

SSH_VAULT_VM="ssh-vault"

if [ "$SSH_VAULT_VM" != "" ]; then
	export SSH_SOCK=/home/user/.SSH_AGENT_$SSH_VAULT_VM
	rm -f "$SSH_SOCK"
	sudo -u user /bin/sh -c "umask 177 && ncat -k -l -U '$SSH_SOCK' -c 'qrexec-client-vm $SSH_VAULT_VM qubes.SshAgent' &"
fi

If you look carefully at the shell scrip above, you will find we are setting the vault VM name using a variable called SSH_VAULT_VM. Change this name to whatever VM you want to use as the vault.

$ sudo vim /rw/config/rc.local
$ sudo chmod +x /rw/config/rc.local

Next, we will add the following to the ~/.bashrc file, so that ssh can find the right socket file.

# Set next line to the ssh key vault you want to use
SSH_VAULT_VM="ssh-vault"

if [ "$SSH_VAULT_VM" != "" ]; then
	export SSH_AUTH_SOCK=~user/.SSH_AGENT_$SSH_VAULT_VM
fi

Then I restarted the vault and client VMs. Because my ssh key also has a passphrase, I entered that using ssh-add command in the ssh-vault VM.

Configuring the policy in dom0

In QubesOS you will have to define a policy in the dom0, based on that the VMs can talk to each other (using QubeOS’ internal). In my case I want only the emails VM should be able to ask to get access to the ssh keys. So, I added the following in /etc/qubes-rpc/policy/qubes.SshAgent file.

emails ssh-vault ask

The above policy rule says that when the emails VM tries to contact ssh-vault VM, it has to ask for permission to do so from the user.

Using ssh (finally!)

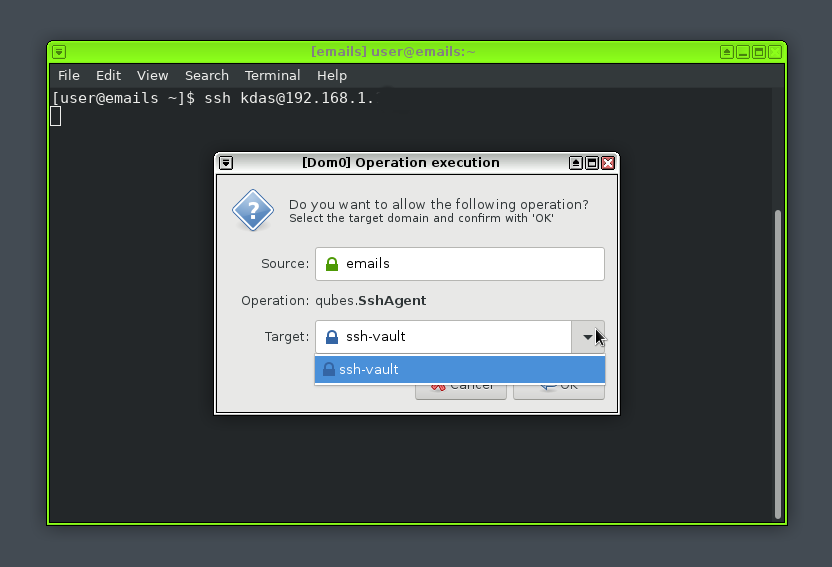
At this moment you can safely start the client VM, and try to ssh into anywhere. It will open up an authentication dialog, you will have to select and click on Okay button to give access to the ssh keys. You will also see a notification in the top notification area.

There is an active IRC channel #qubesin the Freenode server. Join there and ask any doubts you have.

Using diceware to generate passwords

Choosing a new password is always an interesting topic. When I started using computers for the first time, my idea was to find some useful words which I can remember, maybe 2-3 of those words together. With time I found that the websites have different requirements when it comes to choosing a new password. But, in the last few years we also saw many examples where brute forcing a password is a rather simple thing. The modern powerful computers enable anyone to find a right combination of characters in a decent time frame.

What is a diceware password?

Diceware passwords are normal passwords (a few words together) generated from a list of words by either rolling a dice, or by computer. You can read more in the original Diceware website.

Using diceware project to generate your passphrases

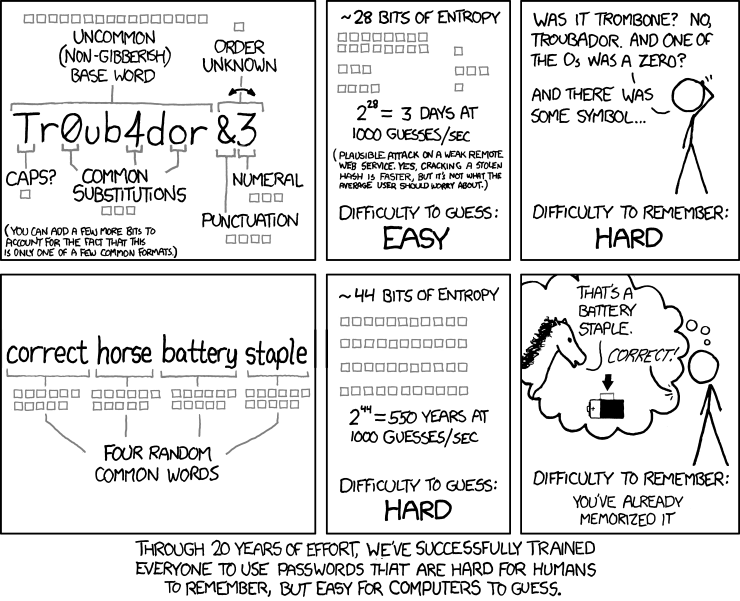
If you notice, I have written passphrase instead of password. This is because passphrases are not only easier to remember than a complex password, but they also provide better security from bruteforce attacks. The following comics from XKCD explains it better than any words.

Installing diceware

diceware is a very simple command line tool written in Python. It can help you to choose a diceware passphrase easily. It was already packaged for Debian, last week I have packaged it for Fedora (thank you Parag for the review). Yesterday night it was pushed to stable. So, now you can install it using dnf.

$ sudo dnf install diceware

Using diceware

$ diceware 
MotorBolsterFountainThrowerPorridgeBattered

By default it is creating passphrases with 6 words in it, but you can increase by using -n command line argument. You should use at least 7 words in your passphrase. Read the story from Micah Lee to understand how this helps to increase the strength of your passphrases in many folds.

The man page of the diceware has more details about usage.

Start using a password manager

Now is a good time to start using a password manager. Save all the passwords/passphrases in one place, and secure it with a super long passphrase which you can remember. This article from Martin Shelton has many examples. The members of Fedora engineering team uses a command line tool called pass which uses gpg to encrypt the passwords.

Using Haven app to secure your belongings

On 22nd December, Edward Snowden (President, board of Freedom of the Press Foundation) announced a new project called Haven, which is built in collaboration between The Guardian Project and Freedom of the Press Foundation. Haven is an Android app which will turn any Android phone into a monitoring system to watch over your laptop, or your house.

The problem Haven is trying to solve is an old one. How do you make sure that no one is tampering with your hardware (or secretly searching your house) while you are away? There is no easy and 100% secure solution, but Haven enables us to see and record what is happening. It uses all the available sensors including microphones (generally there are 3 of them), accelerometer, and camera.

How to install Haven on your phone?

I’ve been wanting to try this app for some time, but I didn’t have any old Android phones. So yesterday, as part of new year celebration, I went and bought a new Android phone (around $100) to install Haven. But, remember that Haven can be installed on cheap $50 burner Android phones too (and this is one of the goal of the project). So, feel free to use whatever is available to you.

The project is still in Beta state, and it is available on Google Play Store, and F-Droid store (nightly beta builds). Remember that now there are fake Haven apps in the Google Play Store, so check twice before you install. The original app is published by The Guardian Project.

If you want to use F-Droid like me, add this new a new repository with the following URL.You can do this from F-Droid settings, in the repositories section.

https://guardianproject.github.io/haven-nightly/fdroid/repo/

After adding the repository, refresh all the repositories by clicking the refresh button, then you can install the latest Haven. I have installed the version mentioned in the following screenshot. Remember that Haven can use another app called Orbot to provide remote access to the logs over Tor, but the Orbot from the Play store kept crashing for me, so I installed the latest Orbot (15.5.1-RC-2-multi-SDK23) from the F-Droid store. I am using the 0.1.0-beta-7 version of Haven.

Configuring Haven

You start Haven, a greeter window will welcome you. Swipe left to move to the next windows of the configuration wizard.

In the first configuration window, you will have to setup which noise level should fire up an alert. This totally depends on where you want to keep your phone (on watch). You can start with the default value and then tweak it from there if you’re not getting the alerts you want.

Then you will have to set the motion level. This will detect if someone moves the phone. For example, if you keep the phone on top your laptop, or a document file, there is no easy way to access the laptop or document without moving the phone first.

Next, you can provide a phone number where you may want to receive notifications, either over SMS or Signal messenger.

After the initial configuration wizard, you can click on the settings button in the application. The first thing to do here is to set which number Haven should use to send Signal notifications.

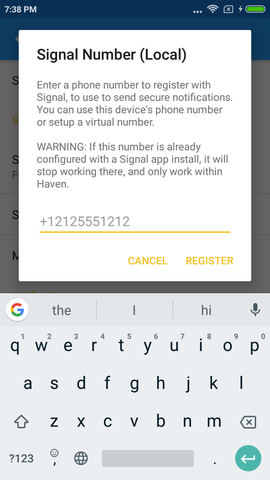
You will need two phone numbers with Signal enabled. One is your primary number, where you will receive the notifications. You will put this number in the Notification Number (Remote). The second number is which Haven will use to send notifications. Put this number to the Signal Number (Local). Best way is to put the second SIM into the same phone of Haven.

Next, click on the REGISTER button. The Signal app on that number will receive a verification code over SMS, you will have to enter that after clicking the VERIFY button.

You can also enable remote access over Tor, just click on the checkbox. This will open the Orbot app, and then come back to the settings screen after Orbot connects to the Tor network.

Remember, you can always come back to the settings and change the values as required. Soon you will find that you will have to do that so that app can adjust to various environmental noises etc.

How to use the app?

By default the app has a 30 second timer so you can make sure that the phone is in a stable place, and then click on the START NOW button. When the timer runs out, the app will start monitoring for any noise, light, movement or vibration to trigger the alarm.

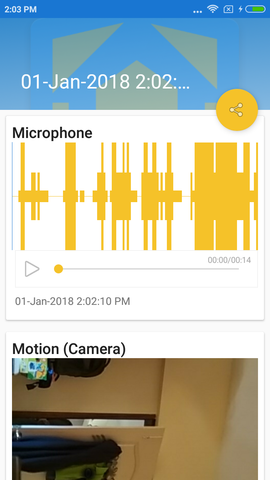
I kept trying to open the door of my office room without any noise, but the motion detector always found me entering the room. I kept the Haven activated and went to sleep in the afternoon. But, first a very loud helicopter, and then a few super bikes and finally some dogs made sure that the system triggered on noise in every other minute. So, I had to increase the noise level in the settings. Though it was fun to hear the recordings on my iPhone, which Haven sent to me over Signal.

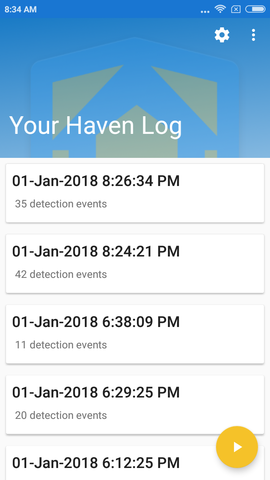
Next time if you start the app, you will find the log entries, and you can click on the play button at the right-bottom corner to start it again. Below is a photo taken by the app while I tired to enter the office room.

Can Haven solve all of my physical security issues?

No, but it will record whatever it sees or hears. There are ways to block radio signals (to make sure that Haven can not send out any notification), but that is an expensive step for an attacker to make. You can keep the phone inside of your hotel locker to record if anyone opens up the locker or make it watch your hallway at the house. Government agencies love to see what is inside of our computers/house(s), but they don’t like get recorded while doing so.

How can I help?

Haven is an Open Source application, the source code is hosted on Github. Feel free to submit issues, write blog posts, make people aware about the application. If you can write Android code, you are most welcome to submit patches to the project. Every form of contribution counts, so don’t hesitate.

You can read more about the project in this post from Micah Lee.

  • Update 2018/01/03: Screenshot of configuration window updated for beta7 release

2017 blog review

Around December 2016, I decided to work more on my writings. After asking around a few friends, and also after reading the suggestions from the masters, it boiled down to one thing. One has to write more. This is no shortcut.

So, I tried to do that through out 2017. I found early morning was the easiest time for me to read/write as there is not much noise, and most importantly, Py still sleeps :).

The biggest point while starting was about what to write? I tried to write about whatever I found useful to me, or things I am excited about. I wrote using FocusWriter (most of the time), and saved the documents as a plain text file (as I use Markdown format in my blog). I also received help from many of my friends, who were kind enough to review my writings. Having a second pair of eyes for the writings is really important, as they can help to not only find the errors, but also show you better ways to express yourself.

One of my weak point (from the childhood) is a small stock of words to express myself. But, that also means my sentences do not have any words which one has to search to find the meaning.

If I just look at the numbers, I wrote 60 blog posts in 2017, which is only 7 more than of 2016. But, the number of views of the HTML pages is more than doubled.

Did your writing skill improved a lot?

The answer is no. But, now, writing is much more easier than ever. I can sit down with any of my mechanical keyboards, and just typing out the things on my mind.

If you ask me about one single thing to read on this topic, I will suggest On Writing by Stephen King.

One thing still can not do on time is replying to emails. Kind of drowned in too many emails. I am trying to slowly unsubscribe from various lists I have joined over the years. I hope you will find the future blog posts useful in different ways.

Duplicate MAC address error in Qubes VMs

Just after I did the fresh install of Qubes 4.0rc3, I saw one error about sys-net (and sometimes same for other VMs) having a duplicate mac address for NIC. I rebooted the system for a few times, which solved the issue.

Start failed: invalid argument: network device with mac 00:16:3e:5e:6c:00 already exists

But, from the last week I started getting the same error again and again. Even if I use the qvm-prefs command to change the mac address, it is still trying to boot using the old address, I could not find the reason behind it. Rebooted the laptop way too many times with a hope of the error vanishing away, but of no use.

At first I checked the file /var/lib/qubes/qubes.xml for the duplicate record of the MAC address, but I found the right value there (the new one I set using the qvm-prefs command).

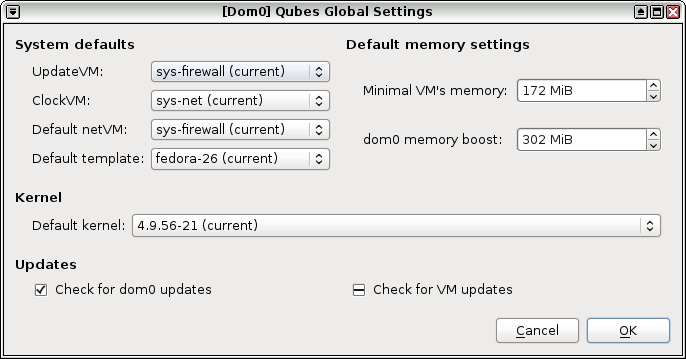
So, the next step was to remove the whole sys-net. As I forgot that I can not remove it till I remove all the dependency, my qvm-remove sys-net command will fail. I had to remove all dependencies using the Qubes Global Settings. Next, I removed and recreated the vm/domain and created a new one.

$ qvm-remove sys-net
$ sudo su -
# cd /srv/formulas/base/virtual-machines-formula/
# qubesctl top.enable qvm.sys-net
# qubesctl --targets sys-net state.highstate

I am yet to learn about Salt, I found a nice starting guide in the official Qubes documentation.

Share files securely using OnionShare

Sharing files securely is always a open discussion topic. Somehow the relationship between security/privacy and usability stand in the opposite sides. But, OnionShare managed to create a bridge between them. It is a tool written by Micah Lee which helps to share files of any size securely and anonymously using Tor.

In the rest of the post I will talk about how you can this tool in your daily life.

How to install OnionShare?

OnionShare is a Python application and already packaged for most of the Linux distributions. If you are using Windows or Mac OS X, then visit the homepage of the application, and you can find the download links there.

On Fedora, you can just install it using dnf command.

sudo dnf install onionshare -y

For Ubuntu, use the ppa repository from Micah.

sudo add-apt-repository ppa:micahflee/ppa
sudo apt-get update
sudo apt-get install onionshare

How to use the tool?

When you start the tool, it will first try to connect to the Tor network. After a successful connection, it will have a window open where you can select a number of files, and then click on Start sharing button. The tool will take some time to create a random onion URL, which you can then pass to the person who is going to download the files using the Tor Browser.

You can mark any download to stop after the first download (using the settings menu). Because the tool is using Tor, it can punch through standard NAT. Means you can share files from directly your laptop or home desktop. One can still access the files using the Tor Browser.

Because of the nature of Tor, the whole connection is end to end encrypted. This also makes the sharer and downloader anonymous, but you have to make sure that you are sharing the download URL in a secure way (for example, you can share it using Signal). OnionShare also has a rate-limit so that an attacker can not do many attempts to guess the full download URL.

Qubes OS 4.0rc3 and latest UEFI systems

Last week I received a new laptop, I am going to use it as my primary work station. The first step was to install Qubes OS 4.0rc3 on the system. It is a Thinkpad T470 with 32GB RAM and a SSD drive.

How to install Qubes on the latest UEFI systems?

A few weeks back, a patch was merged to the official Qubes documentation, which explains in clear steps how to create a bootable USB drive on a Fedora system using livecd-tools. Please follow the guide and create a USB drive which will work on these latest machines. Just simply using dd will not help.

First step after installing Qubes

I upgraded the dom0 to the current testing packages using the following command.

$ sudo qubes-dom0-update --enablerepo=qubes-dom0-current-testing
$ sudo qubes-dom0-update qubes-template-fedora-26

I also installed the Fedora 26 template on my system using the next command. One of the important point to remember that Fedora 25 is going to be end of life today. So, better to use updated version of the distribution :)

There was another important thing happened in the last two weeks. I was in the Freedom of the Press Foundation office in San Fransisco. Means not only I managed to meet my amazing team, I also met many of my personal heroes in this trip. I may write a separate blog post about that later. But for now I can say that I managed to sit near to Micah Lee for 2 weeks and learn a ton about various things, including his Qubes workflow. The following two things were the first change I did to my installation (with his guidance) to make things working properly.

How to modify the copy-paste between domains shortcuts?

Generally Ctrl+Shift+c and Ctrl+Shift+v are used to copy-paste securely between different domains. But, those are the shortcuts to copy-paste from the terminal in all the systems. So, modifying them to a different key combination is very helpful for the muscle memory :)

Modify the following lines in the /etc/qubes/guid.conf file in dom0, I did a reboot after that to make sure that I am using this new key combination.

secure_copy_sequence = “Mod4-c”;
secure_paste_sequence = “Mod4-v”;

The above configuration will modify the copy paste shortcuts to Windows+c and Windows+v in my keyboard layout.

Fixing the wireless driver issue in suspend/resume

I also found that if I suspend the system, after starting it on again, the wireless device was missing from the sys-net domain. Adding the following two module in the /rw/config/suspend-module-blacklist file on the sys-net domain helped me to fix that.

iwlmvm
iwlwifi

The official documentation has a section on the same.

You can follow my posts on Qubes OS here.

Setting up SecureDrop 0.5rc2 in VMs for QA

Next week we have the 0.5 release of SecureDrop. SecureDrop is an open-source whistleblower submission system that media organizations can use to securely accept documents from and communicate with anonymous sources. It was originally created by the late Aaron Swartz and is currently managed by Freedom of the Press Foundation.

In this blog post I am going to tell you how can you set up a production instance of SecureDrop in VM(s) in your computer, and help us to test the system for the new release.

Required software

We provision our VM(s) using Vagrant. You will also need access to a GPG key (along with the private key) to test the whole workflow. The set up is done using Ansible playbooks.

Another important piece is a Tails VM for the administrator/journalist workstation. Download the latest (Tails 3.3) ISO from their website.

You will need at least 8GB RAM in your system so that you can have the 3 VM(s) required to test the full system.

Get the source code

For our test, we will first set up a SecureDrop 0.4.4 production system, and then we will update that to the 0.5rc release.

Clone the SecureDrop repository in a directory in your local computer. And then use the following commands to set up two VM(s). One of the VM is for the application server, and the other VM is the monitor server.

$ vagrant up /prod/ --no-provision

In case you don’t have the right image file for KVM, you can convert the Virtualbox image following this blog post.

Create a Tails VM

Follow this guide to create a virtualized Tails environment.

After the boot, remember to create a Persistence storage, and also setup a administrator password (you will have to provide the administrator password everytime you boot the Tails VM).

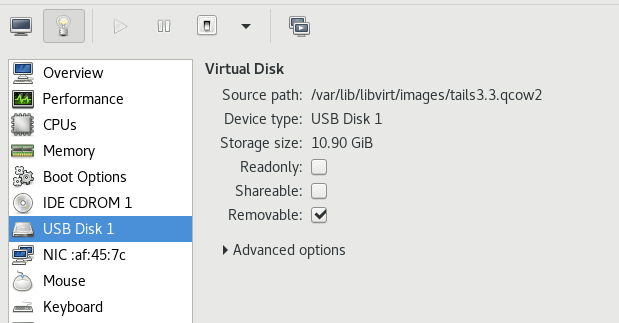
For KVM, remember to mark the drive as a removable USB storage and also mark it in the Booting Options section after the installation.

Then, you can mount the SecureDrop git repository inside the Tails VM, I used this guide for the same.

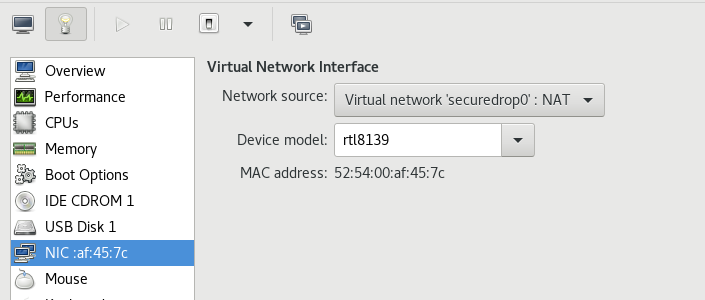
Also remember to change the Virtual Network Interface in the virt-manager to Virtual network ‘securedrop0’: NAT for the Tails VM.

Install SecureDrop 0.4.4 release in the production VM(s).

For the next part of the tutorial, I am assuming that the source code is at the ~/Persistent/securedrop directory.

Move to 0.4.4 tag

$ git checkout 0.4.4

We will also have remove a validation role from the 0.4.4 Ansible playbook, otherwise it will fail on a Tails 3.3 system.

diff --git a/install_files/ansible-base/securedrop-prod.yml b/install_files/ansible-base/securedrop-prod.yml
index 877782ff..37b27c14 100755
--- a/install_files/ansible-base/securedrop-prod.yml
+++ b/install_files/ansible-base/securedrop-prod.yml
@@ -11,8 +11,6 @@
# Don't clobber new vars file with old, just create it.
args:
creates: "{{ playbook_dir }}/group_vars/all/site-specific"
- roles:
- - { role: validate, tags: validate }
- name: Add FPF apt repository and install base packages.
hosts: securedrop

Create the configuration

In the host system make sure that you export your GPG public key to a file in the SecureDrop source directory, for my example I stored it in install_files/ansible-base/kushal.pub. I also have the exported insecure key from Vagrant. You can find that key at ~/.vagrant.d/insecure_private_key in your host system. Make sure to copy that file too in the SecureDrop source directory so that we can later access it from the Tails VM.

Inside of the Tails VM, give the following command to setup the dependencies.

$ ./securedrop-admin setup

Next, we will use the sdconfig command to create the configuration file.

$ ./securedrop-admin sdconfig

The above command will ask you many details, you can use the defaults in most cases. I am pasting my configuration file below, so that you can look at the example values I am using. The IP addresses are the default address for the production Vagrant VM(s). You should keep them the same as mine.

---
### Used by the common role ###
ssh_users: vagrant
dns_server: 8.8.8.8
daily_reboot_time: 4 # An integer between 0 and 23

# TODO Should use ansible to gather this info
monitor_ip: 10.0.1.5
monitor_hostname: mon
app_hostname: app
app_ip: 10.0.1.4

### Used by the app role ###
# The securedrop_header_image has to be in the install_files/ansible-base/ or
# the install_files/ansible-base/roles/app/files/ directory
# Leave set to empty to use the SecureDrop logo.
securedrop_header_image: ""
# The app GPG public key has to be in the install_files/ansible-base/ or
# install_files/ansible-base/roles/app/files/ directory
#
# The format of the app GPG public key can be binary or ASCII-armored,
# the extension also doesn't matter
#
# The format of the app gpg fingerprint needs to be all capital letters
# and zero spaces, e.g. "B89A29DB2128160B8E4B1B4CBADDE0C7FC9F6818"
securedrop_app_gpg_public_key: kushal.pub
securedrop_app_gpg_fingerprint: A85FF376759C994A8A1168D8D8219C8C43F6C5E1

### Used by the mon role ###
# The OSSEC alert GPG public key has to be in the install_files/ansible-base/ or
# install_files/ansible-base/roles/app/files/ directory
#
# The format of the OSSEC alert GPG public key can be binary or
# ASCII-armored, the extension also doesn't matter
#
# The format of the OSSEC alert GPG fingerprint needs to be all capital letters
# and zero spaces, e.g. "B89A29DB2128160B8E4B1B4CBADDE0C7FC9F6818"
ossec_alert_gpg_public_key: kushal.pub
ossec_gpg_fpr: A85FF376759C994A8A1168D8D8219C8C43F6C5E1
ossec_alert_email: kushaldas@gmail.com
smtp_relay: smtp.gmail.com
smtp_relay_port: 587
sasl_username: fakeuser
sasl_domain: gmail.com
sasl_password: fakepassword

### Use for backup restores ###
# If the `restore_file` variable is defined, Ansible will overwrite the state of
# the app server with the state from the restore file, which should have been
# created by a previous invocation of the "backup" role.
# To use uncomment the following line and enter the filename between the quotes.
# e.g. restore_file: "sd-backup-2015-01-15--21-03-32.tar.gz"
#restore_file: ""
securedrop_app_https_on_source_interface: False
securedrop_supported_locales: []

Starting the actual installation

Use the following two commands to start the installation.

$ ssh-add insecure_private_key
$ ./securedrop-admin install

Then wait for a while for the installation to finish.

Configure the Tails VM as a admin workstation

$ ./securedrop-admin tailsconfig

The above command expects that the previous installation step finished without any issue. The addresses for the source and journalist interfaces can be found in the install_files/ansible-base/*ths files at this moment.

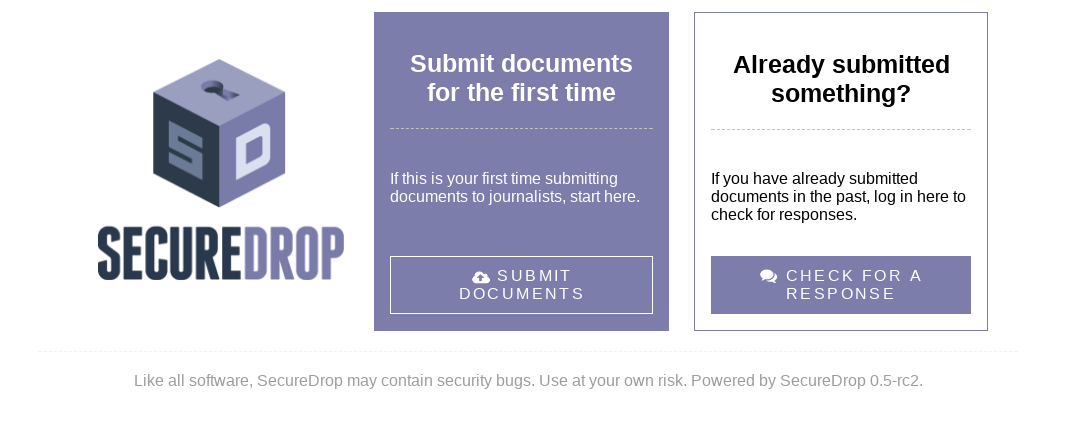
After this command, you should see two desktop shortcuts on your Tails desktop, one pointing to the source interface, and one for journalist interface. Double click on the source interface and make sure that you can view the source interface and the SecureDrop version mentioned in the page is 0.4.4.

Now update the systems to the latest SecureDrop rc release

The following commands in the Tails VM will help you to update to the latest RC release.

$ source .venv/bin/activate
$ cd install_files/ansible-base
$ torify wget https://gist.githubusercontent.com/conorsch/e7556624df59b2a0f8b81f7c0c4f9b7d/raw/86535a6a254e4bd72022865612d753042711e260/securedrop-qa.yml`
$ ansible-playbook -vv --diff securedrop-qa.yml

Then we will SSH into both app and mon VM(s), and give the following the command to update to the latest RC.

$ sudo cron-apt -i -s

Note: You can use ssh app and ssh mon to connect to the systems. You can also checkout the release/0.5 branch and rerun the tailsconfig command. That will make sure the desktop shortcuts are trusted by default.

After you update both the systems, if you reopen the source interface in the Tails VM again, you should see version mentioned as a RC release.

Now, if you open up the source interface onion address in the Tor browser on your computer, you should be able to submit documents/messages.

SecureDrop hackathon at EFF office next week

On December 7th from 6PM we are having a SecureDrop hackathon at the EFF office. Please RSVP and come over to start contributing to SecureDrop.