Kushal Das

FOSS and life. Kushal Das talks here.

kushal76uaid62oup5774umh654scnu5dwzh4u2534qxhcbi4wbab3ad.onion

IP addresses which tried to break into this server in 2019

This Friday, I tried to look into the SSH failures on my servers, how different systems/bots/people tried to break into the servers. I have the logs from July this month (when I moved into newer servers).

Following the standard trends, most of the IP addresses are working as a staging area for attacks by other malware or people. Most of these IP addresses are the real people/places from where the attacks are originating. There are around 2.3k+ IP addresses in this list.

Origin IP locations

per IP map

The above is a map of all of the IP addresses which tried to break into my system.

Country wise

You can see there is a big RED circle here, as one particular IP from Belgium tried 3k+ times, the second country is China, and the USA is in third place. I made the map into a static image as that is easier for the page load.

Per country attacks

BE 3032
CN 1577
US 978
FR 934
RU 807
SG 483
DE 405
NL 319
CA 279
KR 276

Known VS unknown IP addresses

I also verified the IP addresses against AlienVault database, and it is an open threat intelligence community. The API is very simple to use.

Known vs unknown ip

According to the AlienVault, 1513 IP addresses are already known for similar kinds of attacks, and 864 IP addresses are unknown. In the coming days, I will submit back these IP addresses to AlienVault.

I took the highest amount of time to learn how to do that heatmap on the world map. I will write a separate blog post on that topic.

PoC to auto attach USB devices in Qubes

Here is PoC based on qubesadmin API which can auto attach USB devices to any VM as required. By default Qubes auto attaches any device to the sys-usb VM, that helps with bad/malware full USB devices. But, in special cases, we may want to select special devices to be auto attached to certain VMs. In this PoC example, we are attaching any USB storage device, but, we can add some checks to mark only selected devices (by adding more checks), or we can mark few vms where no device can be attached.

I would love to see what all magical ideas you all come up with. Have fun with the code.

Btw, you can execute it in dom0 by

python3 autoattach.py

oqubeslogging, a PoC for centralized logging in Qubes OS

oqubeslogging is a proof of concept project for Qubes OS. This includes a qrexec service, which allows one AppVM (we will call it logging VM for the rest of the blog post) to have all the logs from different select VMs. This enables central logging among QubesOS land.

The second part is a Python logging handler, which if configured correctly, will allow to pass the logging lines to the logging VM

import logging
from oqubeslogging import OQubesLog

def main():
    handler = OQubesLog("workvm", "loggingvm")
    logging.basicConfig(level=logging.DEBUG, handlers=[handler])
    logger = logging.getLogger("example")

    logger.info("kushal says it works")


if __name__ == "__main__":
    main()

Third, is another example code, which if run as root user in any VM, will collect all logs from journald and pass them to the logging VM.

Why is this useful?

The same reason we use central logging in every place. This will enable us to check only one VM to find the correct log. QubesOS is designed for single user in mind, and instead many random AppVM, we will be able to read and parse logs in that one special logging VM.

Verified emoji on Mastodon

Yesterday, just for fun, I added an emoji (as a local emoji) to our mastodon instance, kind of look like a verification icon. Only to show the power of federation and Free Software to the new users of Mastodon. Many other users started using the same. But, most newbies to Mastodon got confused with the same

my profile screenshot

my profile edit screenshot

If you see the above screenshot, I just added :verified: after my name in my profile, and that shows the icon. That is not any formal verification. The https://msdtn.social instance also has a similar emoji, but the big https://mastodon.social does not have the same.

Then how to verify someone on Mastodon?

The best way is via their website or blog. If you click to edit your profile, you will find the option to add a few profile metadata, in those sites, you can verify that you own or have edit access of those sites.

my profile link verify

Thus, my blog comes with a green tick on my profile image. Here is to the link verification documentation from the website.

Feel free to follow me on Mastodon.

Python function to generate Tor v3 onion service authentication keys

Here is a small Python function using the amazing Python Cryptography module to generate the Tor v3 Onion service authentication services.

from cryptography.hazmat.primitives import serialization
from cryptography.hazmat.primitives.asymmetric import x25519
import base64

def generate_tor_v3_keys():
    "Generates public, private keypair"
    private_key = x25519.X25519PrivateKey.generate()
    private_bytes = private_key.private_bytes(
        encoding=serialization.Encoding.Raw	,
        format=serialization.PrivateFormat.Raw,
        encryption_algorithm=serialization.NoEncryption())
    public_key = private_key.public_key()
    public_bytes = public_key.public_bytes(
        encoding=serialization.Encoding.Raw,
        format=serialization.PublicFormat.Raw)
    public = base64.b32encode(public_bytes).replace(b'=', b'') \
                       .decode("utf-8")
    private = base64.b32encode(private_bytes).replace(b'=', b'') \
                        .decode("utf-8")
    return public, private

You can follow my previous blog post to setup an authenticated Onion service.

Started a newsletter

I started a newsletter, focusing on different stories I read about privacy, security, programming in general. Following the advice from Martijn Grooten, I am storing all the interesting links I read (for many months). I used to share these only over Twitter, but, as I retweet many things, it was not easy to share a selected few.

I also did not want to push them in my regular blog. I wanted a proper newsletter over email service. But, keeping the reader’s privacy was a significant point to choose the service. I finally decided to go with Write.as Letters service. I am already using their open source project WriteFreely. This is an excellent excuse to use their tool more and also pay them for the fantastic tools + service.

Feel free to subscribe to the newsletter and share the link with your friends.

Unoon, a tool to monitor network connections from my system

I always wanted to have a tool to monitor the network connections from my laptop/desktop. I wanted to have alerts for random processes making network connections, and a way to block those (if I want to).

Such a tool can provide peace of mind in a few cases. A reverse shell is one the big one, just in case if I manage to open any random malware (read downloads) on my regular Linux system, I want to be notified about the connections it will make. The same goes for trying out any new application. I prefer to use Qubes OS based VMs testing random binaries and applications, and it is also my daily driver. But, the search for a proper tool continued for some time.

Introducing unoon

Unoon main screen

Unoon is a desktop tool that I started writing for monitoring network connections for my system. It has two parts, the backend is written in Go and that monitor and adds details to a local Redis instance (this should be password protected).

I started writing this backend in Rust, but then I had to rewrite it in Go as I wanted to reuse parts of my code from another project so that I can track all DNS queries from the system. This helps to make sense of the data; otherwise, we will see some random IP numbers in the UI.

The frontend is written using PyQt5. Around 14 years ago, I released my first ever released tool using PyQt, and it is still my favorite library to create a desktop application.

Using the development version of unoon

The README has the build steps. You have to start the backend as a daemon, the 
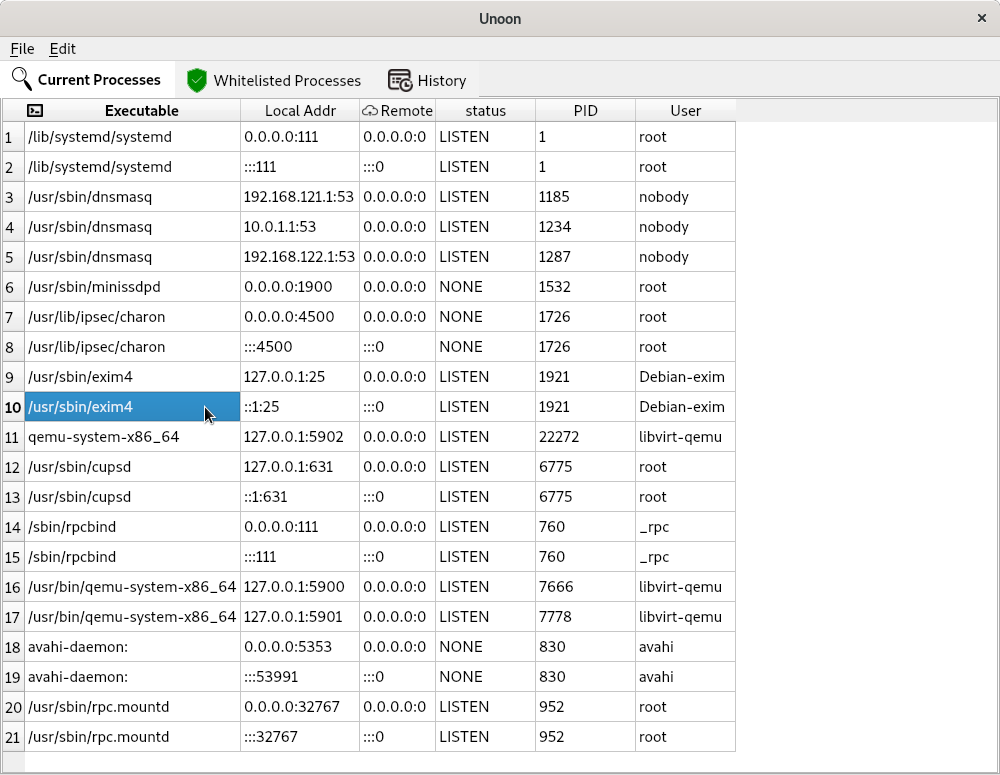
easiest option is to run it inside of a tmux shell. At first, it will show all the currently running processes in the first “Current processes” tab. If you add any executable (via the absolute path) in the Edit->whitelists dialog and then save (and then restart the UI app), those will turn up the whitelisted processes.

Unoon alert

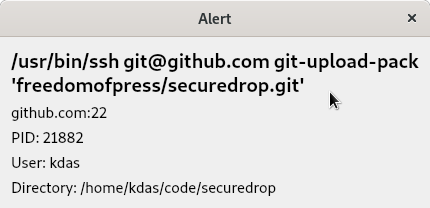
For any new process making network calls, you will get an alert dialog. In the future, we will have the option to block hosts/ips via this alert dialog.

Unoon history

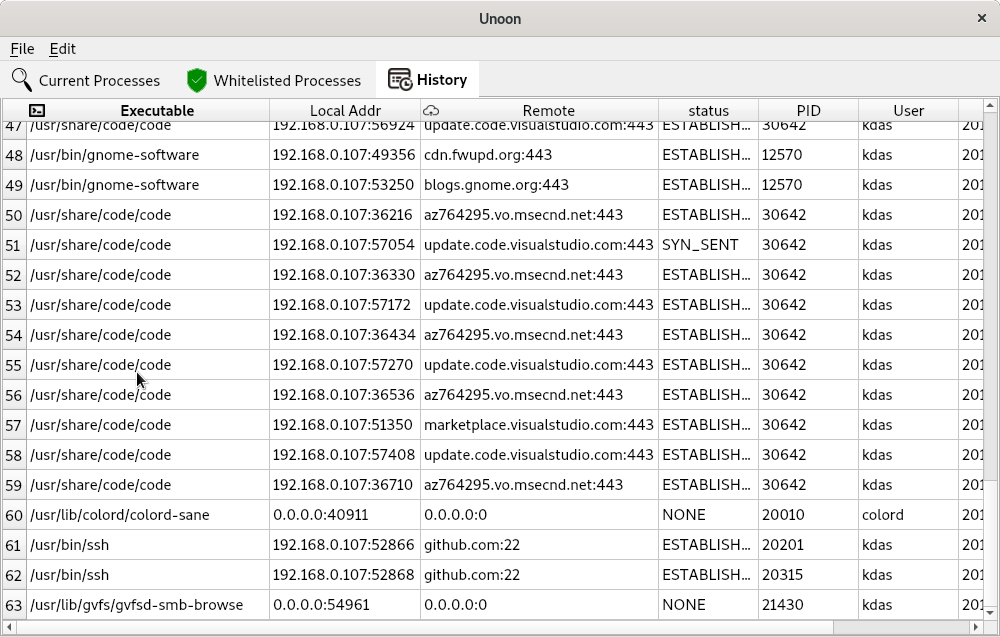
The history tabs will show all alerts history in the runtime. Again, we will have to save this information in a local database, so that we can have better statistics shown to the users.

You can move between different tabs/tables via Alt+1 or Alt+2 and Alt+3 key combinations.

I will add more options to create better-whitelisted processes. There is also ongoing work to mark any normal process as a whitelisted one from the UI (by right-clicking).

Last week, Micah and I managed to spend some late-night hotel room hacking on this tool.

How can you help?

You can start by testing the code base, and provide suggestions on how to improve the tool. Help in UX (major concern) and patches are always welcome.

A small funny story

A few weeks back, on a Sunday late night, I was demoing the very initial version of the tool to Saptak. While we were talking about the tool, suddenly, an entry popped up in the UI /usr/bin/ssh, to a random host. A little bit of search showed that the IP belongs to an EC2 instance. For the next 40 minutes, we both were trying to debug to find out what happened and if the system was already compromised or not. Luckily I was talking about something else before, and to demo something (we totally forgot that topic), I was running Wireshark on the system. From there, we figured that the IP belongs to github.com. It took some more time to figure out that one of my VS Code extension was updating the git, and was using ssh. This is when I understood that I need to show the real domain names on the UI than random IP addresses.

Permanent Record: the life of Edward Snowden

book cover

The personal life and thinking of the ordinary person who did an extraordinary thing.

A fantastic personal narrative of his life and thinking process. The book does not get into technical details, but, it will make sure that people relate to the different events mentioned in the book. It tells the story of a person who is born into the system and grew up to become part of the system, and then learns to question the same system.

I bought the book at midnight on Kindle (I also ordered the physical copies), slept for 3 hours in between and finished it off in the morning. Anyone born in 80s will find so many similarities as an 80s kid. Let it be the Commodore 64 as the first computer we saw or basic as the first-ever programming language to try. The lucky ones also got Internet access and learned to roam around of their own and build their adventure along with the busy telephone lines (which many times made the family members unhappy).

If you are someone from the technology community, I don't think you will find Ed's life was not as much different than yours. It has a different scenario and different key players, but, you will be able to match the progress in life like many other tech workers like ourselves.

Maybe you are reading the book just to learn what happened, or maybe you want to know why. But, I hope this book will help to think about the decisions you make in your life and how that affects the rest of the world. Let it be a group picture posted on Facebook or writing the next new tool for the intelligence community.

Go ahead and read the book, and when you are finished, make sure you pass it across to your friend, or buy them new copies. If you have some free time, you may consider to run a Tor relay or a bridge, a simple step will help many around the world.

On a side note, the book mentions SecureDrop project at the very end, and today is also the release of SecureDrop 1.0.0 (the same day of the book release).

Exciting few weeks in the SecureDrop land

Eric Trump tweet

Last week there was an interesting tweet from Eric Trump, son of US President Donald Trump. Where he points out how Mr. David Fahrenthold, a journalist from Washington Post did some old school journalism and made sure that every Trump organization employee knows about how to securely leak information or talk to a journalist via SecureDrop.

I want to say thank you to him for this excellent advertisement for our work. There were many people over Twitter, cheering him for this tweet.

julian and matt's tweet Parker's tweet Harlo's tweet

If you don’t know what SecureDrop is, it is an open-source whistleblower submission system that media organizations and NGOs can install to securely accept documents from anonymous sources. It was originally created by the late Aaron Swartz and is now managed by Freedom of the Press Foundation. It is mostly written in Python and uses a lot of Ansible. Jennifer Helsby, the lead developer of SecureDrop and I took part in this week’s Python podcast along with our host Tobias. You can listen to learn about many upcoming features and plans.

If you are interested to contribute to the SecureDrop project, come over to our gitter channel and say hello.

defcon

Last month, during Defcon 27, there was a panel about DEF CON to help hackers anonymously submit bugs to the government, interestingly the major suggestion in that panel is to use SecureDrop (hosted by Defcon) so that the researchers can safely submit vulnerabilities to the US government. Watch the full panel discussion to learn more in details.

stylesheet for nmap output

nmap is the most loved network discovery, and security auditing tool out there. It is already 22 years old and has a ton of features. It can generate output in various formats, including one which is useful for grep, and also one XML output.

We also have one XML stylesheet project for the XML output from nmap.

Click on this result to view the output. You can use this to share the result with someone else, where people can view it from a web-browser with better UI.

The following command was used to generate the output. I already downloaded the stylesheet in the local folder.

nmap -sC -sV -oA toots toots.dgplug.org --stylesheet nmap-bootstrap.xsl