In December I spent few days with Rust. I wrote few lines of code and was trying to get in touch with the syntax and feeling of the language. One of the major things in my TODO list was figuring out how to write Python extensions in Rust. Armin Ronacher wrote this excellent post in the Sentry blog back in October, 2016. I decided to learn from the same code base. It is always much easier to make small changes and then see what actually change due the same. This is also my first usage of CFFI module. Before this, I always wrote Python C extensions from scratch. In this post I will assume that we already have a working Rust installation on your system, and then we will go ahead from that.
Creating the initial Rust project
I am already in my new project directory, which is empty.
$ cargo init
Created library project
$ ls
Cargo.toml src
Now, I am going to update the Cargo.toml file with the following content. Feel free to adjust based on your requirements.
[package]
name = "liblearn"
version = "0.1.0"
authors = ["Kushal Das <mail@kushaldas.in>"]

[lib]
name = "liblearn"
crate-type = ["cdylib"]
Using the crate-type attribute we tell the Rust compiler what kind of artifact to generate. We will create a dynamic system library for our example. On my Linux computer it will create a *.so file. You can read more about the crate-types here.
Next we update our src/lib.rs file. Here we are telling that we also have a src/ksum.rs file.
#[cfg(test)]
mod tests {
    #[test]
    fn it_works() {
    }
}

pub mod ksum;
use std::ffi::CStr;
use std::os::raw::{c_uint, c_char};


#[no_mangle]
pub unsafe extern "C" fn sum(a: c_uint, b: c_uint) -> c_uint {
	println!("{}, {}", a, b);
	a + b
}


#[no_mangle]
pub unsafe extern "C" fn onbytes(bytes: *const c_char) {
	let b = CStr::from_ptr(bytes);
	println!("{}", b.to_str().unwrap())
}
We have various types which can help us to handle the data coming from the C
code. We also have two unsafe functions, the first is sum, where we are
accepting two integers, and returning the addition of those values. We are also
printing the integers just for our learning purpose.
We also have a onbytes function, in which we will take a Python bytes input,
and just print it on the STDOUT. Remember this is just an example, so feel free
to make changes and learn more :). The CStr::from_ptr function helps us with
converting raw C string to a safe C string wrapper in Rust. Read the
documentation for the
same to know more.
All of the functions also have no_mangle attribute, so that Rust compiler
does not mangle the names. This helps in using the functions in C code. Marking
the functions extern will help in line of Rust FFI
work. At
this moment you should be able to build the Rust project with cargo build
command.
Writing the Python code
Next we create a build.py file on the top directory, this will help us with CFFI. We will also need our C header file with proper definitions in it, include/liblearn.h
#ifndef LIBLEARN_H_INCLUDED
#define LIBLEARN_H_INCLUDED

unsigned int sum(unsigned int a, unsigned int b);
void onbytes(const char *bytes);
#endif
The build.py
import sys
import subprocess
from cffi import FFI


def _to_source(x):
    if sys.version_info >= (3, 0) and isinstance(x, bytes):
        x = x.decode('utf-8')
    return x


ffi = FFI()
ffi.cdef(_to_source(subprocess.Popen([
'cc', '-E', 'include/liblearn.h'],
stdout=subprocess.PIPE).communicate()[0]))
ffi.set_source('liblearn._sumnative', None)
Feel free to consult the CFFI
documentation to learn things in depth.
If you want to convert Rust Strings to Python and return them, I would suggest
you to have a look at the unpack
function.
The actual Python module source
We have liblearn/init.py file, which holds the actual code for the Python extension module we are writing.
import os
from ._sumnative import ffi as _ffi

_lib = _ffi.dlopen(os.path.join(os.path.dirname(__file__), '_liblearn.so'))

def sum(a, b):
    return _lib.sum(a,b)

def onbytes(word):
    return _lib.onbytes(word)
setup.py file
I am copy pasting the whole setup.py below. Most of it is self explanatory. I
also kept the original comments which explain various points.
import os
import sys
import shutil
import subprocess

try:
    from wheel.bdist_wheel import bdist_wheel
except ImportError:
    bdist_wheel = None

from setuptools import setup, find_packages
from distutils.command.build_py import build_py
from distutils.command.build_ext import build_ext
from setuptools.dist import Distribution


# Build with clang if not otherwise specified.
if os.environ.get('LIBLEARN_MANYLINUX') == '1':
    os.environ.setdefault('CC', 'gcc')
    os.environ.setdefault('CXX', 'g++')
else:
    os.environ.setdefault('CC', 'clang')
    os.environ.setdefault('CXX', 'clang++')


PACKAGE = 'liblearn'
EXT_EXT = sys.platform == 'darwin' and '.dylib' or '.so'


def build_liblearn(base_path):
    lib_path = os.path.join(base_path, '_liblearn.so')
    here = os.path.abspath(os.path.dirname(__file__))
    cmdline = ['cargo', 'build', '--release']
    if not sys.stdout.isatty():
        cmdline.append('--color=always')
    rv = subprocess.Popen(cmdline, cwd=here).wait()
    if rv != 0:
        sys.exit(rv)
    src_path = os.path.join(here, 'target', 'release',
                            'libliblearn' + EXT_EXT)
    if os.path.isfile(src_path):
        shutil.copy2(src_path, lib_path)


class CustomBuildPy(build_py):
    def run(self):
        build_py.run(self)
        build_liblearn(os.path.join(self.build_lib, *PACKAGE.split('.')))


class CustomBuildExt(build_ext):
    def run(self):
        build_ext.run(self)
        if self.inplace:
            build_py = self.get_finalized_command('build_py')
            build_liblearn(build_py.get_package_dir(PACKAGE))


class BinaryDistribution(Distribution):
    """This is necessary because otherwise the wheel does not know that
    we have non pure information.
    """
    def has_ext_modules(foo):
        return True


cmdclass = {
    'build_ext': CustomBuildExt,
    'build_py': CustomBuildPy,
}


# The wheel generated carries a python unicode ABI tag.  We want to remove
# this since our wheel is actually universal as far as this goes since we
# never actually link against libpython.  Since there does not appear to
# be an API to do that, we just patch the internal function that wheel uses.
if bdist_wheel is not None:
    class CustomBdistWheel(bdist_wheel):
        def get_tag(self):
            rv = bdist_wheel.get_tag(self)
            return ('py2.py3', 'none') + rv[2:]
    cmdclass['bdist_wheel'] = CustomBdistWheel


setup(
    name='liblearn',
    version='0.1.0',
    url='http://github.com/kushaldas/liblearn',
    description='Module to learn writing Python extensions in rust',
    license='BSD',
    author='Kushal Das',
    author_email='kushaldas@gmail.com',
    packages=find_packages(),
    cffi_modules=['build.py:ffi'],
    cmdclass=cmdclass,
    include_package_data=True,
    zip_safe=False,
    platforms='any',
    install_requires=[
        'cffi>=1.6.0',
    ],
    setup_requires=[
        'cffi>=1.6.0'
    ],
    classifiers=[
        'Intended Audience :: Developers',
        'License :: OSI Approved :: BSD License',
        'Operating System :: OS Independent',
        'Programming Language :: Python',
        'Topic :: Software Development :: Libraries :: Python Modules'
    ],
    ext_modules=[],
    distclass=BinaryDistribution
)
Building the Python extension
$ python3 setup.py build
running build
running build_py
creating build/lib
creating build/lib/liblearn
copying liblearn/__init__.py -> build/lib/liblearn
Finished release [optimized] target(s) in 0.0 secs
generating cffi module 'build/lib/liblearn/_sumnative.py'
running build_ext
Now we have a build directory. We go inside of the build/lib directory, and try out the following.
$ python3
Python 3.5.2 (default, Sep 14 2016, 11:28:32)
[GCC 6.2.1 20160901 (Red Hat 6.2.1-1)] on linux
Type "help", "copyright", "credits" or "license" for more information.
>>> import liblearn
>>> liblearn.sum(12,30)
12, 30
42
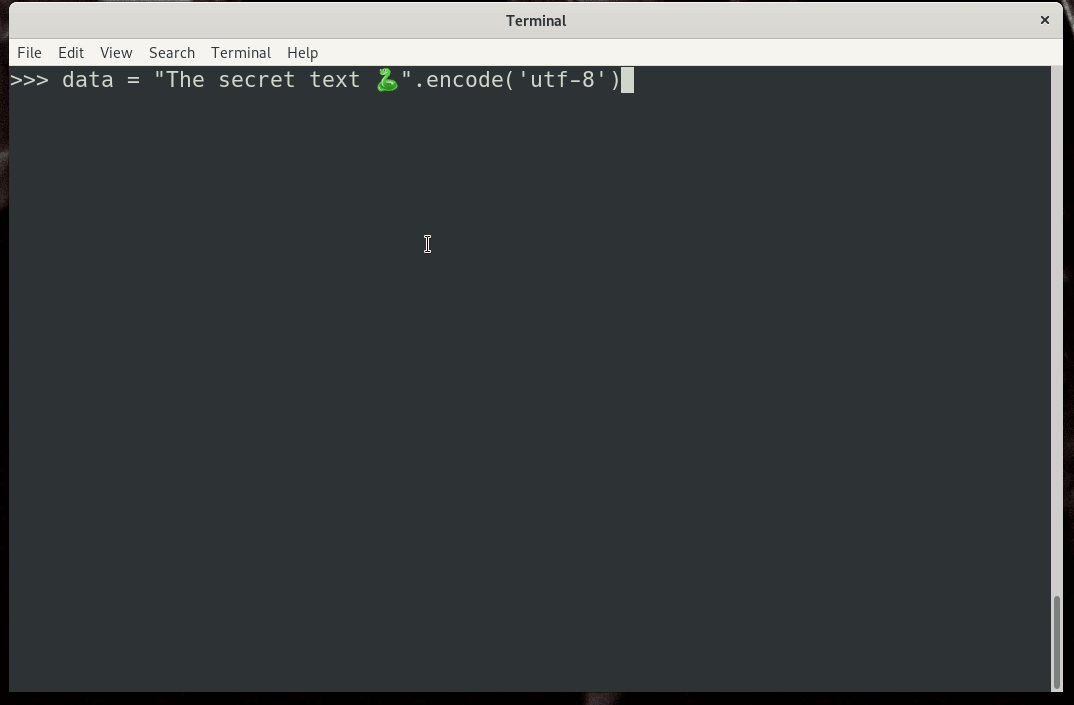
>>> b = "Kushal in bengali কুূশল".encode("utf-8")
>>> liblearn.onbytes(b)
Kushal in bengali কুূশল
This post is only about how to start writing a new extension. My knowledge with
Rust is very minimal. In future I will write more as I learn. You can find all
the source files in github repo.
Thank you Siddhesh, and
Armin for reviewing this post.