Kushal Das

FOSS and life. Kushal Das talks here.

kushal76uaid62oup5774umh654scnu5dwzh4u2534qxhcbi4wbab3ad.onion

SecureDrop development sprint in PyCon 2018

SecureDrop will take part in PyCon US development sprints (from 14th to 17th May). This will be first time for the SecureDrop project to present in the sprints.

If you never heard of the project before, SecureDrop is an open source whistleblower submission system that media organizations can install to securely accept documents from anonymous sources. Currently, dozens of news organizations including The Washington Post, The New York Times, The Associated Press, USA Today, and more, use SecureDrop to preserve the anonymous tipline in an era of mass surveillance. SecureDrop is installed on-premises in the news organizations, and journalists and source both use a web application to interact with the system. It was originally coded by the late Aaron Swartz and is now managed by Freedom of the Press Foundation.

How to prepare for the sprints

The source code of the project is hosted on Github.

The web applications, administration CLI tool, and a small Qt-based GUI are all written in Python. We use Ansible heavily for the orchestration. You can setup the development environment using Docker. This section of the documentation is a good place to start.

A good idea would be to create the initial Docker images for the development before the sprints. We have marked many issues for PyCon Sprints and also there are many documentation issues.

Another good place to look is the tests directorty. We use pytest for most of our test cases. We also have Selenium based functional tests.

Where to find the team?

Gitter is our primary communication platform. During the sprint days, we will in the same room of the CPython development (as I will be working on both).

So, if you are in PyCon sprints, please visit us to know more and maybe, start contributing to the project while in sprints.

Latest attempt to censor Internet and curb press freedom in India

A branch of the Indian government, the Ministry of Information and Broadcasting, is trying once again to censor Internet and Freedom of Speech. This time, it ordered to form a committee of 10 members who will frame regulations for online media/ news portals and online content.

This order includes these following Terms of Reference for the committee.

  • To delineate the sphere of online information dissemination which needs to be brought under regulation, on the lines applicable to print and electronic media.
  • To recommend appropriate policy formulation for online media / news portals and online content platforms including digital broadcasting which encompasses entertainment / infotainment and news/media aggregators keeping in mind the extant FDI norms, Programme & Advertising Code for TV Channels, norms circulated by PCI, code of ethics framed by NBA and norms prescribed by IBF; and
  • To analyze the international scenario on such existing regulatory mechanisms with a view to incorporate the best practices.

What are the immediate problems posed by this order?

If one reads carefully, one can see how vague are the terms, and specifically how they added the term online content into it.

online content means everything we can see/read/listen do over cyberspace. In the last few years, a number of new news organizations came up in India, whose fearless reporting have caused a lot of problems for the government and their friends. Even though they managed to censor publishing (sometimes self censored) news in the mainstream Indian media, but all of these new online media houses and individual bloggers and security researchers and activists kept informing the mass about the wrongdoings of the people in power.

With this latest attempt to restrict free speech over the internet, the government is trying to increase its reach even more. Broad terms like online content platforms or online media or news/media aggregators will include every person and websites under its watch. One of the impacts of mass indiscriminate surveillance like this is that people are shamed into reading and thinking only what is in line with the government, or popular thought .

How do you determine if some blog post or update in a social media platform is news or not? For me, most of things I read on the internet are news to me. I learn, I communicate my thoughts over these various platforms on cyberspace. To all those computer people reading this blog post, think about the moment when you will try to search about “how to do X in Y programming language?” on Internet, but, you can not see the result because that is blocked by this censorship.

India is also known for random blockades of different sites over the years. The Government also ordered to kill Internet for entire states for many days. For the majority of internet blockages, we, the citizens of India were neither informed the reasons nor given a chance to question the legality of those bans. India has been marked as acountry under surveillance by Reporters Without Borders back in 2012.

Also remember that this is the same Government, which was trying to fight at its best in the Supreme Court of India last year, to curb the privacy of every Indian citizen. They said that Indian citizens do not have any right to privacy. Thankfully the bench declared the following:

The right to privacy is protected as an intrinsic part of the right to life and personal liberty under Article 21 and as a part of the freedoms guaranteed by Part III of the Constitution.

Privacy is a fundamental right of every Indian citizen.

However, that fundamental right is still under attack in the name of another draconian law The Aadhaar act. A case is currently going on in the Supreme Court of India to determine the constitutional validity of Aadhaar. In the recent past, when journalists reported how the Aadhaar data can be breached, instead of fixing the problems, the government is criminally investigating the journalists.

A Declaration of the Independence of Cyberspace

Different governments across the world kept trying (and they will keep trying again and again) to curb free speech and press freedom. They are trying to draw borders and boundaries inside of cyberspace, and restrict the true nature of what is it referring to here?.

In 1996, late John Perry Barlow wrote A Declaration of the Independence of Cyberspace, and I think that fits in naturally in the current discussion.

Governments of the Industrial World, you weary giants of flesh and steel, I come from Cyberspace, the new home of Mind. On behalf of the future, I ask you of the past to leave us alone. You are not welcome among us. You have no sovereignty where we gather. -- John Perry Barlow

How can you help to fight back censorship?

Each and every one of us are affected by this, and we all can help to fight back and resist censorship. The simplest thing you can do is start talking about the problems. Discuss them with your neighbor, talk about it while commuting to the office. Explain the problem to your children or to your parents. Write about it, write blog posts, share across all the different social media platforms. Many of your friends (from other fields than computer technology) may be using Internet daily, but might not know about the destruction these laws can cause and the censorship imposed on the citizens of India.

Educate people, learn from others about the problems arising. If you are giving a talk about a FOSS technology, also talk about how a free and open Internet is helping all of us to stay connected. If that freedom goes away, we will lose everything. At any programming workshop you attend, share these knowledge with other participants.

In many cases, using tools to bypass censorship altogether is also very helpful (avoiding any direct confrontation). The Tor Project is a free software and open network which helps to keep freedom and privacy of the users. By circumventing surveillance and censorship, one can use it more for daily Internet browsing. The increase in Tor traffic will help all of the Tor network users together. This makes any attempt of tracking individuals even more expensive for any nation state actors. So, download the Tor Browser today and start using it for everything.

In this era of Public private partnership from hell, Cory Doctorow beautifully explained how internet is the nervous system of 21st century, and how we all can join together to save the freedom of internet. Listen to him, do your part.

Header image copyright: Peter Massas (CC-BY-SA)

dgplug summer training 2018

dgplug summer training 2018 will start at 13:30 UTC, 17th June. This will be the 11th edition. Like every year, we have modified the training based on the feedback and, of course, there will be more experiments to try and make it better.

What happened differently in 2017?

We did not manage to get all the guest sessions mentioned, but, we moved the guest sessions at the later stage of the training. This ensured that only the really interested people were attending, so there was a better chance of having an actual conversation during the sessions. As we received mostly positive feedback on that, we are going to do the same this year.

We had much more discussions among the participants in general than in previous years. Anwesha and I wrote an article about the history of the Free Software and we had a lot of discussion about the political motivation and freedom in general during the training.

We also had an amazing detailed session on Aadhaar and how it is affecting (read destroying) India, by Kiran Jonnalagadda.

Beside, we started writing a new book to introduce the participants to Linux command line. We tried to cover the basics of Linux command line and the tools we use on a day to day basis.

Shakthi Kannan started Operation Blue Moon where he is helping individuals to get things done by managing their own sprints. All information on this project can be found in the aforementioned Github link.

What are the new plans in 2018?

We are living in an era of surveillance and the people in power are trying to hide facts from the people who are being governed. There are a number of Free Software projects which are helping the citizens of cyberspace to resist and bypass the blockades. This year we will focus on these applications and how one can start contributing to the same projects in upstream. A special focus will be given to The Tor project, both from users' and developers' point of views.

In 2017, a lot of people asked help to start learning Go. So, this year we will do a basic introduction to Go in the training. Though, Python will remain the primary choice for teaching.

How to join the training?

First, join our mailing list, and then join the IRC channel #dgplug on Freenode.

Using ZNC on Tor Network for Freenode and OFTC

The Tor network provides a safer way to access the Internet, without local ISP and government recording your every step on the Internet. We can use the same network to chat over IRC. For many FOSS contributors and activists across the world, IRC is a very common medium for a chat. In this blog post, we will learn about how to use ZNC with Tor for IRC.

Introducing ZNC

ZNC is an IRC bouncer program, which will allow your IRC client to stay detached from the server, but still receive and log the messages, so that when you connect a client later on, you will receive all the messages.

In this tutorial, we will use znc-1.6.6 (packaged in Fedora and EPEL). I am also going to guess that you already figured out the basic usage of ZNC.

Installing the required tools

$ sudo dnf install znc tor torsocks

Tor provides a SOCKS proxy at port 9050 (default value), but, ZNC cannot use a SOCKS proxy easily. We will use torify command from torsocks package to use the SOCKS proxy.

ZNC service over Tor network

As a first step, we will make sure that we have the listener at the ZNC service listening as an Onion service. First, we will edit our /etc/tor/torrc file and add the following.

HiddenServiceDir /var/lib/tor/hidden_service/
HiddenSeriveVersion 2
HiddenServicePort 8001 127.0.0.1:8001
HiddenServiceAuthorizeClient stealth hidden_service

After this, when we start the tor service, we will be able to find the .onion address and the HidServAuth value from the /var/lib/tor/hidden_service/hostname file.

# cat /var/lib/tor/hidden_service/hostname
34aaaiwlmrandom8.onion SomeO/+yOOPjvaluetext # client: hidden_service

Now, I will be using a user account ftor in the server to run ZNC. The configuration files for ZNC is at /home/ftor/.znc directory.

I have the following values in the ~/.znc/configs/znc.conf file for the listener.

<Listener listener0>
        AllowIRC = true
        AllowWeb = true
        Host = 127.0.0.1
        IPv4 = true
        IPv6 = false
        Port = 8001
        SSL = false
        URIPrefix = /
</Listener>

Here, I am making sure that the listener only listens to the localhost. We already mapped the port 8001 of localhost to our Onion service. This way the web frontend of ZNC is only available over Tor.

Now you can start service, I will keep it running in the foreground along with debugging messages to make sure that things are working.

$ torify znc --debug

Connecting from web client

I am using xchat as the IRC client. I also have Tor installed on my local computer and added the following line the /etc/tor/torrc file so that my system can find and connect to the Onion service.

HidServAuth 34aaaiwlmrandom8.onion SomeO/+yOOPjvaluetext

If you just want to connect to the ZNC web frontend using the Tor Browser, then you will have to add the same line the Browser/TorBrowser/Data/Tor/torrc inside of the Tor Browser.

Connecting to OFTC network

Now we will connect to the OFTC IRC network. The Tor Project itself has all the IRC channels on this network. Make sure that you have a registered IRC nickname on this network.

Add the following configuration in the ZNC configuration file.

        <Network oftc>
                Encoding = ^UTF-8
                FloodBurst = 4
                FloodRate = 1.00
                IRCConnectEnabled = true
                JoinDelay = 0
                Nick = yournickname
                Server = irc4.oftc.net +6697

                <Chan #tor>
                        Buffer = 500
                </Chan>
        </Network>

Now let us start xchat with torify so that it can find our onion service.

$ torify xchat

Next, we will add our new ZNC service address as a new server, remember to have the password as zncusername/networkname:password. In the above case, the network name is oftc.
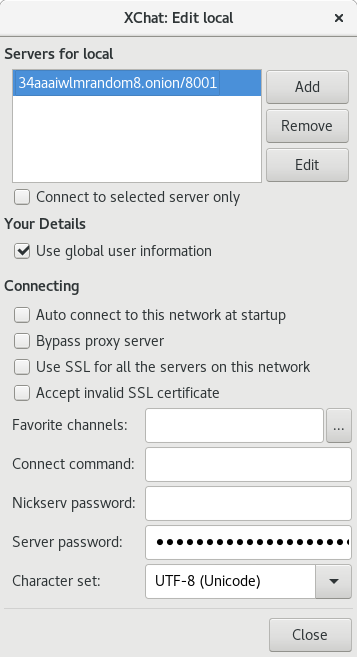
After adding the new server as mentioned above, you should be able to connect to it using xchat.

Connecting to Freenode network

Freenode provides an Onion service to it’s IRC network. This means your connection from the client (ZNC in this case) to the server is end-to-end encrypted and staying inside of the Onion network itself. But, using this will require some extra work.

Creating SSL certificate for Freenode

On the server, we will have to create an SSL certificate.

$ openssl req -x509 -sha256 -nodes -days 1200 -newkey rsa:4096 -out user.pem -keyout user.pem

Remember to keep the name of the output file as user.pem, I had to spend a few hours debugging thanks to a wrong filename.

We will have to find the fingerprint of the certificate by using the following command.

$ openssl x509 -sha1 -noout -fingerprint -in user.pem | sed -e 's/^.*=//;s/://g;y/ABCDEF/abcdef/'
eeeee345b4d9d123456789fa365f4b4b684b6666

Now connect to Freenode normally using your regular client (xchat in my case), and add this fingerprint to your nickname.

/msg NickServ CERT ADD eeeee345b4d9d123456789fa365f4b4b684b6666

You should be able to see the details using whois.

/whois yournick

Enable SASL and Cert module in ZNC

Next, we will move the certificate file to the right location so that ZNC can use it.

$ cp user.pem ~/.znc/users/<yourzncuser>/networks/freenode/moddata/cert/user.pem

Remember to put the right ZNC username in the above command.

Add the following configuration for freenode network in the ZNC configuration file and restart ZNC.

        <Network freenode>
                FloodBurst = 4
                FloodRate = 1.00
                IRCConnectEnabled = true
                JoinDelay = 0
                LoadModule = simple_away
                LoadModule = cert
                LoadModule = sasl
                Nick = yourusername
                Server = freenodeok2gncmy.onion +6697
                TrustedServerFingerprint = 57:2d:6f:dc:90:27:0e:17:b6:89:46:4f:6a:a4:37:6e:e9:20:e1:cd:ee:f5:42:cd:3c:5a:a8:6d:17:16:f8:71


                <Chan #znc>
                </Chan>
        </Network>

Remember to update the nickname. At the end of the blog post, I will explain more about the server fingerprint.

Next, go to the *status tab in your client, and give the following commands to load cert and sasl modules.

/query *status
loadmod cert
loadmod sasl
/msg *sasl Mechanism EXTERNAL
/query *status
Jump

The Jump command will try to reconnect to the Freenode IRC server. You should be able to see the debug output in the server for any error.

The story of the server fingerprint for Freenode

Because Freenode’s SSL certificate is not an EV certificate for the .onion address, ZNC will fail to connect normally. We will have to add the server fingerprint to the configuration so that we can connect. But, this step was failing for a long time, and the excellent folks in #znc helped me to debug the issue step by step. It seems the fingerprint given on the Freenode site is an old one, and we need the current fingerprint. We also have an issue filed on a related note.

Finally, you may want to run the ZNC as a background process on the server.

$ torify znc

Tools versions

  • ZNC 1.7.3
  • tor 0.4.0.5
  • torsocks 2.2.0

If you have queries, feel free to join #znc on Freenode and #tor on OFTC network and ask for help.

Updated post

I have updated the post to use torify command. This will make running znc much simpler than the tool mentioned previously.

Using Python to access Onion network over SOCKS proxy

Tor provides a SOCKS proxy so that you can have any application using the same to connect the Onion network. The default port is 9050. The Tor Browser also provides the same service on port 9150. In this post, we will see how can we use the same SOCKS proxy to access the Internet.

Using Python requests module

I used pipenv to install the dependencies.

$ pipenv install
$ pipenv shell
$ pipenv install requests[socks]
Installing requests[socks]…
Collecting requests[socks]
  Using cached requests-2.18.4-py2.py3-none-any.whl
Collecting chardet<3.1.0,>=3.0.2 (from requests[socks])
  Using cached chardet-3.0.4-py2.py3-none-any.whl
Collecting urllib3<1.23,>=1.21.1 (from requests[socks])
  Using cached urllib3-1.22-py2.py3-none-any.whl
Collecting idna<2.7,>=2.5 (from requests[socks])
  Using cached idna-2.6-py2.py3-none-any.whl
Collecting certifi>=2017.4.17 (from requests[socks])
  Using cached certifi-2018.1.18-py2.py3-none-any.whl
Collecting PySocks!=1.5.7,>=1.5.6; extra == "socks" (from requests[socks])
  Using cached PySocks-1.6.8.tar.gz
Building wheels for collected packages: PySocks
  Running setup.py bdist_wheel for PySocks: started
  Running setup.py bdist_wheel for PySocks: finished with status 'done'
  Stored in directory: /home/kdas/.cache/pip/wheels/77/f0/00/52f304b7dddcca8fca05ad1226382134ad50ba6c1662d7539e
Successfully built PySocks
Installing collected packages: chardet, urllib3, idna, certifi, PySocks, requests
Successfully installed PySocks-1.6.8 certifi-2018.1.18 chardet-3.0.4 idna-2.6 requests-2.18.4 urllib3-1.22

Adding requests[socks] to Pipfile's [packages]…
Pipfile.lock (711973) out of date, updating to (dcbf91)…
Locking [dev-packages] dependencies…
Locking [packages] dependencies…
Updated Pipfile.lock (dcbf91)!
Installing dependencies from Pipfile.lock (dcbf91)…
  🐍   ▉▉▉▉▉▉▉▉▉▉▉▉▉▉▉▉▉▉▉▉▉▉▉▉▉▉▉▉▉▉▉▉ 6/6 — 00:00:01

After this, writing the actual code is very simple, we will be doing a GET request to https://httpbin.org to find out our IP address.

import requests

def main():
    proxies = {
            'http': 'socks5h://127.0.0.1:9050',
            'https': 'socks5h://127.0.0.1:9050'
    }
    r = requests.get('https://httpbin.org/get', proxies=proxies)
    print(r.text)


if __name__ == '__main__':
    main()

If you see closely, you will find that I am using socks5h as the protocol, instead of socks5. The request documentation mentions that using socks5h will make sure that DNS resolution happens over the proxy instead of on the client side.

The output of the code looks like below:

$ python usesocks.py 
{
  "args": {}, 
  "headers": {
    "Accept": "*/*", 
    "Accept-Encoding": "gzip, deflate", 
    "Connection": "close", 
    "Host": "httpbin.org", 
    "User-Agent": "python-requests/2.18.4"
  }, 
  "origin": "137.74.169.241", 
  "url": "https://httpbin.org/get"
}

$ python usesocks.py 
{
  "args": {}, 
  "headers": {
    "Accept": "*/*", 
    "Accept-Encoding": "gzip, deflate", 
    "Connection": "close", 
    "Host": "httpbin.org", 
    "User-Agent": "python-requests/2.18.4"
  }, 
  "origin": "77.247.181.162", 
  "url": "https://httpbin.org/get"
}

Now, you can use the same code to access any standard webservice or access any Onion address.

Running Tor relay inside a docker container

The latest Tor project release is 0.3.2.10. But, that is not available on all the different versions of different Linux distributions. For example, CentOS 7 has tor-0.2.9.14-1.el7, and only Fedora 28 has the latest Tor.

This is where a container can help. The official builds from Tor Project are for Debian, means we can build and use a Debian based container.

The Dockerfile

FROM debian:stretch
LABEL MAINTAINER Kushal Das <mail@kushaldas.in>

RUN apt-get update
RUN apt install vim gpg -y


RUN echo "deb http://deb.torproject.org/torproject.org stretch main\ndeb-src http://deb.torproject.org/torproject.org stretch main" > /etc/apt/sources.list.d/tor.list

# Let us get the key for Tor
RUN gpg --keyserver keys.gnupg.net --recv A3C4F0F979CAA22CDBA8F512EE8CBC9E886DDD89
RUN gpg --export A3C4F0F979CAA22CDBA8F512EE8CBC9E886DDD89 > tor.gpg
RUN apt-key add tor.gpg

# Finally install Tor
RUN apt update
RUN apt install tor deb.torproject.org-keyring -y
ADD ./torrc /etc/tor/torrc

# Add the tor user
RUN groupadd -g 1000 tor && useradd -m -d /home/tor -g 1000 tor


# Now drop to the actual user
USER tor
RUN mkdir -p /home/tor/.tor/keys

VOLUME ["/home/tor/.tor"]

EXPOSE 9001 9051

ENTRYPOINT ["tor"]

I have a configuration file named torrc, you can copy the sample configuration and edit as required. I have the following entries there.

SOCKSPort 0

ORPort 9001

Nickname NICKNAME_FOR_THE_RELAY

ContactInfo  <YOUR_EMAIL_ADDRESS>

ExitRelay 0

Next, we will create a directory in the host system to keep the keys, and other files. We want to restart the container and still have the same details, mounting a directory from the host system into the container will help us in that.

mkdir /mnt/tor
chcon -R -t svirt_sandbox_file_t /mnt/tor

Please also make sure that you have correct ownership of that directory.

Running the container

docker run -d -v /etc/localtime:/etc/localtime -v /mnt/tor:/home/tor/.tor --restart always -p 9001:9001 -name relay kushaldas/tor:0.3.2.10

After starting the container, you can check the logs for any error. If you can see the following message in the log, then it means that you configured the relay properly.

# docker logs -f relay

Self-testing indicates your ORPort is reachable from the outside.

The official relay guide

Tor project recently published an updated relay guide for anyone new to running a relay. Please go through that document first. If you need help, there is a mailing list of Tor relay operators, and #tor channel on OFTC IRC server is also very welcoming.

Tor Mumbai meetup

On 20th January, we had a Tor meetup in Mumbai. Hasgeek organized the event, with OML providing the meeting space. I noticed the announcement over Twitter, and made sure that I registered for the event. Two contributors from the core team, Sukhbir Singh and Antonela Debiasi, were present at the event.

Getting there

Bhavin joined me on the trip. We started early in the morning to make sure that we skip all the traffic, and reach Mumbai with enough time on hand. The venue was surrounded by many excellent food places, which was really helpful.

The meetup

There were around 15 participants. Folks came from different cities. We started a small round of introductions, and both of the core contributors explained how they contribute to different parts of the project. Mentioning names (of the participants) were voluntary, and it was a no photograph event. Harish Pillai also joined us in the meetup.

Antonela described the work, the Tor UX team is doing. Only 2-3 days ago, I’d heard about their work in a discussion with Simply Secure. Antonela explained how they are doing user testing, and later, many participated in the same. We should also do similar kind of user testing in every conference/meetup.

We also tested the Tor network speed. Feel free to run the same test in your system using this link.

Next, Sukhbir gave a detailed talk on the Tor project. This was filled with many interesting facts and how-to(s). Discussions ranged from the Tor Browser itself to other parts of the Tor ecosystem. He also mentioned lot of dos/don’ts while using Tor. While talking about Tor Exit relays in India, Sukhbir mentioned that he never met any of the Exit relay operators in India before.

In the later half of the meetup, I demoed the SecureDrop project. We discussed about how the Freedom of the Press Foundation is helping journalists and whistleblowers worldwide. How to leak securely? was the next topic of discussion. Sukhbir had already mentioned most of the points. I made sure to repeat and refer back to those. I have a separate blog post on the topic. The discussion then moved to the Indian press and why we don’t have any SecureDrop instances running in India. People talked about their concerns and the current situation related to privacy in India.

In the end, we all moved to the microbrewery next door, and discussions continued.

While coming back, we were stuck in Mumbai traffic for a few hours, and reached home late.

Antonela has also shared her views about the meetup in the Tor Blog.

The Onion service to access my blog

I am happy to announce the availability of my website as an Onion hidden service at http://kushal76uaid62oup5774umh654scnu5dwzh4u2534qxhcbi4wbab3ad.onion/. This is a complete different instance than the regular https://kushaldas.in.

The .onion hidden service addresses are generated based on the hash of the public key. It means the Tor browser will take you to the right service which has access to the private key. The Onion services are always inside the Tor network, means you are not exiting the circuit/network. It is also end-to-end encrypted. These features together help to have confidentiality and integrity. If you want to read more about how the Tor hidden services work, read this document.

Things different on this site

  • This website has all the resources local to the server. Saptak helped to identify the external resources. Anwesha and I both wrote two different versions of the Python scripts to make things available locally. It was a fun programming problem.
  • No user-tracking JavaScript in the site.
  • No Disqus comments either. As it would require to load external Javascript, which in turn can be used to identify users.

Visiting the site using Tor Browser

Just in case you never encountered any .onion address before, you can visit these addresses using the Tor Browser. Download the latest version of the site. Remember to download Tor Browser only from the official website. Because my service is using version 3 of hidden service, you will need at least Tor Browser 7.5 to visit it.

Here are a few quick tips for using Tor Browser:

  • Do not install any plugin on the browser. They can be used to find your IP address.
  • Do not change the default browser window size. Browser window size can be used as metatdata to identify the users.
  • Use https versions of the websites you want to visit. The Tor Browser uses HTTPS Everywhere plugin to help you with that. As I mentioned earlier, the onion hidden services are already end-to-end encrypted, and you don't get out of the Tor network, you can use them without the SSL certificates.

You can find more tips on the Tor project website.

Btw, DuckDuckGo also provides the search engine over a hidden service which you can use all the time.

How to configure Tor onion service on Fedora

You can set up a Tor onion service in a VM on your home desktop, or on a Raspberry Pi attached to your home network. You can serve any website, or ssh service using the same. For example, in India most of the time if an engineering student has to demo a web application, she has to demo on her laptop or on a college lab machine. If you set up your web application project as an onion service, you can actually make it available to all of your friends. You don’t need an external IP or special kind of Internet connection or pay for a domain name. Of course, it may be slower than all the fancy website you have, but you don’t have to spend any extra money for this.

In this post, I am going to talk about how can you set up your own service using a Fedora 26 VM. The similar steps can be taken in Raspberry Pi or any other Linux distribution.

Install the required packages

I will be using Nginx as my web server. The first step is to get the required packages installed.

$ sudo dnf install nginx tor
Fedora 26 - x86_64 - Updates                     10 MB/s |  20 MB     00:01
google-chrome                                    17 kB/s | 3.7 kB     00:00
Qubes OS Repository for VM (updates)             98 kB/s |  48 kB     00:00
Last metadata expiration check: 0:00:00 ago on Wed Jan 17 08:30:23 2018.
Dependencies resolved.
================================================================================
 Package                Arch         Version                Repository     Size
================================================================================
Installing:
 nginx                  x86_64       1:1.12.1-1.fc26        updates       535 k
 tor                    x86_64       0.3.1.9-1.fc26         updates       2.6 M
Installing dependencies:
 gperftools-libs        x86_64       2.6.1-5.fc26           updates       281 k
 nginx-filesystem       noarch       1:1.12.1-1.fc26        updates        20 k
 nginx-mimetypes        noarch       2.1.48-1.fc26          fedora         26 k
 torsocks               x86_64       2.1.0-4.fc26           fedora         64 k

Transaction Summary
================================================================================
Install  6 Packages

Total download size: 3.6 M
Installed size: 15 M
Is this ok [y/N]:

Configuring Nginx

After installing the packages, the next step is to setup the web server. For a quick example, we will just show the default Nginx index page over this web service. Please read about Nginx to know more about how to configure Nginx with your web application.

Here we have the web server running on port 80 by default.

Configuring Tor

Next, we will set up the Tor onion service. The configuration file is located at /etc/tor/torrc. We will add the following two lines.

HiddenServiceDir /var/lib/tor/hidden_service/
HiddenServicePort 80 127.0.0.1:80

We are redirecting port 80 in the onion service to the port 80 in the same system.

Starting the services

Remember to open up port 80 in the firewall before starting the services. I am going to keep it an exercise for the reader to find out how :)

We will start nginx and tor service as the next step, you can also watch the system logs to find out status of Tor.

$ sudo systemctl start nginx
$ sudo systemctl start tor
$ sudo journalctl -f -u tor
-- Logs begin at Thu 2017-12-07 07:13:58 IST. --
Jan 17 08:33:43 tortest Tor[2734]: Bootstrapped 0%: Starting
Jan 17 08:33:43 tortest Tor[2734]: Signaled readiness to systemd
Jan 17 08:33:43 tortest systemd[1]: Started Anonymizing overlay network for TCP.
Jan 17 08:33:43 tortest Tor[2734]: Starting with guard context "default"
Jan 17 08:33:43 tortest Tor[2734]: Opening Control listener on /run/tor/control
Jan 17 08:33:43 tortest Tor[2734]: Bootstrapped 5%: Connecting to directory server
Jan 17 08:33:44 tortest Tor[2734]: Bootstrapped 10%: Finishing handshake with directory server
Jan 17 08:33:44 tortest Tor[2734]: Bootstrapped 15%: Establishing an encrypted directory connection
Jan 17 08:33:45 tortest Tor[2734]: Bootstrapped 20%: Asking for networkstatus consensus
Jan 17 08:33:45 tortest Tor[2734]: Bootstrapped 25%: Loading networkstatus consensus
Jan 17 08:33:55 tortest Tor[2734]: I learned some more directory information, but not enough to build a circuit: We have no usable consensus.
Jan 17 08:33:55 tortest Tor[2734]: Bootstrapped 40%: Loading authority key certs
Jan 17 08:33:55 tortest Tor[2734]: Bootstrapped 45%: Asking for relay descriptors
Jan 17 08:33:55 tortest Tor[2734]: I learned some more directory information, but not enough to build a circuit: We need more microdescriptors: we have 0/6009, and can only build 0% of likely paths. (We have 0% of guards bw, 0% of midpoint bw, and 0% of exit bw = 0% of path bw.)
Jan 17 08:33:56 tortest Tor[2734]: Bootstrapped 50%: Loading relay descriptors
Jan 17 08:33:57 tortest Tor[2734]: Bootstrapped 56%: Loading relay descriptors
Jan 17 08:33:59 tortest Tor[2734]: Bootstrapped 65%: Loading relay descriptors
Jan 17 08:34:06 tortest Tor[2734]: Bootstrapped 72%: Loading relay descriptors
Jan 17 08:34:06 tortest Tor[2734]: Bootstrapped 80%: Connecting to the Tor network
Jan 17 08:34:07 tortest Tor[2734]: Bootstrapped 85%: Finishing handshake with first hop
Jan 17 08:34:07 tortest Tor[2734]: Bootstrapped 90%: Establishing a Tor circuit
Jan 17 08:34:08 tortest Tor[2734]: Tor has successfully opened a circuit. Looks like client functionality is working.
Jan 17 08:34:08 tortest Tor[2734]: Bootstrapped 100%: Done

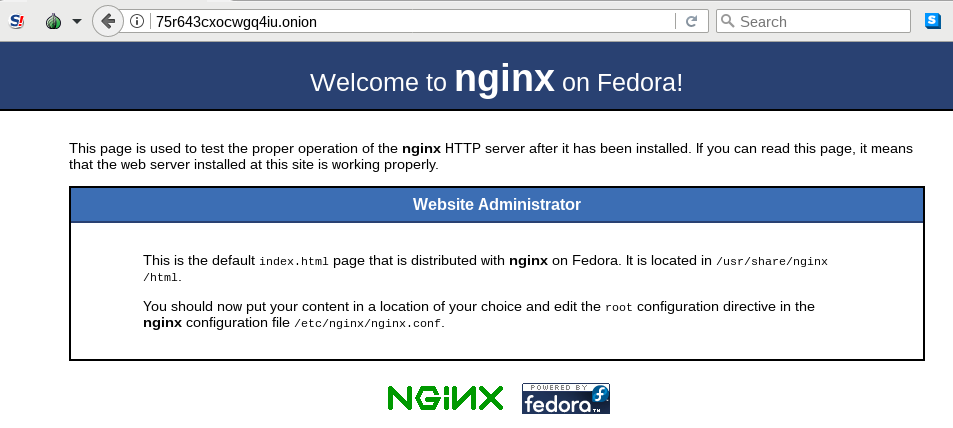
There will be a private key and the hostname file for the onion service in the /var/lib/tor/hidden_service/ directory. Open up Tor browser, and visit the onion address. You should be able to see a page like below screenshot.

Remember to backup the private key file if you want to keep using the same onion address for a longer time.

What all things can we do with this onion service?

That actually depends on your imagination. Feel free to research about what all different services can be provided over Tor. You can start with writing a small Python Flask web application, and create an onion service for the same. Share the address with your friends.

Ask your friends to use Tor browser for daily web browsing. The more Tor traffic we can generate, the more difficult it will become for the nation-state actors to try to monitor traffics, that in turn will help the whole community.

WARNING on security and anonymous service

Remember that this tutorial is only for quick demo purpose. This will not make your web server details or IP or operating system details hidden. You will have to make sure of following proper operational security practices along with system administration skills. Riseup has a page describing best practices. But, please make sure that you do enough study and research before you start providing long-term services over the Tor.

Also please remember that Tor is developed and run by people all over the world and the project needs donation. Every little bit of help counts.

Share files securely using OnionShare

Sharing files securely is always a open discussion topic. Somehow the relationship between security/privacy and usability stand in the opposite sides. But, OnionShare managed to create a bridge between them. It is a tool written by Micah Lee which helps to share files of any size securely and anonymously using Tor.

In the rest of the post I will talk about how you can this tool in your daily life.

How to install OnionShare?

OnionShare is a Python application and already packaged for most of the Linux distributions. If you are using Windows or Mac OS X, then visit the homepage of the application, and you can find the download links there.

On Fedora, you can just install it using dnf command.

sudo dnf install onionshare -y

For Ubuntu, use the ppa repository from Micah.

sudo add-apt-repository ppa:micahflee/ppa
sudo apt-get update
sudo apt-get install onionshare

How to use the tool?

When you start the tool, it will first try to connect to the Tor network. After a successful connection, it will have a window open where you can select a number of files, and then click on Start sharing button. The tool will take some time to create a random onion URL, which you can then pass to the person who is going to download the files using the Tor Browser.

You can mark any download to stop after the first download (using the settings menu). Because the tool is using Tor, it can punch through standard NAT. Means you can share files from directly your laptop or home desktop. One can still access the files using the Tor Browser.

Because of the nature of Tor, the whole connection is end to end encrypted. This also makes the sharer and downloader anonymous, but you have to make sure that you are sharing the download URL in a secure way (for example, you can share it using Signal). OnionShare also has a rate-limit so that an attacker can not do many attempts to guess the full download URL.