Kushal Das

FOSS and life. Kushal Das talks here.

kushal76uaid62oup5774umh654scnu5dwzh4u2534qxhcbi4wbab3ad.onion

Running gotun inside Taskotron

A few weeks ago I wrote about how can we run gotun inside Jenkins. Following the same path, today I am writing how can we run gotun inside Taskotron. Tim Flink & Mike Ruckman (roshi) helped me to do the initial setup.

Setting up the system

In my laptop I created a job.yml following an example Tim posted on IRC.

name: runs gotun inside taskotron

environment:
  rpm:
    - docker

actions:
  - name: run the job
    shell:
      - gotun --job commands

I also had the real definition of the gotun job in the commands.yml file, and the tests in commands.txt file. In this job, I am firing up an instance in the Fedora Infra Cloud. After this, I just ran the runtask command to start the job.

$ sudo runtask -i foo-1.2.3 -t koji_build job.yml

This way we can put gotun inside Taskotron, and then execute the same set of tests we run currently for testing Fedora Atomic images.

Running OpenShift using Minishift

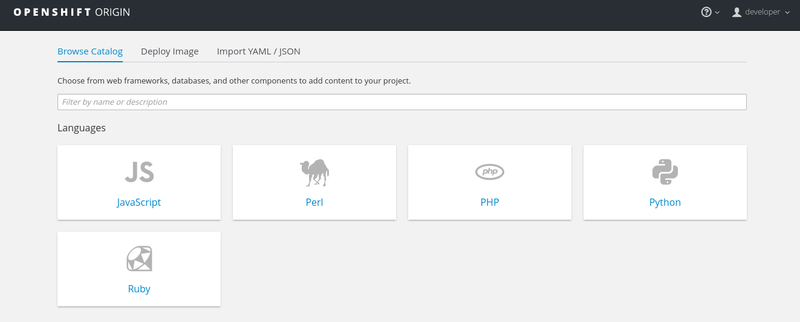
You may already hear about Kubernetes or you may be using it right now. OpenShift Origin is a distribution of Kubernetes, which is optimized for continuous development and multi-tenant deployment. It also powers the Red Hat OpenShift.

Minishift is the upcoming tool which will enable you to run OpenShift locally on your computer on a single node OpenShift cluster inside a VM. I am using it on a Fedora 25 laptop, with help of KVM. It can also be used on Windows or OSX. For KVM, I first had to install docker-machine-driver-kvm. Then downloaded the latest minishift from the releases page. Unzip, and put the binary in your path.

$ ./minishift start
Starting local OpenShift cluster using 'kvm' hypervisor...
E0209 20:42:29.927281    4638 start.go:135] Error starting the VM: Error creating the VM. Error creating machine: Error checking the host: Error checking and/or regenerating the certs: There was an error validating certificates for host "192.168.42.243:2376": tls: DialWithDialer timed out
You can attempt to regenerate them using 'docker-machine regenerate-certs [name]'.
Be advised that this will trigger a Docker daemon restart which might stop running containers.
. Retrying.
Provisioning OpenShift via '/home/kdas/.minishift/cache/oc/v1.4.1/oc [cluster up --use-existing-config --host-config-dir /var/lib/minishift/openshift.local.config --host-data-dir /var/lib/minishift/hostdata]'
-- Checking OpenShift client ... OK
-- Checking Docker client ... OK
-- Checking Docker version ... OK
-- Checking for existing OpenShift container ... OK
-- Checking for openshift/origin:v1.4.1 image ... 
   Pulling image openshift/origin:v1.4.1
   Pulled 0/3 layers, 3% complete
   Pulled 0/3 layers, 24% complete
   Pulled 0/3 layers, 45% complete
   Pulled 1/3 layers, 63% complete
   Pulled 2/3 layers, 81% complete
   Pulled 2/3 layers, 92% complete
   Pulled 3/3 layers, 100% complete
   Extracting
   Image pull complete
-- Checking Docker daemon configuration ... OK
-- Checking for available ports ... OK
-- Checking type of volume mount ... 
   Using Docker shared volumes for OpenShift volumes
-- Creating host directories ... OK
-- Finding server IP ... 
   Using 192.168.42.243 as the server IP
-- Starting OpenShift container ... 
   Creating initial OpenShift configuration
   Starting OpenShift using container 'origin'
   Waiting for API server to start listening
   OpenShift server started
-- Adding default OAuthClient redirect URIs ... OK
-- Installing registry ... OK
-- Installing router ... OK
-- Importing image streams ... OK
-- Importing templates ... OK
-- Login to server ... OK
-- Creating initial project "myproject" ... OK
-- Removing temporary directory ... OK
-- Server Information ... 
   OpenShift server started.
   The server is accessible via web console at:
       https://192.168.42.243:8443

   You are logged in as:
       User:     developer
       Password: developer

   To login as administrator:
       oc login -u system:admin

The oc binary is in ~/.minishift/cache/oc/v1.4.1/ directory, so you can add that in your PATH. If you open up the above-mentioned URL in your browser, you will find your OpenShift cluster is up and running well.

Now you can start reading the Using Minishift to start using your brand new OpenShift Cluster.

Running gotun inside Jenkins

By design gotun is a command line tool which can be called from other scripts, or any larger system. In the world of CI, Jenkins is the biggest name. So, one of the goals was also being able to execute within Jenkins for tests.

Setting up a Jenkins instance for test

vIf you don’t have a setup for Jenkins already, you can just create a new one for staging using the official container. For my example setup, I am using the same at http://status.kushaldas.in

Setting up the first job

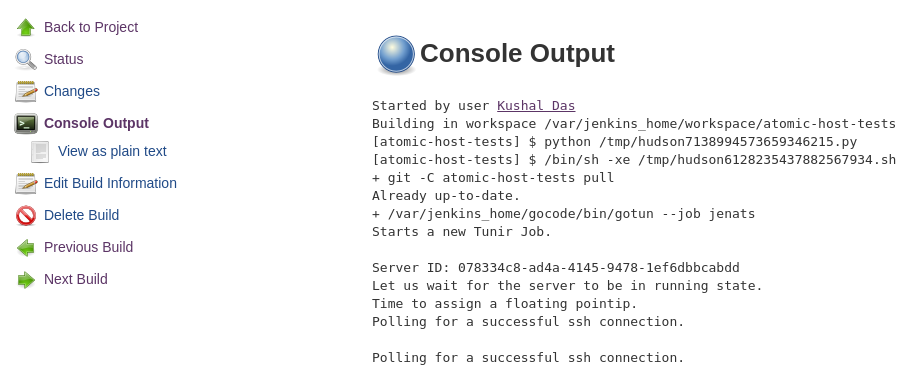
My only concern was how to setup the secrets for authentication information on Jenkins (remember I am a newbie in Jenkins). This blog post helped me to get it done. In the first job, I am creating the configuration (if in future we add something dynamic like the image name there). The secrets are coming from the ENV variables as described in the gotun docs. In the job, I am running the Fedora Atomic tests on the image. Here is one example console output.

Running the upstream Atomic host tests in gotun inside Jenkins

My next task was to run the upstream Project Atomic host tests using the similar setup. All the configuration file for the tests are available on this git repo. As explained in a previous post, onevm.py creates the inventory file for Ansible, and then runsetup.sh executes the playbook. You can view the job output here.

For both the jobs, I am executing a Python script to create the job yaml files.

Keeping the tools simple

When I talk about programming or teach in a workshop, I keep repeating one motto: Try to keep things simple. Whenever I looked at the modern complex systems which are popular among the users, generally they are many simple tools working together solving a complex problem.

The Unix philosophy

Back in college days, I read about the Unix philosophy. It is a set of ideas and philosophical approaches to the software development. From the Wikipedia page, we can find four points.

  • Make each program do one thing well. To do a new job, build afresh rather than complicate old programs by adding new "features".
  • Expect the output of every program to become the input to another, as yet unknown, program. Don't clutter output with extraneous information. Avoid stringently columnar or binary input formats. Don't insist on interactive input.
  • Design and build software, even operating systems, to be tried early, ideally within weeks. Don't hesitate to throw away the clumsy parts and rebuild them.
  • Use tools in preference to unskilled help to lighten a programming task, even if you have to detour to build the tools and expect to throw some of them out after you've finished using them.

Do one thing

The first point is something many people decide to skip. The idea of a perfect system which can do everything leads to a complex over engineered software which takes many years to land in production. The first causality is the user of the system, then the team who has to maintain the system up & running. A simple system with proper documentation also attracts number of users. These first users also become your community. They try out the new features, provide valuable feedback. If you are working on an Open Source project, creating that community around your project is always important for the sustainability of the project.

Pipe and redirection between tools

Piping and redirection in Linux shells were another simple magic I learned during the early days in college. How a tool like grep can take the input stream and provide an output, which in turn can be used in the next tool, was one of the best thing I found in the terminal. As a developer, I spend a lot of time in the terminals, and we use piping and redirection in daily life many times.

Build and try and repeat

I think all of the modern agile followers know this point very well. Unless you are allowing your users to try out your tool and allow them to provide feedback, your tool will not be welcomed by the users. We, the programmers have this attitude that every problem can be solved by code, and our ideas are always the correct. No, that is not the case at all. Go out in the world, show your tool to as many people as possible, take feedback. Rewrite and rebuild your tool as required. If you wait for 3 years and hope that someone will force your tool to the users, that will not go well in long run.

Do One Thing and Do It Well

The whole idea of Do One Thing and Do It Well has been discussed many times. Search the term in your favorite search engine, and you will surely find many documents explaining the idea in details. Following this idea while designing tools or systems helped me till date. Tunir or gotun tried to follow the same ideas as much as possible. They are build to execute some command on a remote system and act accordingly to the exit codes. I think this is the one line description of both the tools. To verify if the tool is simple or not, I keep throwing the tool to the new users and go through the feedback.

Last night we received a mail from Dusty Mabe in the Fedora Cloud list, to test the updates-testing tree for Fedora Atomic. At the end of the email, he also gave the command to execute to rebase to the updates-testing tree.

# rpm-ostree rebase fedora-atomic/25/x86_64/testing/docker-host 

With that as input from upstream, it was just adding the command in one line on top of the current official Fedora Atomic tests, and followed by a reboot command and wait for the machine to come back online.

sudo rpm-ostree rebase fedora-atomic/25/x86_64/testing/docker-host
@@ sudo reboot
SLEEP 120
curl -O http://infrastructure.fedoraproject.org/infra/autocloud/tunirtests.tar.gz
tar -xzvf tunirtests.tar.gz
...

This helped me to find the regression in atomic command within the next few minutes while I was working on something else. As I reported the issue to the upstream, they are already working to find a solution (some discussion here). The simplicity of the tool helped me to get things done faster in this case.

Please let me know what do you think about this particular idea about designing software in the comments below.

Testing a redis container using gotun

Testing container is one of the major reason for the existence of the tool gotun. In this blog post, I am going to show you how easy it becomes to test a container. But, easy is still a relative term. If setting up your container requires very complex steps, then you will have to do those first. And then, finally, you can test the application. You can use Ansible to do the hard part of setting up the application.

Fedora Redis container

In our example, we will test the Fedora Redis container. Redis is an in-memory data structure store. We use it as key: value store, as a database. It can also hold some complex infrastructures.

Let me post the test commands first.

sudo docker run -d --name redis fedora/redis
sudo docker run  -d --link redis:rd --name client fedora/redis
COPY: ./redistests.py vm1:./
sudo python3 -m unittest redistests.RedisTest.test_set -v
sudo python3 -m unittest redistests.RedisTest.test_append -v
sudo docker rm -f client
sudo python3 -m unittest redistests.RedisTest.test_newclient -v

In the first line, I am starting a new redis container. In the second line, I am running a container named “client”. In the next two lines, I have two tests. I will be using this container in those two tests. Then I will delete the container, and as the part of the last test, we will create a new container, and connect to the redis server container to get the value for the key name.

In the third line, I am copying a Python3 unittest file over to the VM, and then executing the tests one by one. I wanted to check the output from the redis-cli command instead of the exit code, that is why I decided to use Python unittest module. It makes parsing the output text much easier, and we can do complex analysis of the output text. We follow the same style in the Fedora Atomic tests.

redistests.py

import unittest
import subprocess

def system(cmd):
    """
    Invoke a shell command.
    :returns: A tuple of output, err message, and return code
    """
    ret = subprocess.Popen(cmd, shell=True, stdin=subprocess.PIPE,
                stdout=subprocess.PIPE, stderr=subprocess.PIPE, close_fds=True)
    out, err = ret.communicate()
    return out.decode("utf-8"), err.decode("utf-8"), ret.returncode


class RedisTest(unittest.TestCase):

    def test_set(self):
        out, err, eid = system("docker exec client redis-cli -h rd SET name kushal")
        out, err, eid = system("docker exec client redis-cli -h rd GET name")
        self.assertEqual(out, "kushal\n")

    def test_append(self):
        system("docker exec client redis-cli -h rd DEL clients")
        out, err, eid = system("docker exec client redis-cli -h rd APPEND clients ABC")
        self.assertEqual(out, "3\n")
        out, err, eid = system("docker exec client redis-cli -h rd APPEND clients XYZ")
        self.assertEqual(out, "6\n")
        out, ere, eid = system("docker exec client redis-cli -h rd GET clients")
        self.assertEqual(out, "ABCXYZ\n")

    def test_newclient(self):
        out, err, eid = system("docker run --rm --link redis:r2d2 --name newclient fedora/redis redis-cli -h r2d2 GET name")
        self.assertEqual(out, "kushal\n")

The output from the job.

$ ./gotun --job commands
Starts a new Tunir Job.

Server ID: cb0f491d-a921-46dd-b6e1-3c4353884d6c
Let us wait for the server to be in running state.
Time to assign a floating pointip.
Polling for a successful ssh connection.

Polling for a successful ssh connection.

Polling for a successful ssh connection.

Polling for a successful ssh connection.

Polling for a successful ssh connection.

Executing:  sudo docker run -d --name redis fedora/redis
Executing:  sudo docker run  -d --link redis:rd --name client fedora/redis
Executing COPY:  scp -o StrictHostKeyChecking=no -r -i /home/kdas/Downloads/kushal-testday.pem ./redistests.py fedora@209.132.184.210:./
Executing:  sudo python3 -m unittest redistests.RedisTest.test_set -v
Executing:  sudo python3 -m unittest redistests.RedisTest.test_append -v
Executing:  sudo docker rm -f client
Executing:  sudo python3 -m unittest redistests.RedisTest.test_newclient -v
---------------


Result file at: /tmp/tunirresult_210751937


Job status: true


command: sudo docker run -d --name redis fedora/redis
status:true

Unable to find image 'fedora/redis:latest' locally
Trying to pull repository docker.io/fedora/redis ... 
sha256:1bb7b6c03575dd43db6e8e3fc0b06c0b3df0178af9ea382b6f9df577d053bd22: Pulling from docker.io/fedora/redis
a3ed95caeb02: Pull complete 
cadab8e68e03: Pull complete 
9db1d534feda: Pull complete 
a4d5e4eefba6: Pull complete 
Digest: sha256:1bb7b6c03575dd43db6e8e3fc0b06c0b3df0178af9ea382b6f9df577d053bd22
Status: Downloaded newer image for docker.io/fedora/redis:latest
b83c3f13fa698627447575651e585f3308e795f579ea772c66d02ae0f1c72939


command: sudo docker run  -d --link redis:rd --name client fedora/redis
status:true

6096e414e2f7c314c9601ae6eaedbb3faf9fb265b70a4f77e5ba7b9a93b19209


command: sudo python3 -m unittest redistests.RedisTest.test_set -v
status:true

test_set (redistests.RedisTest) ... ok

----------------------------------------------------------------------
Ran 1 test in 0.199s

OK


command: sudo python3 -m unittest redistests.RedisTest.test_append -v
status:true

test_append (redistests.RedisTest) ... ok

----------------------------------------------------------------------
Ran 1 test in 0.289s

OK


command: sudo docker rm -f client
status:true

client


command: sudo python3 -m unittest redistests.RedisTest.test_newclient -v
status:true

test_newclient (redistests.RedisTest) ... ok

----------------------------------------------------------------------
Ran 1 test in 1.298s

OK


Total Number of Tests:6
Total NonGating Tests:0
Total Failed Non Gating Tests:0

Success.

PyLadies Pune meetup, February 2017

TL;DR - It was a lot of fun.

This month’s PyLadies Pune meetup was held in reserved-bit, the new hackerspace in Pune. The microbits were sent by Ntoll, without his help this workshop was not possible.

The morning

Anwesha left home earlier so that she can join in from the beginning. I came in late, as I had to get Py (our 2 years old daughter) ready for the day. By the time I reached in the hackerspace, the rest of the participants were discussing PyCon Pune, and how are they going to represent PyLadies in the conference.

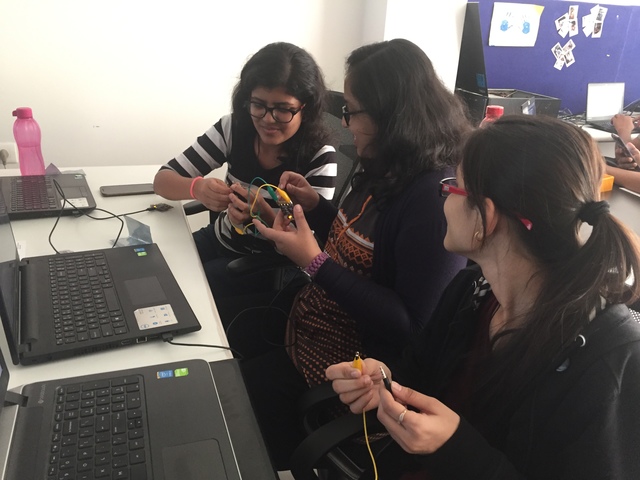
After having a large round of coffee, I started with setting up the laptops for Microbit development. That involved getting the latest Mu editor. I precached the binaries on my laptop and shared over the local network for faster access. We also had 3 people with Windows on the laptops, so we downloaded the device driver as explained in the Mu documentation. By this time we had 10 participants in the meetup.

Just when I started handing over the devices to each participant, I figured that I left the main pack of the devices back at home. Sayan ran back to our house and brought us the packet of Microbits. Meanwhile, all participants wrote a script to find out the groups of the current user in the Linux systems. We shared a group file for the Windows users.

Programming with Microbit

I spoke about the hardware and backstory for few minutes. Then we dived into the world of MicroPython. Everyone started scrolling their favorite message into the display. People also opened up the official documentation of the microbit-micropython project. They started exploring the API of their own. After a few fun trial and errors, we moved into the world of music, and speech. I never tried these two modules before. Everyone plugged their earphones into the microbits using the alligator-chip cables. We also learned about handling button presses, and people were experimenting all the things together.

In the last part of the workshop, I demoed the radio module. I think that was the most fun part of the whole day. People started sending out various messages and seeing them live on each other's devices. Siddhesh and Nisha went outside of the hackerspace to find till how far they can receive the messages. It seems these small devices can cover a large area. People had enough time to experiment on their own. Looking at the enjoyment at their faces, we could understand how much fun they were having. We are going to see more of this during the PyCon Pune devsprints.

Testing Fedora Atomic Images using upstream Atomic Host tests

Project Atomic has a group of tests written in Ansible. In this blog post, I am going to show to use those along with gotun. I will be running the improved-sanity-test as suggested in the #atomic channel on Freenode.

createinventory.py

The following is the content of the createinventory.py file. We use this file to generate the inventory file for Ansible.

#!/usr/bin/env python

import json

data = None
with open("current_run_info.json") as fobj:
    data = json.loads(fobj.read())

user = data['user']
host1 = data['vm1']
key = data['keyfile']

result = """{0} ansible_ssh_host={1} ansible_ssh_user={2} ansible_ssh_private_key_file={3}
""".format(host1, host1,user,key)
with open("./inventory", "w") as fobj:
    fobj.write(result)

gotun job configuration and the actual job file

---
BACKEND: "openstack"
NUMBER: 1

OS_AUTH_URL: "https://fedorainfracloud.org:5000/v2.0"
USERNAME="username"
TENANT_ID="ID"
PASSWORD="PASSWORD"
OS_REGION_NAME: "RegionOne"
OS_IMAGE: "Fedora-Atomic-25-20170124.1.x86_64.qcow2"
OS_FLAVOR: "m1.medium"
OS_SECURITY_GROUPS:
    - "ssh-anywhere-cloudsig"
    - "default"
OS_NETWORK: "NETWORK ID"
OS_FLOATING_POOL: "external"
OS_KEYPAIR: "kushal-test"
key: "/home/kdas/kushal-test.pem"

Above fedora.yml configuration boots up the VM for us in the OpenStack environment. Then we have the actual test file called fedora.txt.

HOSTCOMMAND: ./createinventory.py
HOSTTEST: ansible-playbook -i inventory tests/improved-sanity-test/main.yml

Now when we run the job (remember, it takes a lot of time to run).

$ gotun --job fedora
Starts a new Tunir Job.

Server ID: 3e8cd0c7-bc79-435e-9cf9-169c5bc66b3a
Let us wait for the server to be in running state.
Time to assign a floating point IP.
Polling for a successful ssh connection.

Polling for a successful ssh connection.

Polling for a successful ssh connection.

Polling for a successful ssh connection.

Polling for a successful ssh connection.


Executing:  HOSTTEST: ansible-playbook -i inventory tests/improved-sanity-test/main.yml
---------------


Result file at: /tmp/tunirresult_326996419


Job status: true


command: ansible-playbook -i inventory tests/improved-sanity-test/main.yml
status:true


PLAY [Improved Sanity Test - Pre-Upgrade] **************************************

TASK [setup] *******************************************************************
ok: [209.132.184.162]

TASK [ansible_version_check : Fail if avc_major is not defined] ****************
skipping: [209.132.184.162]

TASK [ansible_version_check : Fail if avc_minor is not defined] ****************
skipping: [209.132.184.162]

TASK [ansible_version_check : Check if Ansible is the correct version (or newer)] ***
ok: [209.132.184.162] => {
    "changed": false, 
    "msg": "All assertions passed"
}

TASK [atomic_host_check : Determine if Atomic Host] ****************************
ok: [209.132.184.162]

<SKIPPING ALL THE OTHER OUTPUT>

TASK [var_files_present : Check for correct SELinux type] **********************
changed: [209.132.184.162]

PLAY RECAP *********************************************************************
209.132.184.162            : ok=260  changed=170  unreachable=0    failed=0   

[DEPRECATION WARNING]: always_run is deprecated. Use check_mode = no instead..

This feature will be removed in version 2.4. Deprecation warnings can be 
disabled by setting deprecation_warnings=False in ansible.cfg.
 [WARNING]: Consider using yum, dnf or zypper module rather than running rpm
 [WARNING]: Consider using get_url or uri module rather than running curl
[DEPRECATION WARNING]: always_run is deprecated. Use check_mode = no instead..

This feature will be removed in version 2.4. Deprecation warnings can be 
disabled by setting deprecation_warnings=False in ansible.cfg.
[DEPRECATION WARNING]: always_run is deprecated. Use check_mode = no instead..

This feature will be removed in version 2.4. Deprecation warnings can be 
disabled by setting deprecation_warnings=False in ansible.cfg.


Total Number of Tests:1
Total NonGating Tests:0
Total Failed Non Gating Tests:0

Success.

Previously, I blogged about how to use the upstream Kubernetes Ansible repo to test Kubernetes on Atomic images. Using this style, you can use any ansible playbook to do the real setup, and then use Ansible to test for you, or have your own set of test cases. Do let me know what do you think in the comments.

Writing Python Extensions in Rust

In December I spent few days with Rust. I wrote few lines of code and was trying to get in touch with the syntax and feeling of the language. One of the major things in my TODO list was figuring out how to write Python extensions in Rust. Armin Ronacher wrote this excellent post in the Sentry blog back in October, 2016. I decided to learn from the same code base. It is always much easier to make small changes and then see what actually change due the same. This is also my first usage of CFFI module. Before this, I always wrote Python C extensions from scratch. In this post I will assume that we already have a working Rust installation on your system, and then we will go ahead from that.

Creating the initial Rust project

I am already in my new project directory, which is empty.

$ cargo init
Created library project
$ ls
Cargo.toml src

Now, I am going to update the Cargo.toml file with the following content. Feel free to adjust based on your requirements.

[package]
name = "liblearn"
version = "0.1.0"
authors = ["Kushal Das <mail@kushaldas.in>"]

[lib]
name = "liblearn"
crate-type = ["cdylib"]

Using the crate-type attribute we tell the Rust compiler what kind of artifact to generate. We will create a dynamic system library for our example. On my Linux computer it will create a *.so file. You can read more about the crate-types here.

Next we update our src/lib.rs file. Here we are telling that we also have a src/ksum.rs file.

#[cfg(test)]
mod tests {
    #[test]
    fn it_works() {
    }
}

pub mod ksum;
use std::ffi::CStr;
use std::os::raw::{c_uint, c_char};


#[no_mangle]
pub unsafe extern "C" fn sum(a: c_uint, b: c_uint) -> c_uint {
	println!("{}, {}", a, b);
	a + b
}


#[no_mangle]
pub unsafe extern "C" fn onbytes(bytes: *const c_char) {
	let b = CStr::from_ptr(bytes);
	println!("{}", b.to_str().unwrap())
}

We have various types which can help us to handle the data coming from the C code. We also have two unsafe functions, the first is sum, where we are accepting two integers, and returning the addition of those values. We are also printing the integers just for our learning purpose.

We also have a onbytes function, in which we will take a Python bytes input, and just print it on the STDOUT. Remember this is just an example, so feel free to make changes and learn more :). The CStr::from_ptr function helps us with converting raw C string to a safe C string wrapper in Rust. Read the documentation for the same to know more.

All of the functions also have no_mangle attribute, so that Rust compiler does not mangle the names. This helps in using the functions in C code. Marking the functions extern will help in line of Rust FFI work. At this moment you should be able to build the Rust project with cargo build command.

Writing the Python code

Next we create a build.py file on the top directory, this will help us with CFFI. We will also need our C header file with proper definitions in it, include/liblearn.h

#ifndef LIBLEARN_H_INCLUDED
#define LIBLEARN_H_INCLUDED

unsigned int sum(unsigned int a, unsigned int b);
void onbytes(const char *bytes);
#endif

The build.py

import sys
import subprocess
from cffi import FFI


def _to_source(x):
    if sys.version_info >= (3, 0) and isinstance(x, bytes):
        x = x.decode('utf-8')
    return x


ffi = FFI()
ffi.cdef(_to_source(subprocess.Popen([
'cc', '-E', 'include/liblearn.h'],
stdout=subprocess.PIPE).communicate()[0]))
ffi.set_source('liblearn._sumnative', None)

Feel free to consult the CFFI documentation to learn things in depth. If you want to convert Rust Strings to Python and return them, I would suggest you to have a look at the unpack function.

The actual Python module source

We have liblearn/init.py file, which holds the actual code for the Python extension module we are writing.

import os
from ._sumnative import ffi as _ffi

_lib = _ffi.dlopen(os.path.join(os.path.dirname(__file__), '_liblearn.so'))

def sum(a, b):
    return _lib.sum(a,b)

def onbytes(word):
    return _lib.onbytes(word)

setup.py file

I am copy pasting the whole setup.py below. Most of it is self explanatory. I also kept the original comments which explain various points.

import os
import sys
import shutil
import subprocess

try:
    from wheel.bdist_wheel import bdist_wheel
except ImportError:
    bdist_wheel = None

from setuptools import setup, find_packages
from distutils.command.build_py import build_py
from distutils.command.build_ext import build_ext
from setuptools.dist import Distribution


# Build with clang if not otherwise specified.
if os.environ.get('LIBLEARN_MANYLINUX') == '1':
    os.environ.setdefault('CC', 'gcc')
    os.environ.setdefault('CXX', 'g++')
else:
    os.environ.setdefault('CC', 'clang')
    os.environ.setdefault('CXX', 'clang++')


PACKAGE = 'liblearn'
EXT_EXT = sys.platform == 'darwin' and '.dylib' or '.so'


def build_liblearn(base_path):
    lib_path = os.path.join(base_path, '_liblearn.so')
    here = os.path.abspath(os.path.dirname(__file__))
    cmdline = ['cargo', 'build', '--release']
    if not sys.stdout.isatty():
        cmdline.append('--color=always')
    rv = subprocess.Popen(cmdline, cwd=here).wait()
    if rv != 0:
        sys.exit(rv)
    src_path = os.path.join(here, 'target', 'release',
                            'libliblearn' + EXT_EXT)
    if os.path.isfile(src_path):
        shutil.copy2(src_path, lib_path)


class CustomBuildPy(build_py):
    def run(self):
        build_py.run(self)
        build_liblearn(os.path.join(self.build_lib, *PACKAGE.split('.')))


class CustomBuildExt(build_ext):
    def run(self):
        build_ext.run(self)
        if self.inplace:
            build_py = self.get_finalized_command('build_py')
            build_liblearn(build_py.get_package_dir(PACKAGE))


class BinaryDistribution(Distribution):
    """This is necessary because otherwise the wheel does not know that
    we have non pure information.
    """
    def has_ext_modules(foo):
        return True


cmdclass = {
    'build_ext': CustomBuildExt,
    'build_py': CustomBuildPy,
}


# The wheel generated carries a python unicode ABI tag.  We want to remove
# this since our wheel is actually universal as far as this goes since we
# never actually link against libpython.  Since there does not appear to
# be an API to do that, we just patch the internal function that wheel uses.
if bdist_wheel is not None:
    class CustomBdistWheel(bdist_wheel):
        def get_tag(self):
            rv = bdist_wheel.get_tag(self)
            return ('py2.py3', 'none') + rv[2:]
    cmdclass['bdist_wheel'] = CustomBdistWheel


setup(
    name='liblearn',
    version='0.1.0',
    url='http://github.com/kushaldas/liblearn',
    description='Module to learn writing Python extensions in rust',
    license='BSD',
    author='Kushal Das',
    author_email='kushaldas@gmail.com',
    packages=find_packages(),
    cffi_modules=['build.py:ffi'],
    cmdclass=cmdclass,
    include_package_data=True,
    zip_safe=False,
    platforms='any',
    install_requires=[
        'cffi>=1.6.0',
    ],
    setup_requires=[
        'cffi>=1.6.0'
    ],
    classifiers=[
        'Intended Audience :: Developers',
        'License :: OSI Approved :: BSD License',
        'Operating System :: OS Independent',
        'Programming Language :: Python',
        'Topic :: Software Development :: Libraries :: Python Modules'
    ],
    ext_modules=[],
    distclass=BinaryDistribution
)

Building the Python extension

$ python3 setup.py build
running build
running build_py
creating build/lib
creating build/lib/liblearn
copying liblearn/__init__.py -> build/lib/liblearn
Finished release [optimized] target(s) in 0.0 secs
generating cffi module 'build/lib/liblearn/_sumnative.py'
running build_ext

Now we have a build directory. We go inside of the build/lib directory, and try out the following.

$ python3
Python 3.5.2 (default, Sep 14 2016, 11:28:32)
[GCC 6.2.1 20160901 (Red Hat 6.2.1-1)] on linux
Type "help", "copyright", "credits" or "license" for more information.
>>> import liblearn
>>> liblearn.sum(12,30)
12, 30
42
>>> b = "Kushal in bengali কুূশল".encode("utf-8")
>>> liblearn.onbytes(b)
Kushal in bengali কুূশল

This post is only about how to start writing a new extension. My knowledge with Rust is very minimal. In future I will write more as I learn. You can find all the source files in github repo.

Thank you Siddhesh, and Armin for reviewing this post.

Testing Kubernetes on Fedora Atomic using gotun

Kubernetes is one of the major components of the modern container technologies. Previously, using Tunir I worked on ideas to test it automatically on Fedora Atomic images. The new gotun provides a better way to setup and test a complex system like Kubernetes.

In the following example I have used Fedora Infra OpenStack to setup 3 instances, and then used the upstream contrib/ansible repo to do the real setup of the Kubernetes. I have two scripts in my local directory where the ansible directory also exists. First, createinventory.py, which creates the ansible inventory file, and also a hosts file with the right IP addresses. We push this file to every VM and copy to /etc/ using sudo. You can easily do this over ansible, but I did not want to change or add anything to the git repo, that is why I am doing it like this.

#!/usr/bin/env python

import json

data = None
with open("current_run_info.json") as fobj:
    data = json.loads(fobj.read())

user = data['user']
host1 = data['vm1']
host2 = data['vm2']
host3 = data['vm3']
key = data['keyfile']

result = """kube-master.example.com ansible_ssh_host={0} ansible_ssh_user={1} ansible_ssh_private_key_file={2}
kube-node-01.example.com ansible_ssh_host={3} ansible_ssh_user={4} ansible_ssh_private_key_file={5}
kube-node-02.example.com ansible_ssh_host={6} ansible_ssh_user={7} ansible_ssh_private_key_file={8}

[masters]
kube-master.example.com
 
[etcd:children]
masters
 
[nodes]
kube-node-01.example.com
kube-node-02.example.com
""".format(host1,user,key,host2,user,key,host3,user,key)
with open("ansible/inventory/inventory", "w") as fobj:
    fobj.write(result)

hosts = """127.0.0.1   localhost localhost.localdomain localhost4 localhost4.localdomain4
::1         localhost localhost.localdomain localhost6 localhost6.localdomain6
{0} kube-master.example.com
{1} kube-node-01.example.com
{2} kube-node-02.example.com
""".format(host1,host2,host3)

with open("./hosts","w") as fobj:
    fobj.write(hosts)

Then, I also have a runsetup.sh script, which runs the actual script inside the ansible directory.

#!/usr/bin/sh
cd ./ansible/scripts/
export ANSIBLE_HOST_KEY_CHECKING=False
./deploy-cluster.sh

The following the job definition creates the 3VM(s) on the Cloud.

---
BACKEND: "openstack"
NUMBER: 3

OS_AUTH_URL: "https://fedorainfracloud.org:5000/v2.0"
TENANT_ID: "ID of the tenant"
USERNAME: "user"
PASSWORD: "password"
OS_REGION_NAME: "RegionOne"
OS_IMAGE: "Fedora-Atomic-25-20170124.1.x86_64.qcow2"
OS_FLAVOR: "m1.medium"
OS_SECURITY_GROUPS:
    - "ssh-anywhere-cloudsig"
    - "default"
    - "wide-open-cloudsig"
OS_NETWORK: "NETWORKID"
OS_FLOATING_POOL: "external"
OS_KEYPAIR: "kushal-testkey"
key: "/home/kdas/kushal-testkey.pem"

Then comes the final text file which contains all the actual test commands.

HOSTCOMMAND: ./createinventory.py
COPY: ./hosts vm1:./hosts
vm1 sudo mv ./hosts /etc/hosts
COPY: ./hosts vm2:./hosts
vm2 sudo mv ./hosts /etc/hosts
COPY: ./hosts vm3:./hosts
vm3 sudo mv ./hosts /etc/hosts
HOSTTEST: ./runsetup.sh
vm1 sudo kubectl get nodes
vm1 sudo atomic run projectatomic/guestbookgo-atomicapp
SLEEP 60
vm1 sudo kubectl get pods

Here I am using the old guestbook application, but you can choose to deploy any application for this fresh Kubernetes cluster, and then test if it is working fine or not. Please let me know in the comments what do you think about this idea. Btw, remember that the ansible playbook will take a long time to run.

Working over ssh in Python

Working with the remote servers is a common scenario for most of us. Sometimes, we do our actual work over those remote computers, sometimes our code does something for us in the remote systems. Even Vagrant instances on your laptop are also remote systems, you still have to ssh into those systems to get things done.

Setting up of the remote systems

Ansible is the tool we use in Fedora Infrastructure. All of our servers are configured using Ansible, and all of those playbooks/roles are in a public git repository. This means you can also setup your remote systems or servers in the exact same way Fedora Project does.

I also have many friends who manage their laptops or personal servers using Ansible. Setting up new development systems means just a run of a playbook for them. If you want to start doing the same, I suggest you have a look at the lightsaber built by Ralph Bean.

Working on the remote systems using Python

There will be always special cases where you will have to do something on a remote system from your application directly than calling an external tool (read my previous blog post on the same topic). Python has an excellent module called Paramiko to help us out. This is a Python implementation of SSHv2 protocol.

def run(host='127.0.0.1', port=22, user='root',
                  command='/bin/true', bufsize=-1, key_filename='',
                  timeout=120, pkey=None):
    """
    Excecutes a command using paramiko and returns the result.
    :param host: Host to connect
    :param port: The port number
    :param user: The username of the system
    :param command: The command to run
    :param key_filename: SSH private key file.
    :param pkey: RSAKey if we want to login with a in-memory key
    :return:
    """
    client = paramiko.SSHClient()
    client.set_missing_host_key_policy(paramiko.AutoAddPolicy())

    client.connect(hostname=host, port=port,
            username=user, key_filename=key_filename, banner_timeout=10)
    chan = client.get_transport().open_session()
    chan.settimeout(timeout)
    chan.set_combine_stderr(True)
    chan.get_pty()
    chan.exec_command(command)
    stdout = chan.makefile('r', bufsize)
    stdout_text = stdout.read()
    status = int(chan.recv_exit_status())
    client.close()
    return stdout_text, status

The above function is a modified version of the run function from Tunir codebase. We are creating a new client, and then connecting to the remote system. If you have an in-memory implementation of the RSA Key, then you can use the pkey parameter the connect method, otherwise, you can provide the full path to the private key file as shown in the above example. I also don’t want to verify or store the host key, the second line of the function adds a policy to make sure of that.

Working on the remote systems using Golang

Now, if you want to do the same in golang, it will not be much different. We will use golang’s crypto/ssh package. The following is taken from gotun project. Remember to fill in the proper error handling as required by your code. I am just copy-pasting the important parts from my code as an example.

func (t TunirVM) FromKeyFile() ssh.AuthMethod {
	file := t.KeyFile
	buffer, err := ioutil.ReadFile(file)
	if err != nil {
		return nil
	}

	key, err := ssh.ParsePrivateKey(buffer)
	if err != nil {
		return nil
	}
	return ssh.PublicKeys(key)
}

sshConfig := &ssh.ClientConfig{
	User: viper.GetString("USER"),
	Auth: []ssh.AuthMethod{
		vm.FromKeyFile(),
	},
}

connection, err := ssh.Dial("tcp", fmt.Sprintf("%s:%s", ip, port), sshConfig)
session, err = connection.NewSession()
defer session.Close()
output, err = session.CombinedOutput(actualcommand)

Creating an ssh connection to a remote system using either Python or Golang is not that difficult. Based on the use case choose to either have that power in your code or reuse an existing powerful tool like Ansible.