Kushal Das

FOSS and life. Kushal Das talks here.

kushal76uaid62oup5774umh654scnu5dwzh4u2534qxhcbi4wbab3ad.onion

A few new generation command line tools

Many of us live on the terminal. We use tools which allows us to do things faster and let us stay productive. Most of these tools are old. Sometimes we do pick up a few new generation command line tools. Here is a small list of tools I am using daily. All of these are written in Rust .

ripgrep

ripgrep screenshot

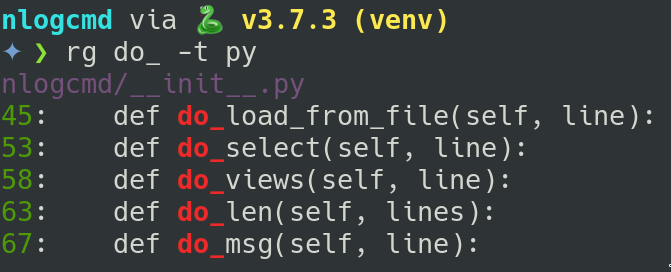
ripgrep was the first Rust tool I started using daily as a replacement for grep. It is easy to use. The output looks nice, and also works with my vim.

exa

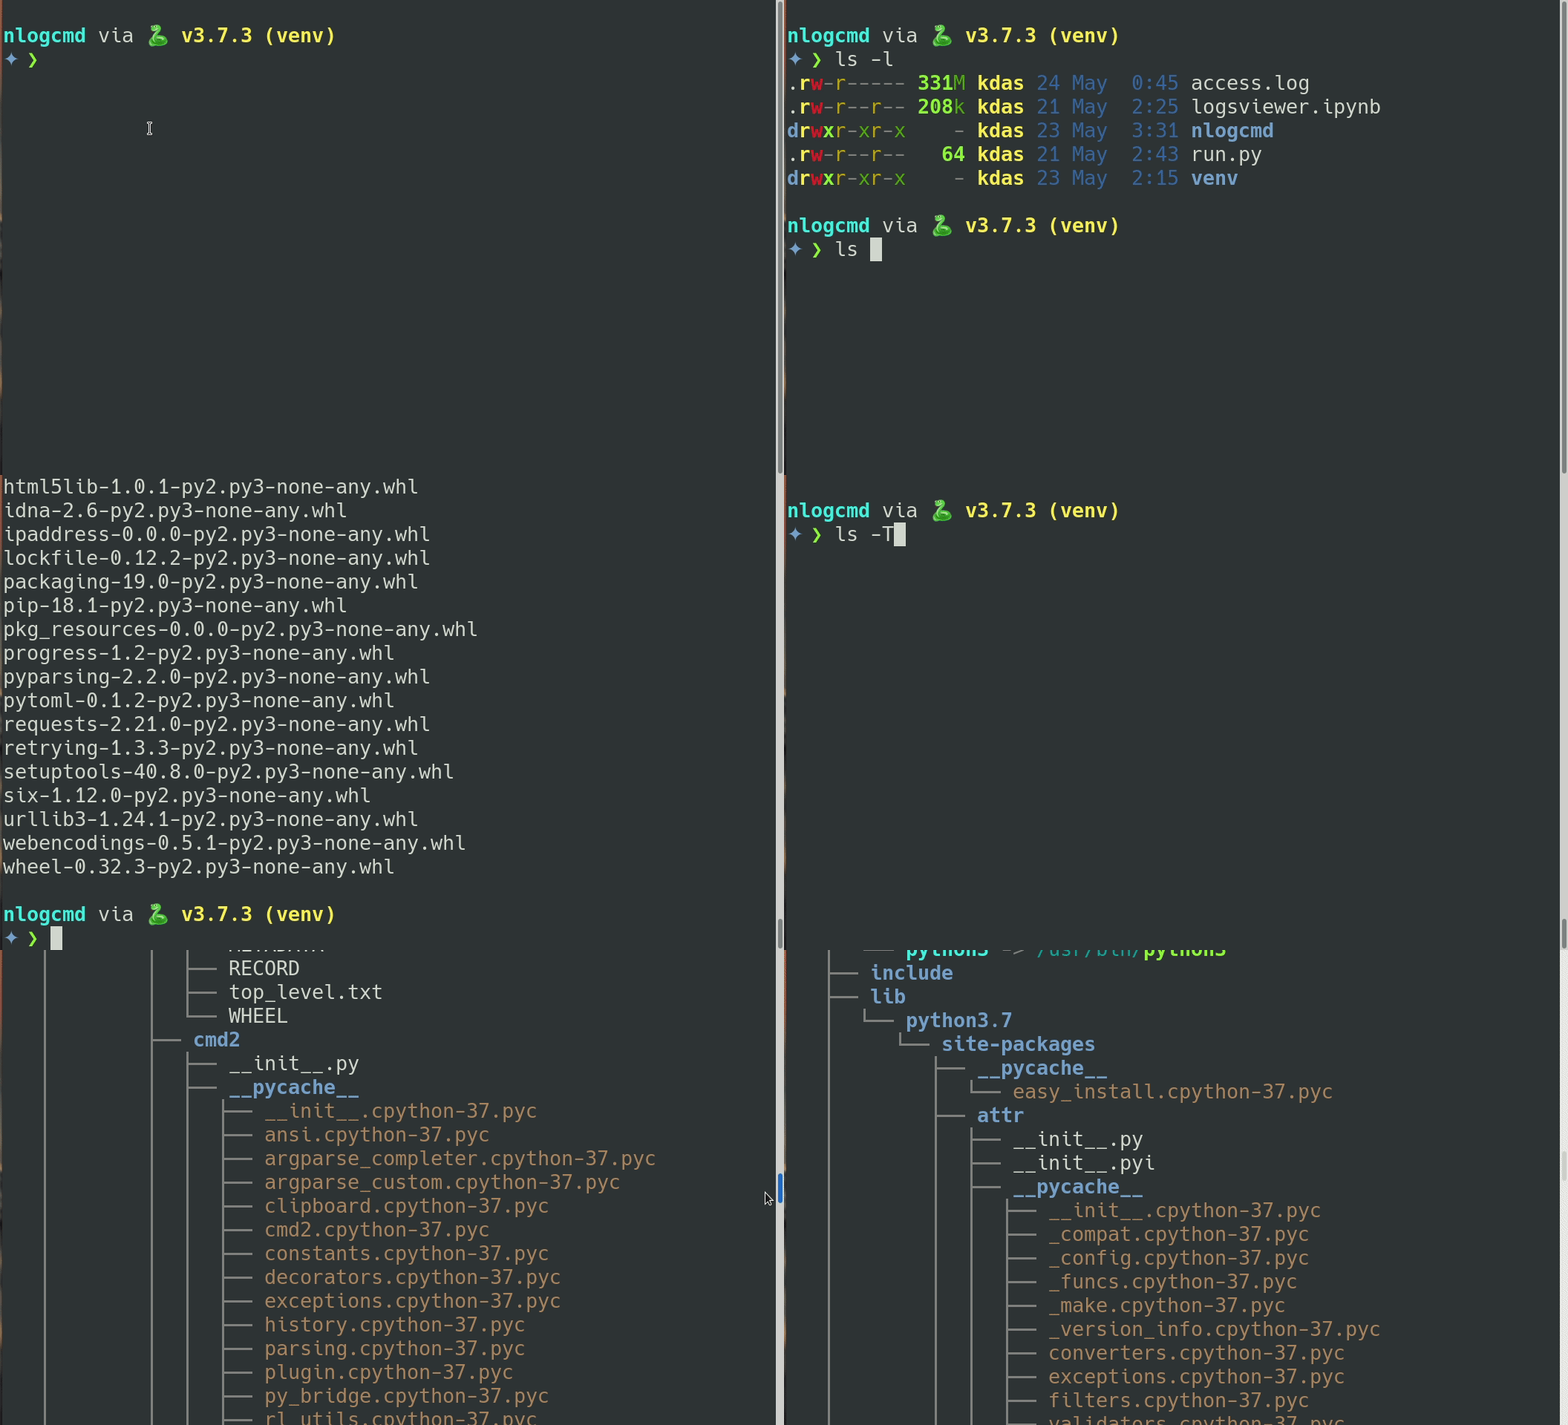
exa is the replacement for ls. It includes many useful flags.

exa demo

bat

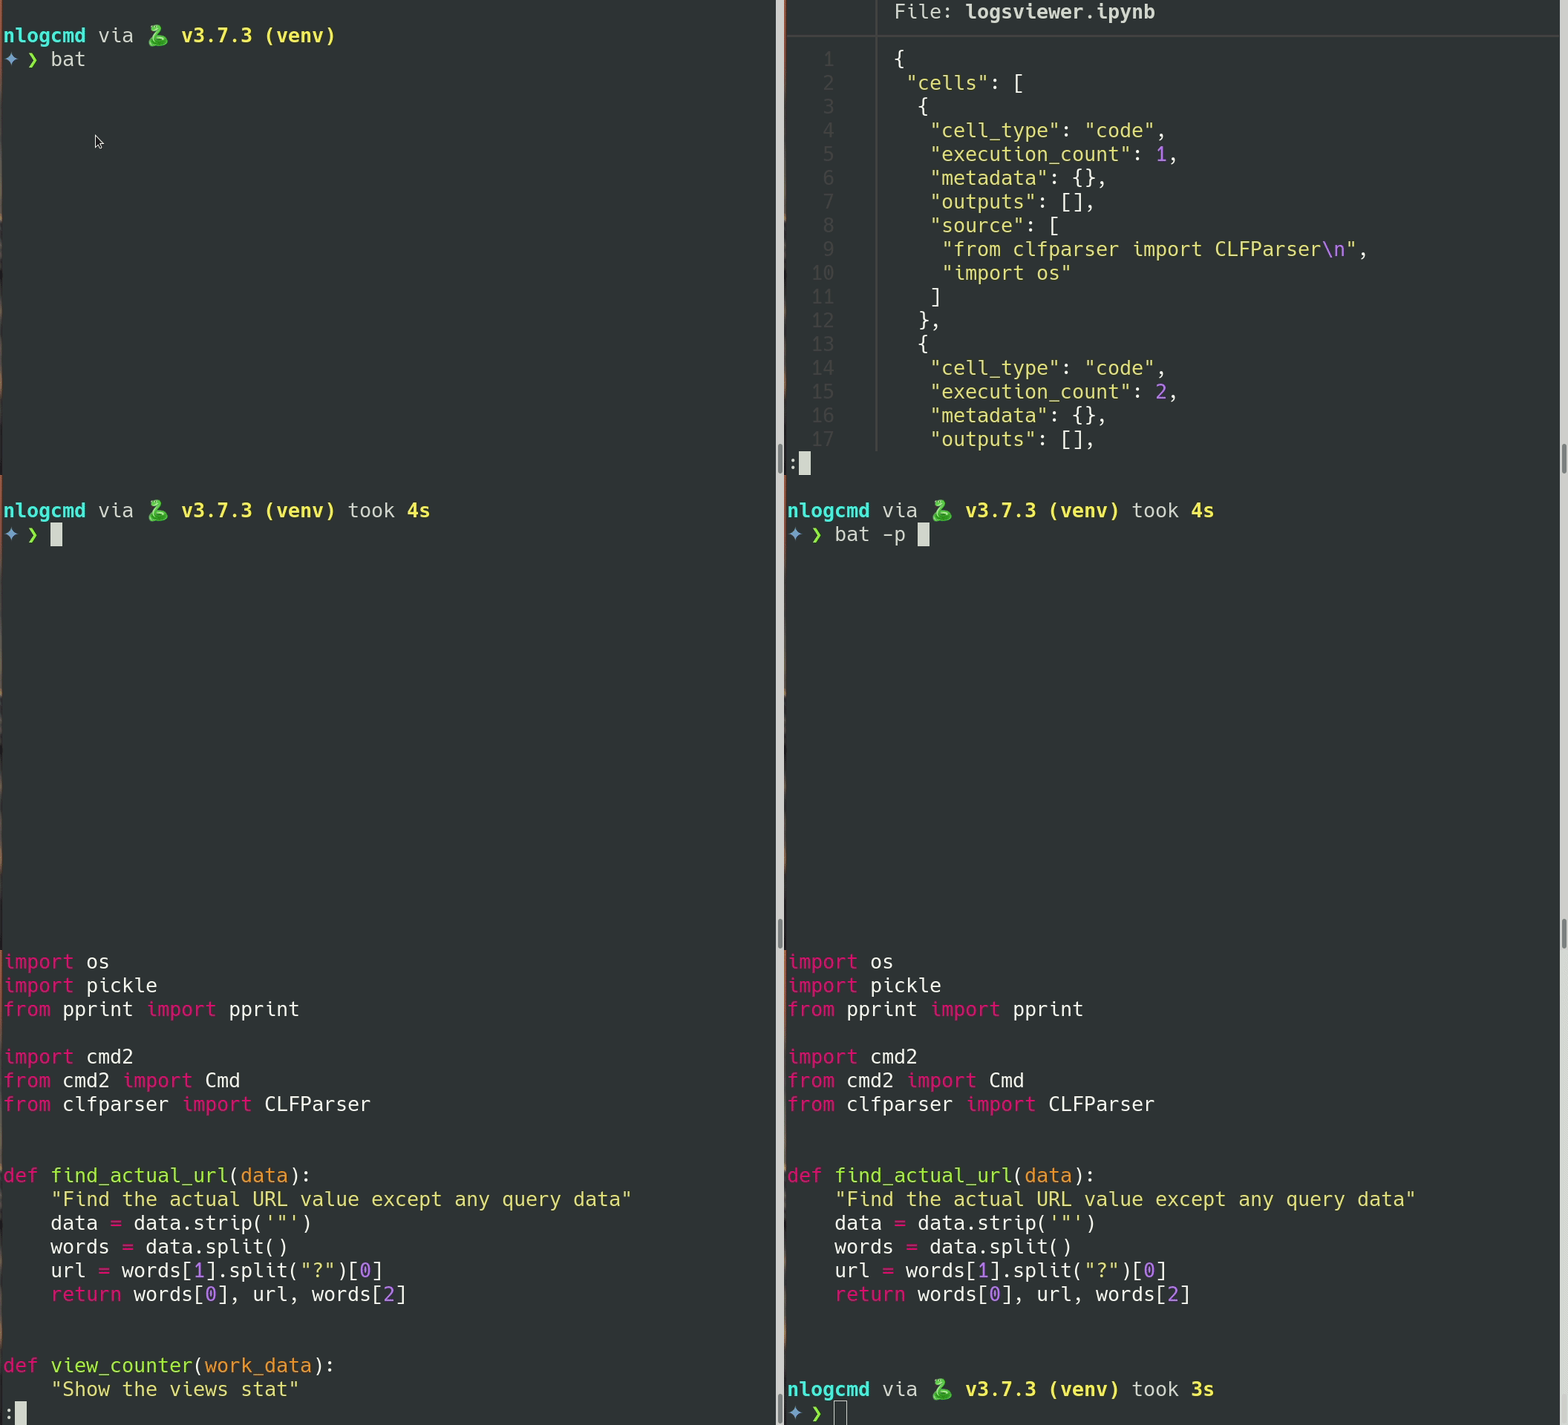
bat is the one stop replacement for cat and less. It also provides syntax highlighting with nice colours. I do have an alias cat=/usr/bin/bat -p.

bat demo

zoxide

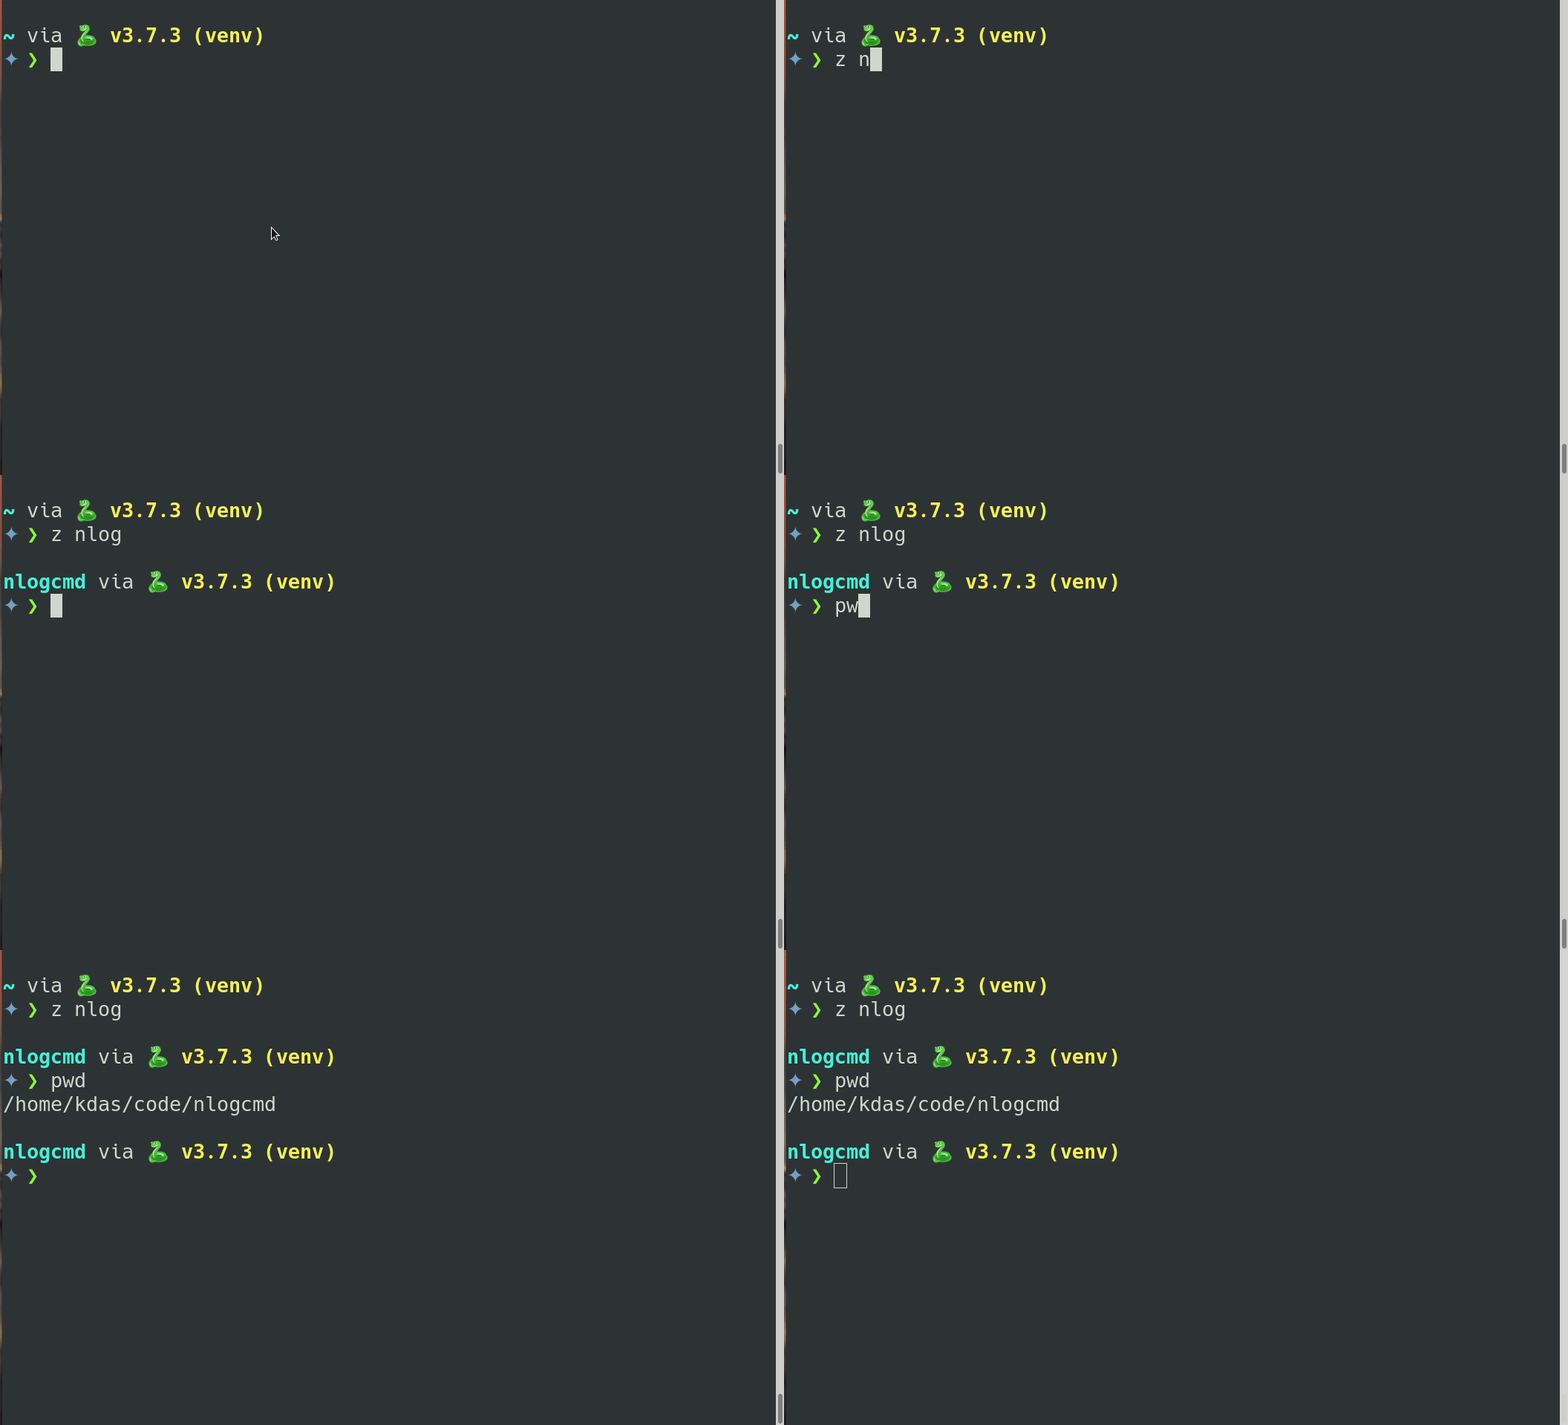
zoxide allows to move around directories super fast.

zoxide demo

starship

starship is the shell prompt you can see in all of the GIFs above. It allows a lot of customization.

All of these tools are packaged in Fedora 32 by the amazing fedora-rust SIG.

Securing your Elastic services using authenticated onion services

Last year I set up an ElasticSearch box to monitor a few of my servers. The goal was to learn the basics of the elastic ecosystem. I know how powerful it is but never played enough with it before.

While doing the setup, I was wondering about how to secure communication between nodes. I can not send data over plain HTTP to the nodes, and also have to make sure to have some amount of authentication. I was a bit confused about the subscriptions options.

Authenticated onion services to rescue

I use authenticated onion services in many of my regular services. It provides an easy way to connect to services (over TCP) along with encryption and authentication.

Using the same in the logstash server is an even better option for me as I do not have to open up any port in the firewall. As the logstash was listening to 5044 on localhost, I added the following configuration to the /etc/tor/torrc in the logstash server. You should use v3 addresses, and this blog post will explain how to configure that.

HiddenServiceDir /var/lib/tor/logstash
HiddenServiceVersion 2
HiddenServicePort 5044 127.0.0.1:5044
HiddenServiceAuthorizeClient stealth logstash

In the client nodes, I first had to configure Tor to reach my Onion service (details is in the blog post above). Next, I added the server address and local proxy (from Tor) details to /etc/filebeat/filebeat.yml.

output.logstash:
  # The Logstash hosts
  hosts: ["youronionaddress.onion:5044"]
  proxy_url: socks5://localhost:9050
  proxy_use_local_resolver: false
  index: "filebeat-kushaldas"

And done :) Just start the logstash server, and also the filebeat service in every node. The data will start flowing in.

If you have query about the Tor Project, you can visit our new https://community.torproject.org/ site.

Single file implementation of PEP582

During 2018 CPython core developer sprint, I worked on the PEP 582. The goal was to help all the newbie learners during their first day writing Python by skipping the whole complexity of virtual environments. The PEP contains a reference implementation. During the sprint itself, a few core developers did not like the idea of yet another feature focusing only on newbies. Instead, there was another discussion to create a single tool to solve all the problems in the packaging world.

Now, in 2020, we, the Python trainers, are still facing the same problem. How to explain the whole idea of virtual environments to the newbie? Should we teach the concept of the Operating system and shells and environments or teach Python?

A few nights ago, during a chat with Brett Cannon, he suggested having a single tool to do the same and see how people react.

Introducing project PEP582

PEP582 is a single file implementation of the above-mentioned idea. You can call it a stupid hack, but it works.

Installing the project and using it

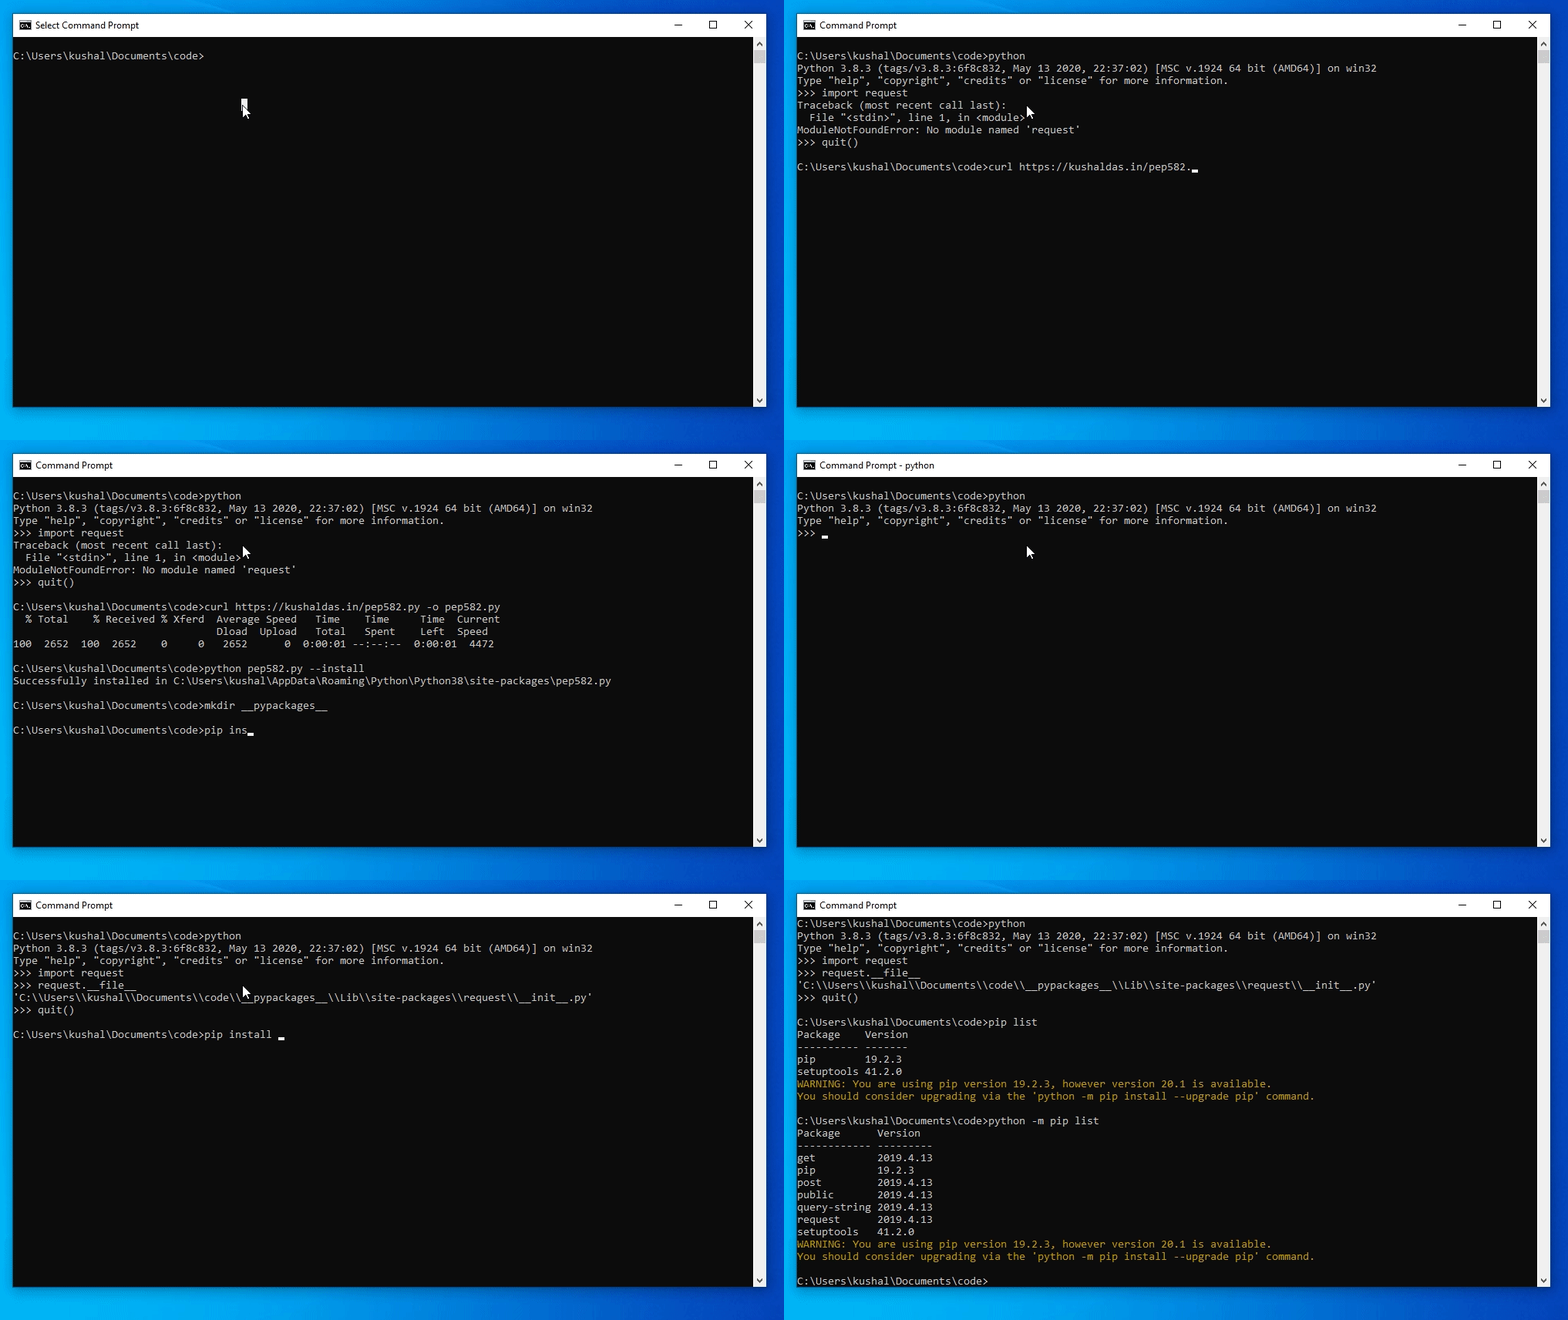
First, get the latest copy of the source, and then you can install it (without any root/administrator access) using Python itself. If you are using Ubuntu or Debian system, it assumes that you already have python3-venv and python3-pip installed.

curl https://raw.githubusercontent.com/kushaldas/pep582/master/pep582.py -o pep582.py
python3 pep582.py --install
Successfully installed in /home/kdas/.local/lib/python3.7/site-packages/pep582.py

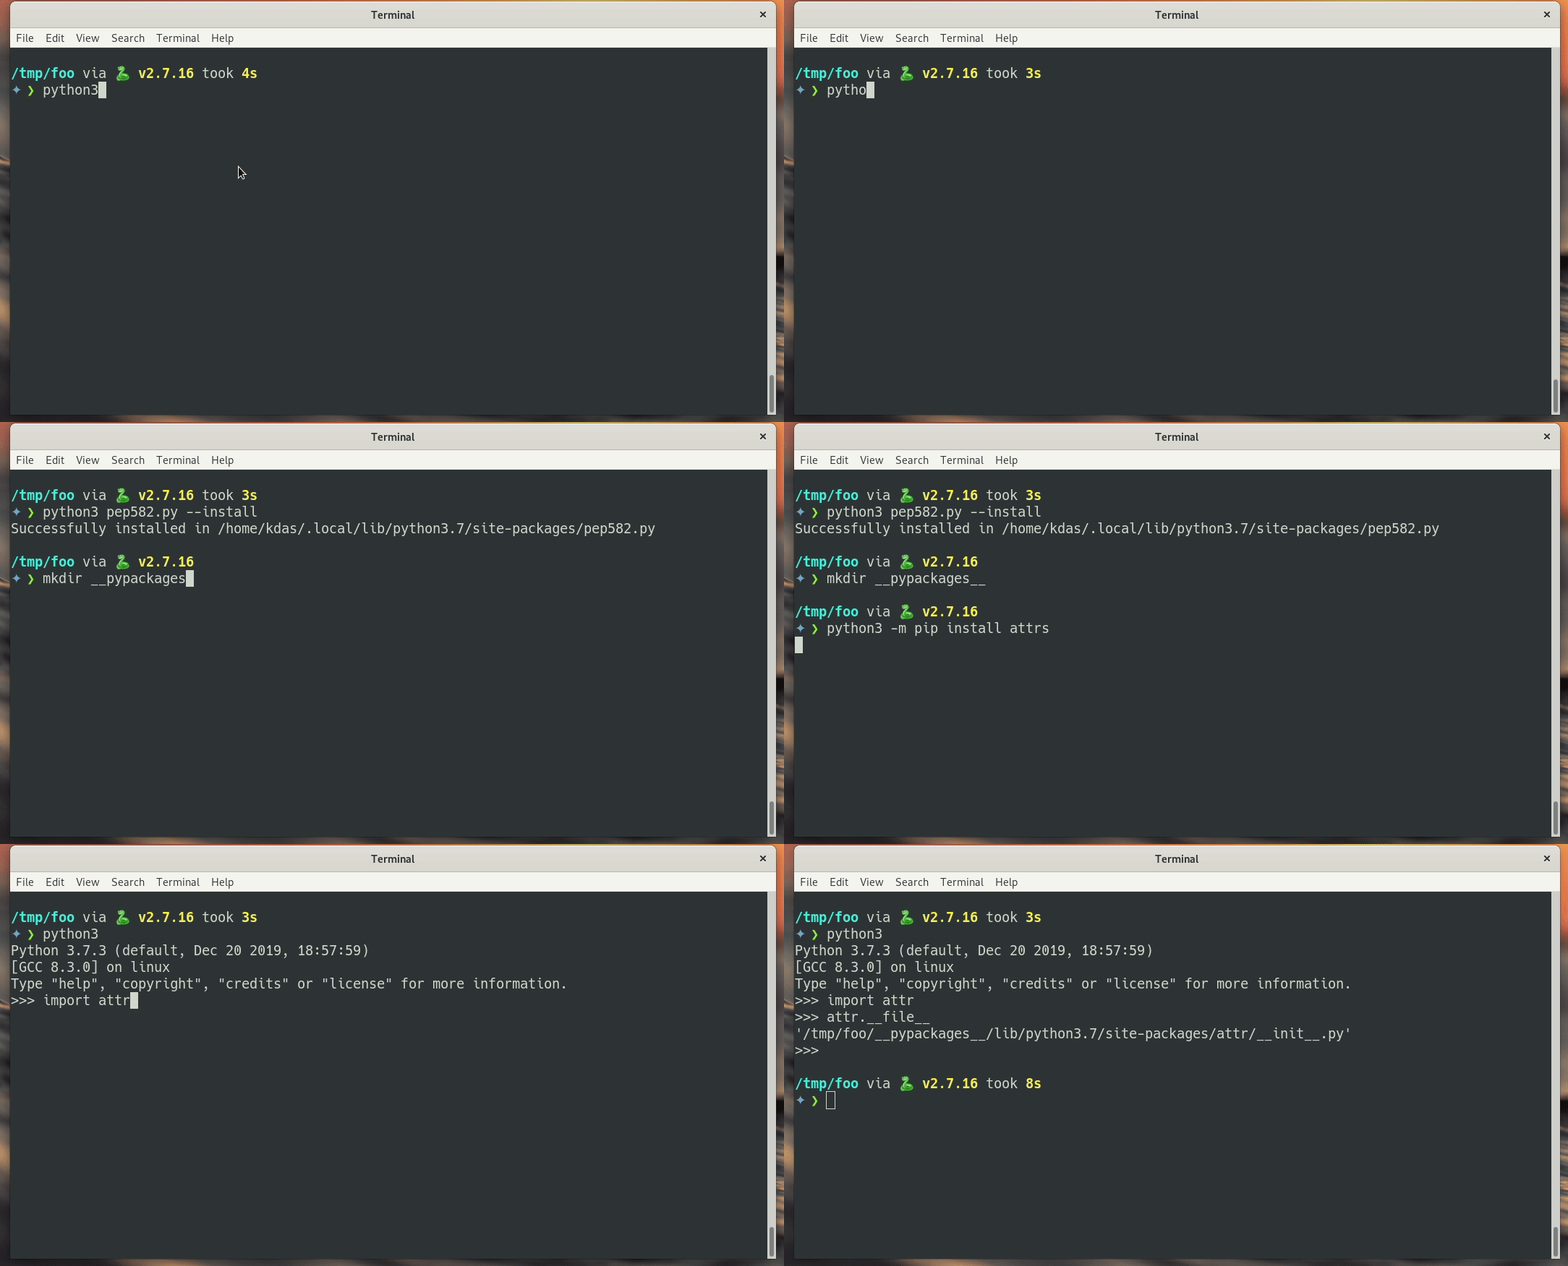
After this, in any directory, if you create a __pypackages__ directory, python executable will start using it. If you install any package via pip, it will also install in the __pypackages__ directory.

pep582 demo

It does not modify the PATH variable. If you want to install and use any executable. This is not a replacement for virtual environments. The tool is here to help the newbies to start programming fast. For more advanced work, they will have to learn about virtual environments.

Oh, this works on Windows too. I never tested on Mac yet.

pep582 demo

Please play around, and let me know any improvement you want to see. You are always welcome to open issues in the project repository.

Writing Python module in Rust using PyO3

Back in 2017, I wrote about how to create Python modules using Rust. Things changed in between, especially PyO3 project now makes it super easy to create such extension modules.

Requirements

I am using Python 3.7.3 and using the latest nightly build of Rust using rustup tool. Remember to use the nightly toolchain than stable.

rustup default nightly

The example source

use pyo3::prelude::*;
use pyo3::types::PyDict;
use pyo3::wrap_pyfunction;
use std::collections::HashMap;

#[pyfunction]
/// Formats the sum of two numbers as string.
fn sum_as_string(a: usize, b: usize) -> PyResult<String> {
    Ok((a + b).to_string())
}

#[pyfunction]
/// Formats the sum of two numbers as string.
fn get_result() -> PyResult<HashMap<String, String>> {
    let mut result = HashMap::new();
    result.insert("name".to_string(), "kushal".to_string());
    result.insert("age".to_string(), "36".to_string());
    Ok(result)
}

#[pyfunction]
// Returns a Person class, takes a dict with {"name": "age", "age": 100} format.
fn give_me_a_person(data: &PyDict) -> PyResult<Person> {
    let name: String = data.get_item("name").unwrap().extract().unwrap();
    let age: i64 = data.get_item("age").unwrap().extract().unwrap();

    let p: Person = Person::new(name, age);
    Ok(p)
}

#[pyclass]
#[derive(Debug)]
struct Person {
    #[pyo3(get, set)]
    name: String,
    #[pyo3(get, set)]
    age: i64,
}

#[pymethods]
impl Person {
    #[new]
    fn new(name: String, age: i64) -> Self {
        Person { name, age }
    }
}

#[pymodule]
/// A Python module implemented in Rust.
fn myfriendrust(_py: Python, m: &PyModule) -> PyResult<()> {
    m.add_wrapped(wrap_pyfunction!(sum_as_string))?;
    m.add_wrapped(wrap_pyfunction!(get_result))?;
    m.add_wrapped(wrap_pyfunction!(give_me_a_person))?;
    m.add_class::<Person>()?;
    Ok(())
}

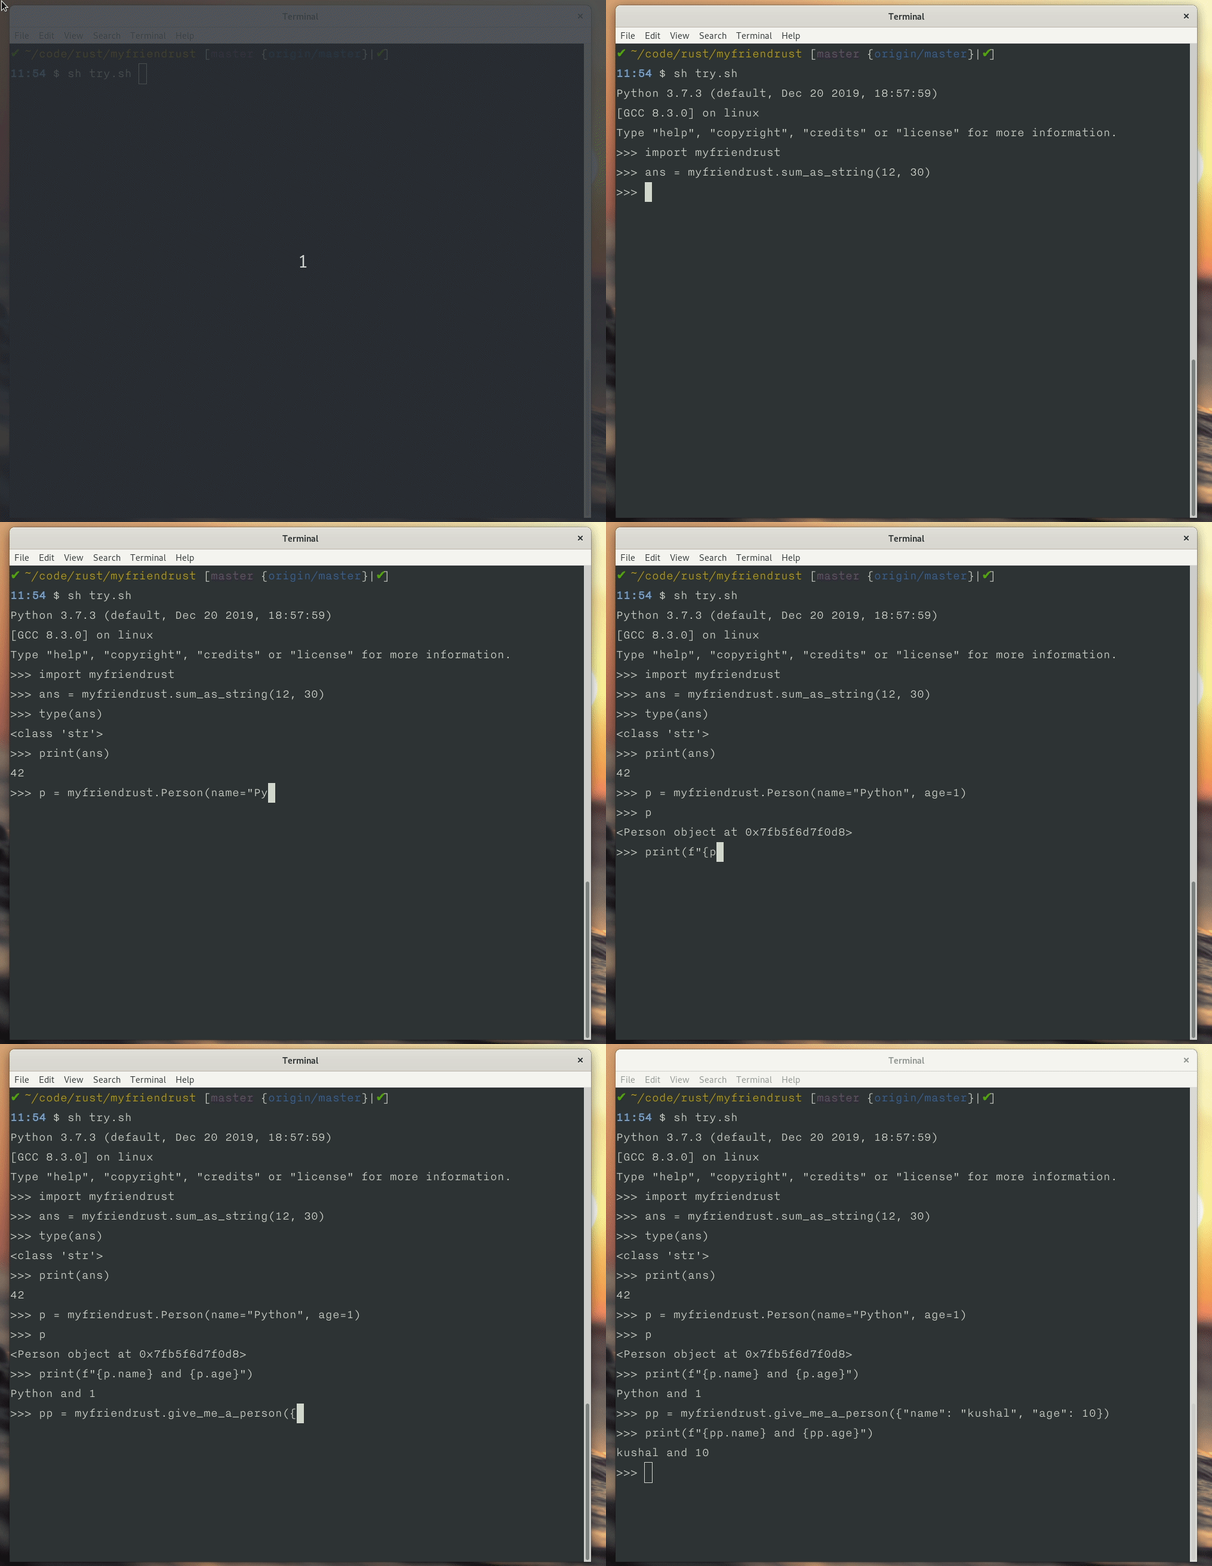
In this example, we are creating one class Person, and 3 different function. You can checkout the whole source from this git repo.

get_result function returns a HashMap object from Rust. Where as give_me_person takes a Python dictionary as argument and then creates a Person class from it and then returns it to Python.

One thing to notice that we are using __new__ to create an instance of the Person class. You can read about the class creation in the documentation.

Building the module

$ cargo build --release
<omitting output>
Compiling myfriendrust v0.1.0 (/home/kdas/code/rust/myfriendrust)
Finished release [optimized] target(s) in 2.60s

$ ls target/release/
build deps examples incremental libmyfriendrust.d libmyfriendrust.so

This will create a libmodulename.so file, in this case the name of the file is libmyfriendrust.so. I have a helper shell script try.sh to rename the file to myfriendrust.so so that I can test it.

cd target/release
mv libmyfriendrust.so myfriendrust.so
python3

Now, let us try it out.

To build a wheel for distribution

You can use maturin tool to create a wheel for distribution.

$ maturin build
πŸ”— Found pyo3 bindings
🐍 Found CPython 3.7m at python3.7
Compiling proc-macro2 v1.0.10
Compiling unicode-xid v0.2.0
Compiling syn v1.0.18
Compiling serde v1.0.106
Compiling ryu v1.0.4
Compiling proc-macro-hack v0.5.15
Compiling libc v0.2.69
Compiling regex-syntax v0.6.17
Compiling autocfg v1.0.0
Compiling itoa v0.4.5
Compiling scopeguard v1.1.0
Compiling smallvec v1.4.0
Compiling cfg-if v0.1.10
Compiling unindent v0.1.5
Compiling inventory v0.1.6
Compiling version_check v0.9.1
Compiling num-traits v0.2.11
Compiling lock_api v0.3.4
Compiling quote v1.0.3
Compiling regex v1.3.7
Compiling parking_lot_core v0.7.2
Compiling parking_lot v0.10.2
Compiling pyo3-derive-backend v0.9.2
Compiling serde_derive v1.0.106
Compiling ghost v0.1.1
Compiling ctor v0.1.14
Compiling paste-impl v0.1.11
Compiling inventory-impl v0.1.6
Compiling indoc-impl v0.3.5
Compiling paste v0.1.11
Compiling pyo3cls v0.9.2
Compiling indoc v0.3.5
Compiling serde_json v1.0.51
Compiling pyo3 v0.9.2
Compiling myfriendrust v0.1.0 (/home/kdas/code/rust/myfriendrust)
Finished dev [unoptimized + debuginfo] target(s) in 56.57s
πŸ“¦ Built wheel for CPython 3.7m to /home/kdas/code/rust/myfriendrust/target/wheels/myfriendrust-0.1.0-cp37-cp37m-manylinux1_x86_64.whl

This post is just an introduction. You can look into the documentation and start writing more complex code. If you say I write bad Rust code, then yes. I am still a very beginner in Rust.

mod_wsgi and a Python extention

I was working on a performance analysis of a web API. After I identified the possible issues, I tried to see if I can use a native extension for that part of code (it is a Flask application). In this case the extension was written in Rust. It worked very well. In both test environment and using mod_wsgi-express it was super fast. But it failed when I tried to use it in the production under nginx + mod_wsgi combination. The import modulename statement was just stuck. Causing a timeout in the application. There were no other error messages or log lines.

Found the cause only after having a chat with Graham. After listening to the problem, he told me the solution in seconds. To set the Application Group as %{GLOBAL}.

WSGIApplicationGroup %{GLOBAL}

This is to make sure that we are using the first (main) interpreter, instead of any of the sub-intepreters. The reason explained in the mod_wsgi documentation

The consequences of attempting to use a C extension module for Python which is implemented against the simplified API for GIL state management in any sub interpreter besides the first, is that the code is likely to deadlock or crash the process.

A few things from last week

Last Monday I wrote some tips on security while working from home. in Economic Time. This includes some basic steps everyone of us can take. If you want to follow better practices, please read https://ssd.eff.org.

There was a fake news going around in WhatsApp about government surveillance, a story was published to bust this myth, and I answered a questions for that story. You can read it in either The Wire or Alt News site.

Introducing ManualBox project

One of the major security features of the QubesOS is the file vaults, where access to specific files can only happen via user input in the GUI applet. Same goes to the split-ssh, where the user has to allow access to the ssh key (actually on a different VM).

I was hoping to have similar access control to important dotfiles with passwords, ssh private keys, and other similar files on my regular desktop system. I am introducing ManualBox which can provide similarly access control on normal Linux Desktops or even on Mac.

GIF of usage

How to install?

Follow the installation guide on the Mac in the wiki. For Linux, we are yet to package the application, and you can directly run from the source (without installing).

git clone https://github.com/kushaldas/manualbox.git
cd manualbox

On Fedora

sudo dnf install python3-cryptography python3-qt5 python3-fusepy python3-psutil fuse -y

On Debian

sudo apt install python3-cryptography python3-pyqt5 python3-fusepy python3-psutil fuse

Usage guide

To start the application from source:

On Linux:

./devscripts/manualbox

On Mac:

Click on the App icon like any other application.

If you are running the tool for the first time, it will create a new manualbox and mount it in ~/secured directory, it will also give you the password, please store it somewhere securely, as you will need it to mount the filesystem from the next time.

initial screen

After selecting (or you can directly type) the mount path (must be an empty directory), you should type in the password, and then click on the Mount button.

File system mounted

Now, if you try to access any file, the tool will show a system notification, and you can either Allow or Deny via the following dialog.

Allow or deny access

Every time you allow file access, it shows the notification message via the system tray icon.

Accessing file msg

To exit the application, first click on the Unmount, and right-click on the systray icon, and click on the Exit or close via window close button.

How to exit from the application

Usage examples (think about your important dotfiles with passwords/tokens)

Note: If you open the mounted directory path from a GUI file browser, you will get too many notifications, as these browsers will open the file many times separately. Better to have you GUI application/command line tool to use those files as required.

Thunderbird

You can store your thuderbird profile into this tool. That way, thunderbird needs your permission for access when you start the application.

ls -l ~/.thunderbird/
# now find your right profile (most people have only one)
mv ~/.thunderbird/xxxxxx.default/logins.json ~/secured/
ln -s ~/secured/logins.json ~/.thunderbird/xxxxxx.default/logins.json

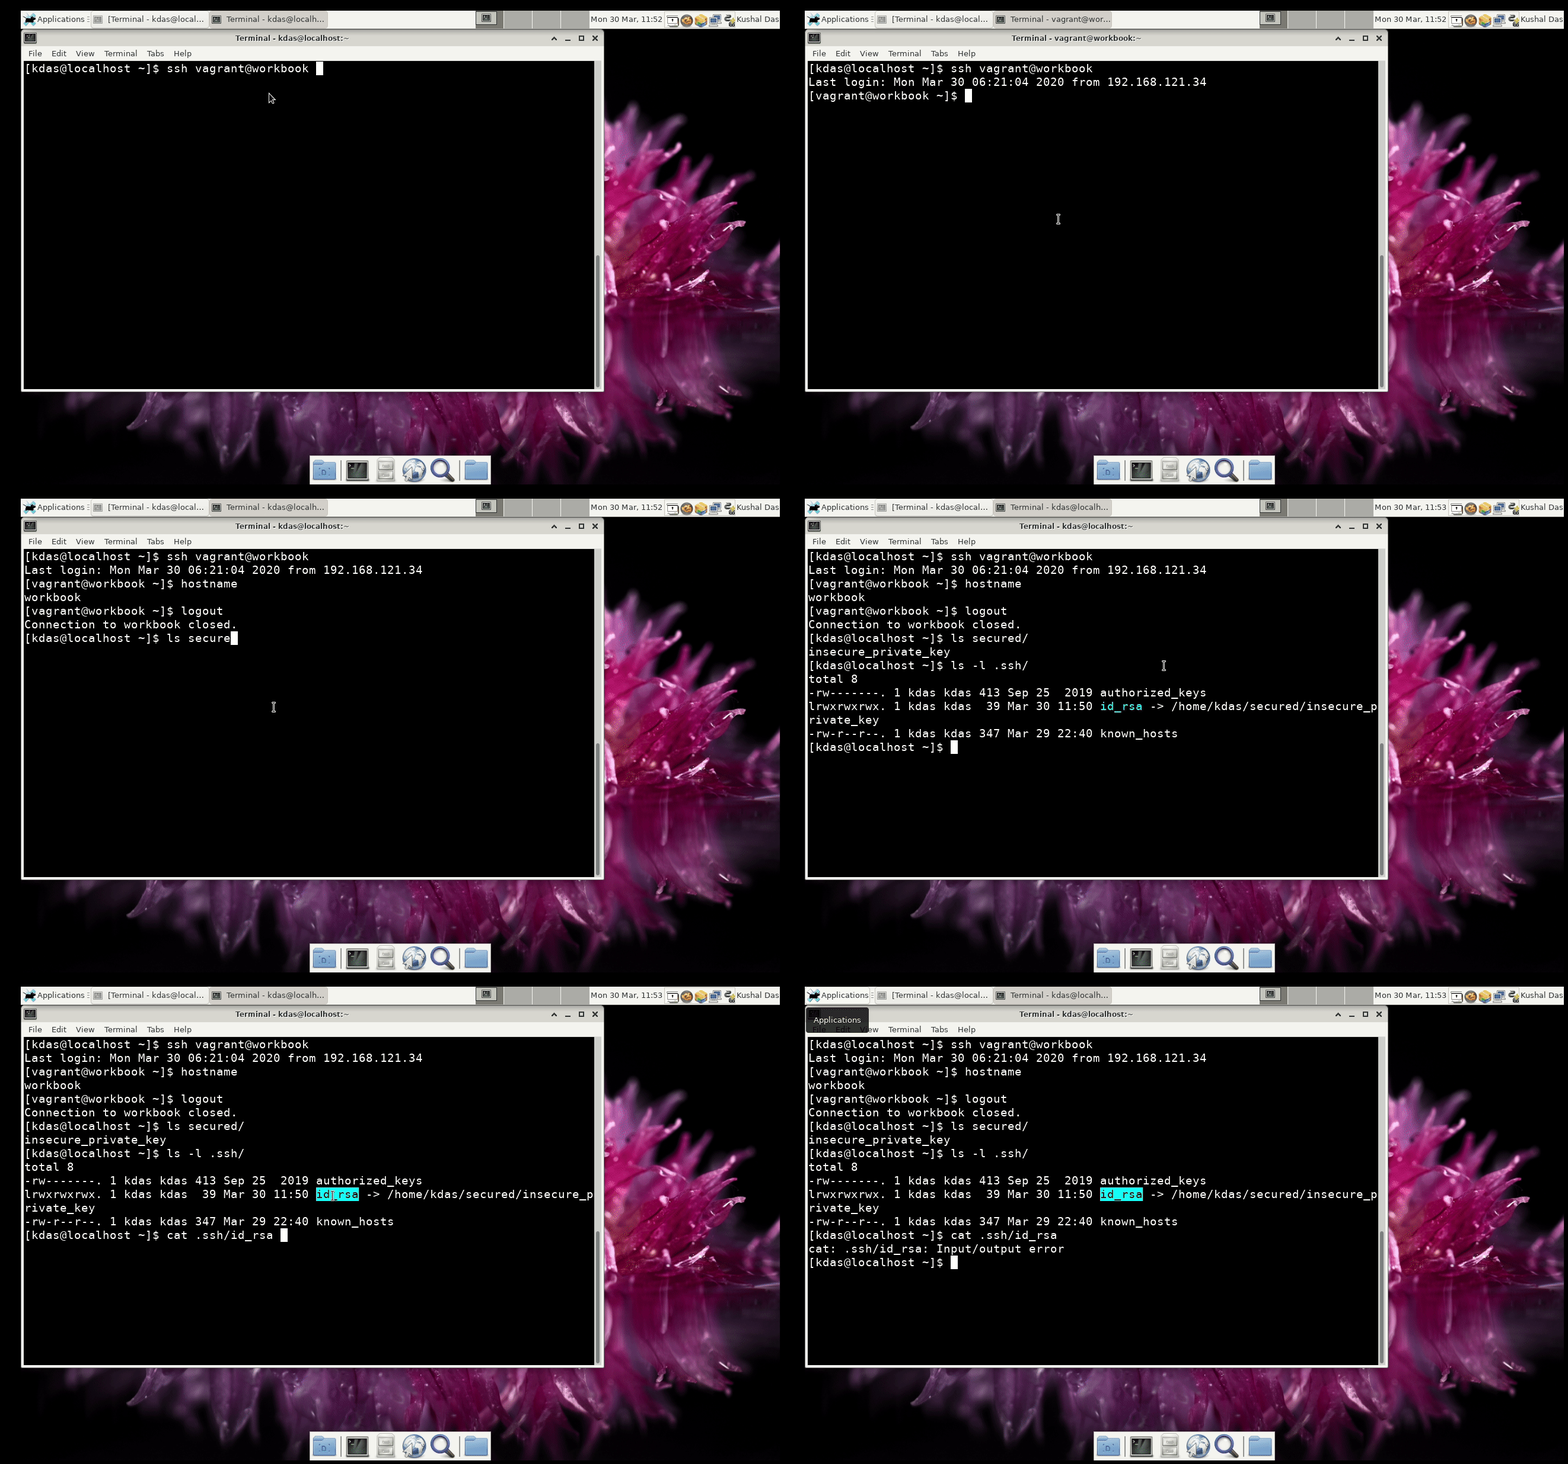
SSH private key

mv ~/.ssh/id_rsa ~/secured/
ln -s ~/secured/id_rsa ~/.ssh/id_rsa

If you have any issues, please file issues or even better a PR along with the issue :)

More power to you my friend

With Chelsea and Micah

Today marks 365 days of incarceration of Chelsea Manning, with around $256000 in fines. She has not been charged for any crime.

At home, Py (daughter) wanted to know why her Wonder Woman is still in the dungeon? We had to explain Grand jury subpoena to her in simple terms and explain that her Wonder Woman aunty is resisting it, even though that means she is in a dungeon (where most good people go when they fight for truth against the big powers of the world). Py now wants to go to USA and meet Chelsea. The other day, Py also declared that after growing up she will fight for others and go to dungeon just like Chelsea.

Chelsea spoke about her believes and principles again and again, and why did she feel that leaking the war crimes to the world was her duty. By the same principles, she is standing up to the secret hearings of grand juries now. Everyone knows that there is no good reason to put her back into the prison system, but the government still did that.

UN officials already accused the US government of using torture against Chelsea. The officials also mentioned to the US government:

believe that subjecting Chelsea to more punishment will change her mind, they are gravely mistaken.

After waking up today morning, I suddenly found she again tried to commit suicide and now recovering in the hospital. She had previously spent 7+years in prison including 11 months of solitary confinement, and these things in total causes a lot of mental health issues.

I hope for her speedy recovery and also hope someone in the US judicial system will see the injustice to her and release her soon. Meanwhile, we all can send her letters (on white paper, handwritten or drawn) to the following address:

Chelsea Elizabeth Manning
A0181426
William G. Truesdale Adult Detention Center
2001 Mill Road
Alexandria, VA 22314

You can also read her statement released on Aaron Swartz Day 2019.

Maintaining your Qubes system using Salt part 1

Last year I published qubes-ansible project. This enables maintaining your Qubes OS system via Ansible. But, to do the same, you will have to take a few steps as Ansible is not in the default Qubes.

Qubes uses Salt to maintain the system. It also has helpful documentation to explain the idea. In this post and with a few more in the future, I am planning to write a series with basic examples of the same, so that you can maintain your Qubes laptop with the Salt itself.

Working in dom0

You can either directly the required files in dom0, or write them in your standard development VM, and then copy them over to dom0. The choice is yours.

I am directly writing them into dom0 using vim as my editor.

The outcome

I want to create the following:

  • A new template called fancy-template based on debian-10
  • Install a few packages into it.
  • Create a new apt repo for VS Code in it.
  • Install VS Code in it.
  • Create an AppVM called fancy using the template with 3000MB RAM.

Creating .top and .sls files

The .top file will help us to link between any machine (VMs or dom0) and some state files (.sls).

To find the currently enabled top files use the following command:

qubesctl top.enabled

Now, we will create our own top file.

Create the following file as /srv/salt/learnqubes.top

base:
  dom0:
    - fancy-template

Here we are saying for the dom0 machine (VM) use the state file named fancy-template. The state files contain state and configuration of the machines (VMs).

Creating the first state file

Copy paste the following in /srv/salt/fancy-template.sls file.

create-fancy-template:
  qvm.vm:
    - name: fancy-template
    - clone:
      - source: debian-10
      - label: blue
    - tags:
      - add:
        - playground

create-fancy-vm:
  qvm.vm:
    - name: fancy
    - present:
      - template: fancy-template
      - label: red
      - mem: 3000
    - prefs:
      - template: fancy-template

First, we are using a unique name for that step, where we are asking for a qvm.vm (VM), saying that the name is fancy-template, and it is a clone of debian-10. We are also mentioning the label color and adding a tag to the template.

In the next step, we are creating the AppVM named fancy, from the template, red as the label, and 3000MB RAM.

Enabling the .top first

# qubesctl top.enable learnqubes

This command will enable our top file. You can recheck the list of enabled .top files after this.

Applying the state to dom0

# qubesctl --show-output state.highstate

This command will make sure that all the states from all of the enabled top files will be applied to dom0. After this command finished, you should be able to see our new template and the AppVM.

Enabling vscode repo and installing the packages

We will first write a new state file for the steps, write the following to /srv/salt/add-my-fancy-system.sls file.

install-packages:
  pkg.installed:
    - pkgs:
      - htop
      - sl
      - git
  - refresh: True

install-python-apt-for-repo-config:
  pkg.installed:
    - pkgs:
      - python-apt
   
configure-apt-test-apt-repo:
  pkgrepo.managed:
    - name: "deb [arch=amd64] https://packages.microsoft.com/repos/vscode stable main"
    - file: /etc/apt/sources.list.d/vscode.list
    - key_url: "salt://microsoft.asc"
    - clean_file: True # squash file to ensure there are no duplicates
    - require:
      - pkg: install-python-apt-for-repo-config

install-vscode:
  pkg.installed:
    - pkgs:
      - code

You can read all the details about pkg module, and here we are installing a few packages first. While installing the initial packages, we also make sure to refresh the database (think about apt update). To create the apt repository, we used pkgrepo salt module. You will find one interesting thing in that section, and we are mentioning a GPG public key for the repository.

We actually have to download it in a VM and move it to the dom0 in the same /srv/salt directory.

# qvm-run --pass-io devvm β€˜cat /home/user/microsoft.asc’ > /srv/salt/microsoft.asc

Remember to replace devvm with the right AppVM in your system.

We will also update the top file so that it knows to use the make-my-fancy-system.sls file for our fancy-template.

The following is the updated top file.

base:
  dom0:
    - fancy-template

  fancy-template:
    - make-my-fancy-system

Then, we can ask Qubes to apply the state to only the fancy-template VM.

# qubesctl --show-output --skip-dom0 --targets fancy-template state.highstate

This command should create the right state in the fancy-template. Remember to shut down the template and the AppVM (if they are running), and then start the fancy AppVM again. You will find it has all the packages, including VS Code.
Which verison of Python are you running?

The title of the is post is misleading.

I actually want to ask you which version of Python3 are you running? Yes, it is a question I have to ask myself based on projects I am working on. I am sure there are many more people in the world who are also in the similar situation.

Just to see what all versions of Python(3) I am running in different places:

  • Python 3.7.3
  • Python 3.5.2
  • Python 3.6.9
  • Python 3.7.4
  • Python 2.7.5
  • Python 3.7.6

What about you?