Kushal Das

FOSS and life. Kushal Das talks here.

kushal76uaid62oup5774umh654scnu5dwzh4u2534qxhcbi4wbab3ad.onion

Adding directory to path in csh on FreeBSD

While I was trying to install rust on a FreeBSD box, I figured that I will have to update the path on the system with directory path of the ~/.cargo/bin. I added the following line in the ~/.cshrc file for the same.

set path = ( $path /home/kdas/.cargo/bin)

I am yet to learn much about csh, but, I can count this as a start.

Using signify tool for sign and verification

We generally use GNUPG for sign and verify files on our systems. There are other tools available to do so; some tools are particularly written only for this purpose. signify is one such tool from the OpenBSD land.

How to install signify?

pkg install signify

I used the above command to install the tool on my FreeBSD system, and you can install it in your Debian system too, the tool is called signify-openbsd as Debian already has another tool with the same name. signify is yet to be packaged for Fedora, if you are Fedora packager, you may want to package this one for all of us.

Creating a public/private key pair

signify -G -s atest.sec -p atest.pub -c "Test key for blog post"

The command will also ask for a password for the secret key. -c allows us to add a comment in our key files. The following is the content of the public keyfile.

untrusted comment: Test key for blog post public key 
RWRjWJ28QRKKQCXxYPqwbnOqgsLYQSwvqfa2WDpp0dRDQX2Ht6Xl4Vz4

As it is very small in size, you can even create a QR code for the same.

Signing a file

In our demo directory, we have a hello.txt file, and we can use the newly generated key to create a signature.

signify -S -s atest.sec -m hello.txt

This will create a hello.txt.sig file as the signature.

Verifying the signature

$ signify -V -p atest.pub -m hello.txt
Signature Verified

This assumes the signature file in the same directory. You can find the OpenBSD signature files under /usr/local/etc/signify (or in /etc/signify/ if you are on Debian).

To know more about the tool, read this paper.

A few bits on tmux

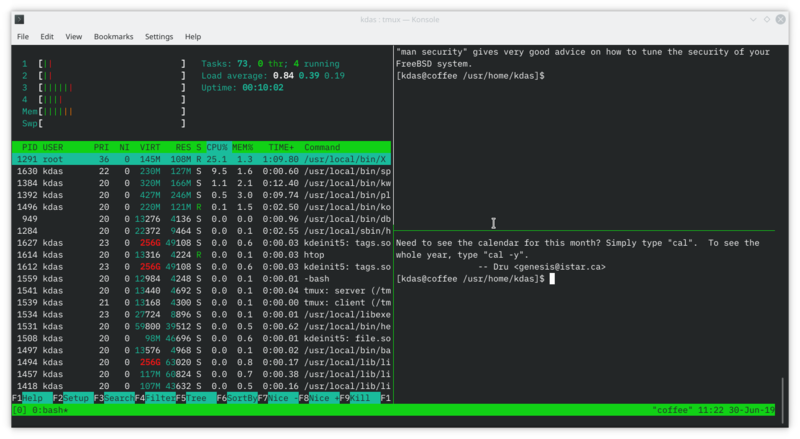
I don’t remember when I started using tmux, but, the move from screen to tmux was quick. I have it installed on all of my systems and VMs. Though I never bothered to have a proper configuration file, it also means that I never used any plugin or other particular configuration. I don’t prefer to use plugins for command line applications much (for example in Vim), as not all systems will have those plugins installed.

tmux screenshot

While working on OSCP labs, I wished for a way to keep my tmux sessions logged, as that helps to create the report or remember the process in the future. Later, I found IPPSec has a video on their usage of tmux, which includes a plugin to log tmux sessions. I decided to give it a go and created my tmux.conf based on the same.

$ cat ~/.tmux.conf

# Remap prefix to screens
set -g prefix C-a
bind C-a send-prefix
unbind C-b

# Other values
set -g history-limit 100000
set -g allow-rename off

# Join windows
bind-key j command-prompt -p "Join pane from:"  "join-pane -s '%%'"
bind-key s command-prompt -p "Send pane to:"  "join-pane -t '%%'"

# Search mode VI
set-window-option -g mode-keys vi
bind -T copy-mode-vi y send-keys -X copy-pipe-and-cancel 'xclip -in -selection clipboard'

# git clone https://github.com/tmux-plugins/tmux-logging
run-shell /opt/tmux-logging/logging.tmux

Following IPPSec, I have also converted the prefix key to Ctrl+a. This change helps to use another tmux in a remote system, where the default Ctrl+b works as the prefix key. I have also moved the default search to vi mode. You can start selecting text by pressing the spacebar, and then press y to copy text to the primary system clipboard, and helps to copy text easily to any other GUI application. This feature requires xclip tool from the system packages.

I have also cloned the tmux-logging repository under /opt.

On Twitter, Justin Garrison pointed me to his super amazing awesome-tmux repository, which contains many many useful resources on tmux. I spent a good part of reading The Tao of tmux.

Now, my tmux is working the way I want on my Linux systems and also on the FreeBSD laptop (where I am writing this blog post). Btw, if you search tmux cheatsheet on https://duckduckgo.com it provides a lovely view of the cheat sheet in the result page.

FreeBSD on a Thinkpad 230

From the first-ever conference I attended, I started picking up many tools and habits from other participants, speakers, and friends. It is still the same with many new conferences I go to, by meeting new people and learning about new technologies, or sometimes about technologies which are not so new.

I use Linux as my primary operating system at home over 15 years now, getting a good Internet connection helped to make it happen. It was the same for my servers too. I do run different distributions, depending on the kind of work that needs to be done. When I go to many language-specific or general technical conferences, I do always find some discussions related to which distribution is good for what. However, whenever I met Trouble aka Philip Paeps, his lines are always amusing, but, also making questions about how FreeBSD differs from Linux in every possible way. I had FreeBSD running in few VMs at home, which is okay to have an understanding of the basics. To know more in details, I decided to move my primary site https://kushaldas.in over FreeBSD around a year ago. Till now it is running fine, and as a simple static website, there is not much to do anyway.

Last week during rootconf I again met trouble and a bunch of old friends (who all are regular in the FreeBSD world). They helped me to understand how to upgrade to the latest release, and showed a few more tricks. I wanted to use it more to become familiar with command line tools.

I got a X230 laptop with CoreBoot and installed FreeBSD 12 on it. The necessary installation went very smooth. Then, I decided to have KDE as a desktop environment on it. I followed the guide. However, I failed to get sddm working. Even though friends at #freebsd and #bsdin tried to help/debug, only in the evening, we figured out that I was missing some critical Xorg related packages.

# pkg install xf86-input-keyboard xf86-input-mouse xf86-input-synaptics xf86-input-libinput xauth

Also, remember to upgrade the system to the latest.

# freeebsd-update fetch
# freebsd-update install

I have installed the regular applications I use in my standard Linux boxes, including FocusWriter. Remember to install the hunspell package and corresponding dictionary for your language, if you want to have spell checking in FocusWriter.

I am writing this blog post in the same tool in the FreeBSD system. I completely forgot how good the old X series ThinkPad keyboards were feeling nice to type on this. I will keep using this system for learning purpose and hoping to write more in the coming days.