Kushal Das

FOSS and life. Kushal Das talks here.

kushal76uaid62oup5774umh654scnu5dwzh4u2534qxhcbi4wbab3ad.onion

vcrpy for web related tests

Couple of weeks ago, Jen pointed me to vcrpy. This is a Python implementation of Ruby’s library with same name.

What is vcrpy?

It is a Python module which helps to write faster and simple tests involving HTTP requests. It records all the HTTP interactions in plain text files (by default in a YAML file). This helps to write deterministic tests, and also to run them in offline.

It works well with the following Python modules.

  • requests
  • aiohttp
  • urllib3
  • tornado
  • urllib2
  • boto3

Usage example

Let us take a very simple test case.

import unittest
import requests

class TestExample(unittest.TestCase):

    def test_httpget(self):
        r = requests.get("https://httpbin.org/get?name=vcrpy&lang=Python")
        self.assertEqual(r.status_code, 200)
        data = r.json()
        self.assertEqual(data["args"]["name"], "vcrpy")
        self.assertEqual(data["args"]["lang"], "Python")


if __name__ == "__main__":
    unittest.main()

In the above code, we are making a HTTP GET request to the https://httpbin.org site and examining the returned JSON data. Running the test takes around 1.75 seconds in my computer.

$ python test_all.py
.
------------------------------------------------------------------
Ran 1 test in 1.752s

OK

Now, we can add vcrpy to this project.

import unittest
import vcr
import requests

class TestExample(unittest.TestCase):

    @vcr.use_cassette("test-httpget.yml")
    def test_httpget(self):
        r = requests.get("https://httpbin.org/get?name=vcrpy&lang=Python")
        self.assertEqual(r.status_code, 200)
        data = r.json()
        self.assertEqual(data["args"]["name"], "vcrpy")
        self.assertEqual(data["args"]["lang"], "Python")

if __name__ == "__main__":
    unittest.main()

We imported vcr module, and added a decorator vcr.use_cassette to our test function. Now, when we will execute the test again, vcrpy will record the HTTP call details in the mentioned YAML file, and use the same for the future test runs.

$ python test_all.py
.
------------------------------------------------------------------
Ran 1 test in 0.016s

OK

You all can also notice the time taken to run the test, around 0.2 second.

Read the project documentation for all the available options.

Setting up SecureDrop 0.5rc2 in VMs for QA

Next week we have the 0.5 release of SecureDrop. SecureDrop is an open-source whistleblower submission system that media organizations can use to securely accept documents from and communicate with anonymous sources. It was originally created by the late Aaron Swartz and is currently managed by Freedom of the Press Foundation.

In this blog post I am going to tell you how can you set up a production instance of SecureDrop in VM(s) in your computer, and help us to test the system for the new release.

Required software

We provision our VM(s) using Vagrant. You will also need access to a GPG key (along with the private key) to test the whole workflow. The set up is done using Ansible playbooks.

Another important piece is a Tails VM for the administrator/journalist workstation. Download the latest (Tails 3.3) ISO from their website.

You will need at least 8GB RAM in your system so that you can have the 3 VM(s) required to test the full system.

Get the source code

For our test, we will first set up a SecureDrop 0.4.4 production system, and then we will update that to the 0.5rc release.

Clone the SecureDrop repository in a directory in your local computer. And then use the following commands to set up two VM(s). One of the VM is for the application server, and the other VM is the monitor server.

$ vagrant up /prod/ --no-provision

In case you don’t have the right image file for KVM, you can convert the Virtualbox image following this blog post.

Create a Tails VM

Follow this guide to create a virtualized Tails environment.

After the boot, remember to create a Persistence storage, and also setup a administrator password (you will have to provide the administrator password everytime you boot the Tails VM).

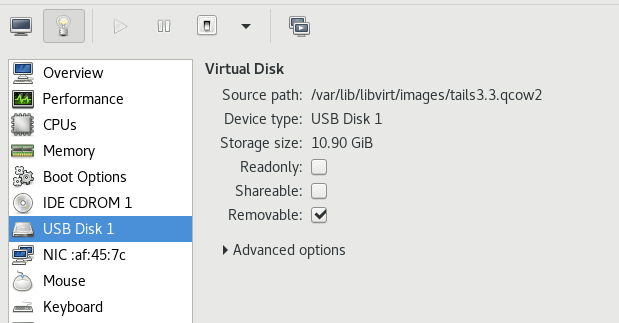
For KVM, remember to mark the drive as a removable USB storage and also mark it in the Booting Options section after the installation.

Then, you can mount the SecureDrop git repository inside the Tails VM, I used this guide for the same.

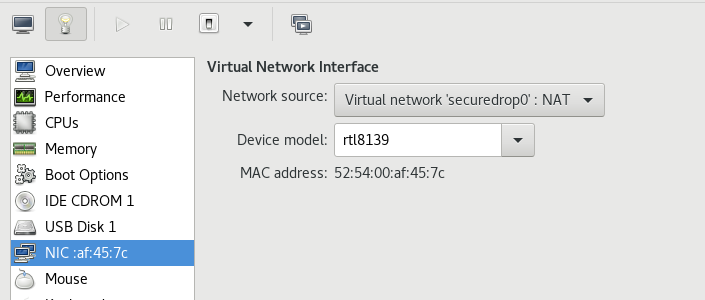
Also remember to change the Virtual Network Interface in the virt-manager to Virtual network ‘securedrop0’: NAT for the Tails VM.

Install SecureDrop 0.4.4 release in the production VM(s).

For the next part of the tutorial, I am assuming that the source code is at the ~/Persistent/securedrop directory.

Move to 0.4.4 tag

$ git checkout 0.4.4

We will also have remove a validation role from the 0.4.4 Ansible playbook, otherwise it will fail on a Tails 3.3 system.

diff --git a/install_files/ansible-base/securedrop-prod.yml b/install_files/ansible-base/securedrop-prod.yml
index 877782ff..37b27c14 100755
--- a/install_files/ansible-base/securedrop-prod.yml
+++ b/install_files/ansible-base/securedrop-prod.yml
@@ -11,8 +11,6 @@
# Don't clobber new vars file with old, just create it.
args:
creates: "{{ playbook_dir }}/group_vars/all/site-specific"
- roles:
- - { role: validate, tags: validate }
- name: Add FPF apt repository and install base packages.
hosts: securedrop

Create the configuration

In the host system make sure that you export your GPG public key to a file in the SecureDrop source directory, for my example I stored it in install_files/ansible-base/kushal.pub. I also have the exported insecure key from Vagrant. You can find that key at ~/.vagrant.d/insecure_private_key in your host system. Make sure to copy that file too in the SecureDrop source directory so that we can later access it from the Tails VM.

Inside of the Tails VM, give the following command to setup the dependencies.

$ ./securedrop-admin setup

Next, we will use the sdconfig command to create the configuration file.

$ ./securedrop-admin sdconfig

The above command will ask you many details, you can use the defaults in most cases. I am pasting my configuration file below, so that you can look at the example values I am using. The IP addresses are the default address for the production Vagrant VM(s). You should keep them the same as mine.

---
### Used by the common role ###
ssh_users: vagrant
dns_server: 8.8.8.8
daily_reboot_time: 4 # An integer between 0 and 23

# TODO Should use ansible to gather this info
monitor_ip: 10.0.1.5
monitor_hostname: mon
app_hostname: app
app_ip: 10.0.1.4

### Used by the app role ###
# The securedrop_header_image has to be in the install_files/ansible-base/ or
# the install_files/ansible-base/roles/app/files/ directory
# Leave set to empty to use the SecureDrop logo.
securedrop_header_image: ""
# The app GPG public key has to be in the install_files/ansible-base/ or
# install_files/ansible-base/roles/app/files/ directory
#
# The format of the app GPG public key can be binary or ASCII-armored,
# the extension also doesn't matter
#
# The format of the app gpg fingerprint needs to be all capital letters
# and zero spaces, e.g. "B89A29DB2128160B8E4B1B4CBADDE0C7FC9F6818"
securedrop_app_gpg_public_key: kushal.pub
securedrop_app_gpg_fingerprint: A85FF376759C994A8A1168D8D8219C8C43F6C5E1

### Used by the mon role ###
# The OSSEC alert GPG public key has to be in the install_files/ansible-base/ or
# install_files/ansible-base/roles/app/files/ directory
#
# The format of the OSSEC alert GPG public key can be binary or
# ASCII-armored, the extension also doesn't matter
#
# The format of the OSSEC alert GPG fingerprint needs to be all capital letters
# and zero spaces, e.g. "B89A29DB2128160B8E4B1B4CBADDE0C7FC9F6818"
ossec_alert_gpg_public_key: kushal.pub
ossec_gpg_fpr: A85FF376759C994A8A1168D8D8219C8C43F6C5E1
ossec_alert_email: kushaldas@gmail.com
smtp_relay: smtp.gmail.com
smtp_relay_port: 587
sasl_username: fakeuser
sasl_domain: gmail.com
sasl_password: fakepassword

### Use for backup restores ###
# If the `restore_file` variable is defined, Ansible will overwrite the state of
# the app server with the state from the restore file, which should have been
# created by a previous invocation of the "backup" role.
# To use uncomment the following line and enter the filename between the quotes.
# e.g. restore_file: "sd-backup-2015-01-15--21-03-32.tar.gz"
#restore_file: ""
securedrop_app_https_on_source_interface: False
securedrop_supported_locales: []

Starting the actual installation

Use the following two commands to start the installation.

$ ssh-add insecure_private_key
$ ./securedrop-admin install

Then wait for a while for the installation to finish.

Configure the Tails VM as a admin workstation

$ ./securedrop-admin tailsconfig

The above command expects that the previous installation step finished without any issue. The addresses for the source and journalist interfaces can be found in the install_files/ansible-base/*ths files at this moment.

After this command, you should see two desktop shortcuts on your Tails desktop, 
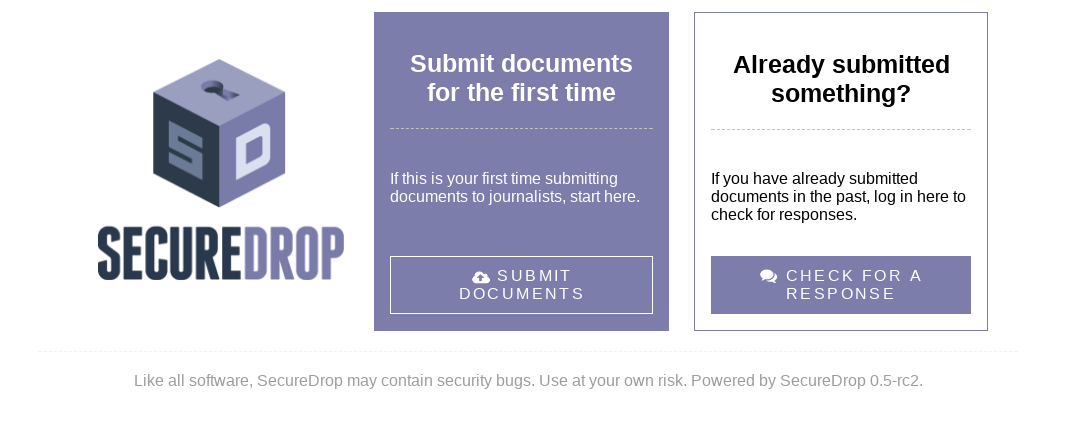
one pointing to the source interface, and one for journalist interface. Double click on the source interface and make sure that you can view the source interface and the SecureDrop version mentioned in the page is 0.4.4.

Now update the systems to the latest SecureDrop rc release

The following commands in the Tails VM will help you to update to the latest RC release.

$ source .venv/bin/activate
$ cd install_files/ansible-base
$ torify wget https://gist.githubusercontent.com/conorsch/e7556624df59b2a0f8b81f7c0c4f9b7d/raw/86535a6a254e4bd72022865612d753042711e260/securedrop-qa.yml`
$ ansible-playbook -vv --diff securedrop-qa.yml

Then we will SSH into both app and mon VM(s), and give the following the command to update to the latest RC.

$ sudo cron-apt -i -s

Note: You can use ssh app and ssh mon to connect to the systems. You can also checkout the release/0.5 branch and rerun the tailsconfig command. That will make sure the desktop shortcuts are trusted by default.

After you update both the systems, if you reopen the source interface in the Tails VM again, you should see version mentioned as a RC release.

Now, if you open up the source interface onion address in the Tor browser on your computer, you should be able to submit documents/messages.

SecureDrop hackathon at EFF office next week

On December 7th from 6PM we are having a SecureDrop hackathon at the EFF office. Please RSVP and come over to start contributing to SecureDrop.

State of tests for Fedora Cloud and Atomic in March 2016

Till Fedora 22 release we have tested our Cloud images only with manual help. The amazing Fedora QA team organized test days, and also published detailed documentation on the wiki about how to test the images. People tried to help as when possible, as not having access to a Cloud was a problem for many. The images are also big in size (than any random RPM), so that also meant only people with enough bandwidth can help.

During Fedora 23 release cycle, we worked on a change for Automated Two Week Atomic release. A part of it was about having automated testing, which we enabled using Autocloud project. This automatically tests every Cloud Base and Atomic qcow2 images, and libvirt, and Virtualbox based Vagrant images.

This post will explain the state of currently activated tests for the same. These tests are written as Python3 unittest cases.

At first we run 5 non-gating tests, failing any of these will not do a release blocking, but at the end of each run we get the summary for all of these non-gating tests. These include bzip2, cpio, diffutils, Audit.

Then we go ahead in testing the basics test cases, things like journald logging, package install (only on base image), SELinux should be enforcing, and no service should fail during startup of the image.

The next test is about checking that /tmp should be world writable. We then move into testing the mount status of the /tmp filesystem. If it is a link, then also it should behave properly. Our next test checks that for Vagrant images we are using predictable naming convention of network devices, basically checking the existing of eth0.

We then disable crond service, after a reboot we make sure that the service is still in disabled state, and do the rest of service manipulations. We also check that the user journald log file exists on that reboot, this comes from a regression test. Then we reboot the instance again.

After this second reboot, we test the status of the crond service once again, and then we move to our special tests cases related to Atomic host. Means these tests will run only on Atomic hosts (both cloud, and Vagrant ones).

In the first test we check if the package docker is at all installed or not. Yes, if you guessed that this is a regression test, then you are correct. We once had an image without the docker package inside :) Next, we test the docker storage setup, that should be up, and in running state. We then run the busybox image, and see that it should be able to run properly. The atomic command is used next to start the same container. Pulling in the latest Fedora image, and running it is the next test. As our next test, we try to mount / as /host in the container. The next test is about having /bin, /sbin, and /usr mounted as read only in the Atomic host. In our final test, we check that a privileged container should be able to talk to the host docker daemon.

We also have a github wiki page explaining how to write any new test case. Feel free to ping if you want to contribute, and make Fedora flying high in the Cloud.

Life of Tunir

This comics explains the birth of the project Tunir. When I started working in the Fedora Cloud SIG, I volunteered myself to help with the testing of the Cloud images. We have very clear guidelines about what to test, and how to test.

Basically, you have to boot up a cloud image (or the atomic image) in a Cloud or on your local computer, run a few commands in sequence, and check the output. For the first few times it was fun to do, but slowly I found it is difficult for me. Being a super lazy programmer, I thought why not use the computer to do this job, it is not music theory :) The birth of Tunir was the result of the conversation between me and even lazier me. I just had to convert the shell commands into some Python3 based unittest cases.

At beginning it could only handle the qcow2 images of cloud base and atomic image. But while working with two week atomic change, I found out that we need do the same for Vagrant based images. It is important to remember that Fedora project generates two different kind of Vagrant boxes, one for libvirt, another one for standard Virtualbox based .box file. So Tunir got the power to execute tests on any given Vagrant image. Using these features Tunir is being consumed by the Autocloud project, where we automatically test Fedora cloud and Atomic image builds. I should not forget to mention that Tunir can also connect to a remote system, and execute the tests there. Did I mention that Tunir is doing all of these with only one JSON file containing the job description, and one text file containing the commands used for the actual tests? Tunir started as a tool for a developer, who does not want to spend time in configuration, it remains in the same way.

Until a couple of releases back, Tunir actually had two types of tests in it, one type of commands which will return zero as a success value, we could also mark a set of commands as the ones which will return non-zero exit code. Right now Tunir can have a third set of commands, the non-gating tests, these commands may pass, or they may fail. But Tunir will continue executing the tests accordingly.

I wrote Tunir to test the actual OS images, but it is generic enough that it can be used to test any application. You can easily configure it to download all the dependencies of your project every time on a clean cloud/Vagrant image, and then it will build and test your application (or the full application stack along with configuration files).

Last week I have added a new weapon in Tunir's arsenal. It can now test using a given AWS AMI ID. If you run your application on AWS cloud platform, you now can use Tunir to test it there. This code is in a separate branch, but will be merged in the master this week. Following the similar style Praveen Kumar submitted a patch using which Tunir can run tests on an Openstack Cloud. We will work on it a little bit more before merging it to master branch.

You can view the tests already written for Fedora in this repository. Thanks to Trishna Guha, and Farhaan Bukhsh we now have many more test cases. I have written a document explaining how to write more tests, I have another document which explains how to debug failed tests.

What is in the future? The best way to predict your future is to create it. We have the features which we, and our users use regularly. Tunir is still simple enough for anyone to understand in less than 10 minutes. If you just want to say hi, or you are looking forward for any new feature, come to #fedora-cloud on freenode.