Kushal Das

FOSS and life. Kushal Das talks here.

kushal76uaid62oup5774umh654scnu5dwzh4u2534qxhcbi4wbab3ad.onion

Creating password input widget in PyQt

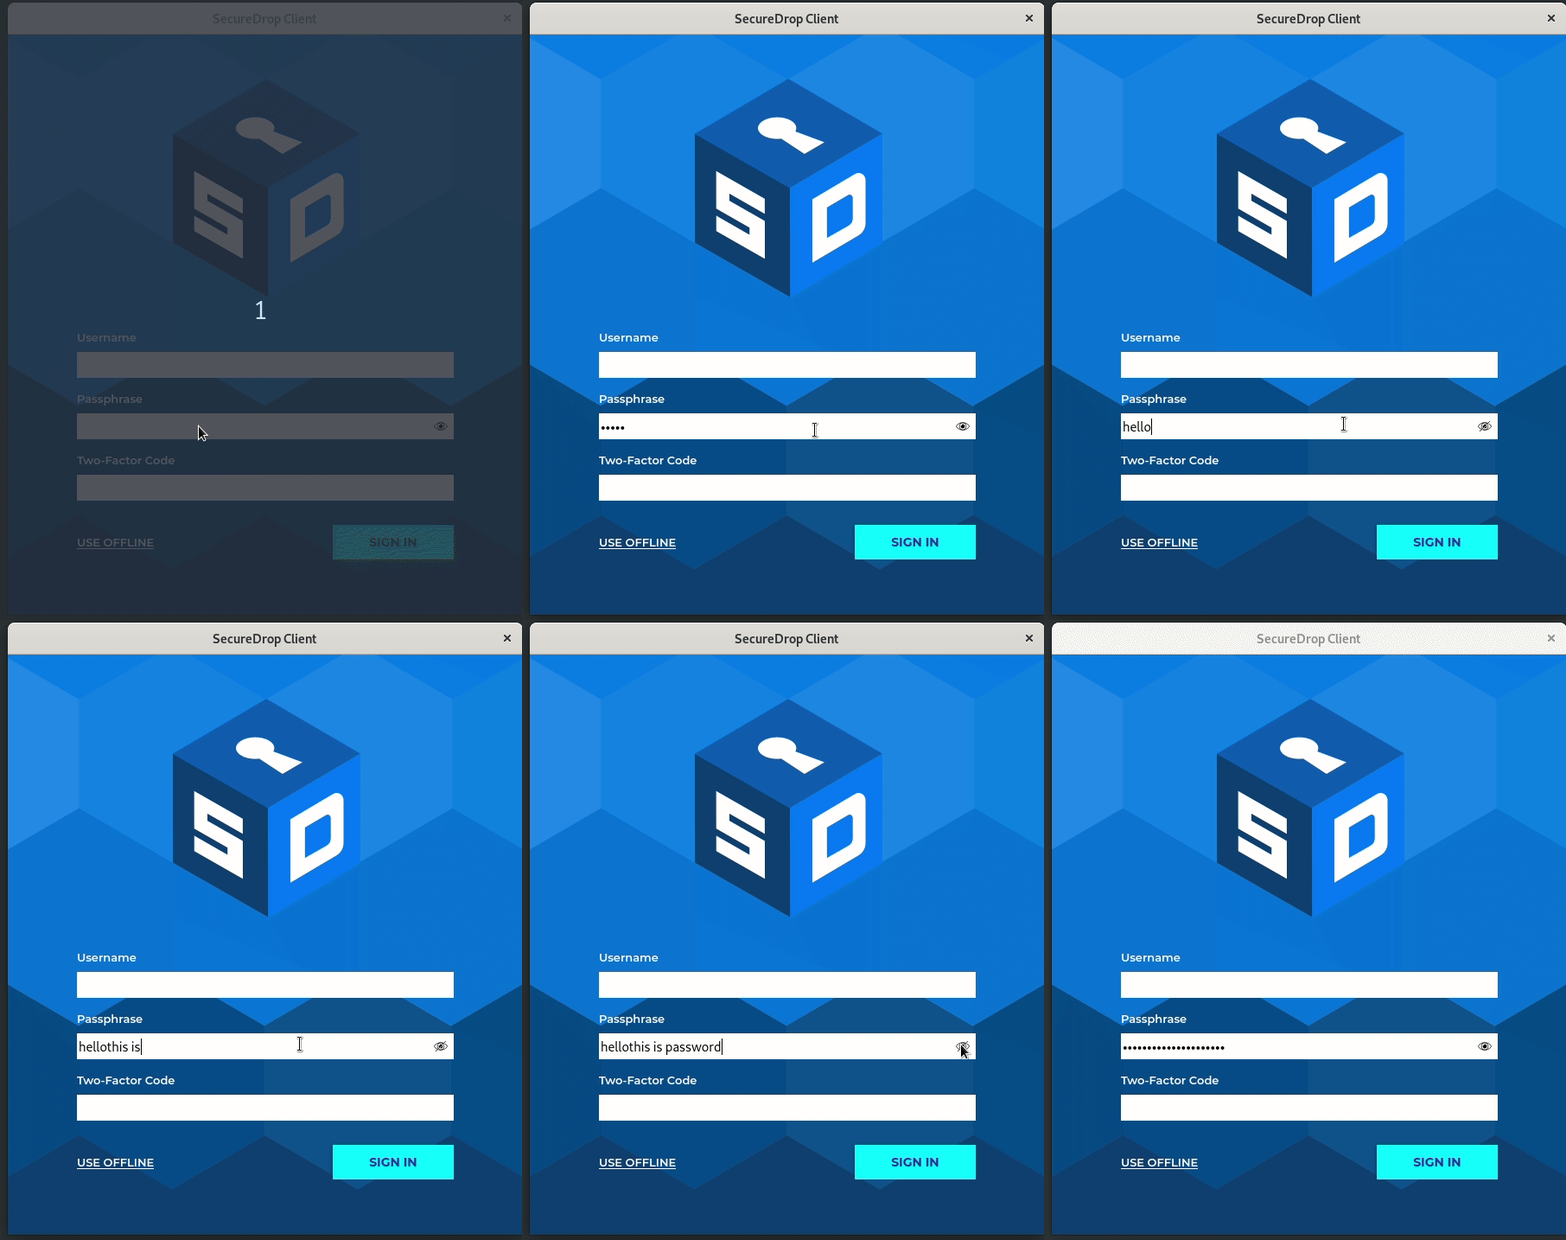
One of the most common parts of writing any desktop tool and taking password input is about having a widget that can show/hide password text. In Qt, we can add a QAction to a QLineEdit to do the same. The only thing to remember, that the icons for the QAction, must be square in aspect ratio; otherwise, they look super bad.

The following code creates such a password input, and you can see it working at the GIF at the end of the blog post. I wrote this for the SecureDrop client project.

class PasswordEdit(QLineEdit):
    """
    A LineEdit with icons to show/hide password entries
    """
    CSS = '''QLineEdit {
        border-radius: 0px;
        height: 30px;
        margin: 0px 0px 0px 0px;
    }
    '''

    def __init__(self, parent):
        self.parent = parent
        super().__init__(self.parent)

        # Set styles
        self.setStyleSheet(self.CSS)

        self.visibleIcon = load_icon("eye_visible.svg")
        self.hiddenIcon = load_icon("eye_hidden.svg")

        self.setEchoMode(QLineEdit.Password)
        self.togglepasswordAction = self.addAction(self.visibleIcon, QLineEdit.TrailingPosition)
        self.togglepasswordAction.triggered.connect(self.on_toggle_password_Action)
        self.password_shown = False

    def on_toggle_password_Action(self):
        if not self.password_shown:
            self.setEchoMode(QLineEdit.Normal)
            self.password_shown = True
            self.togglepasswordAction.setIcon(self.hiddenIcon)
        else:
            self.setEchoMode(QLineEdit.Password)
            self.password_shown = False
            self.togglepasswordAction.setIcon(self.visibleIcon)

Updates on Unoon in December 2019

This Saturday evening, I sat with Unoon project after a few weeks, I was continuously running it, but, did not resume the development effort. This time Bhavin also joined me. Together, we fixed a location of the whitelist files issue, and unoon now also has a database (using SQLite), which stores all the historical process and connection information. In the future, we will provide some way to query this information.

As usual, we learned many new things about different Linux processes while doing this development. One of the important ones is about running podman process, and how the user id maps to the real system. Bhavin added a patch that fixes a previously known issue of crashing due to missing user name. Now, unoon shows the real user ID when it can not find the username in the /etc/passwd file.

You can read about Unoon more in my previous blog post.

Unoon, a tool to monitor network connections from my system

I always wanted to have a tool to monitor the network connections from my laptop/desktop. I wanted to have alerts for random processes making network connections, and a way to block those (if I want to).

Such a tool can provide peace of mind in a few cases. A reverse shell is one the big one, just in case if I manage to open any random malware (read downloads) on my regular Linux system, I want to be notified about the connections it will make. The same goes for trying out any new application. I prefer to use Qubes OS based VMs testing random binaries and applications, and it is also my daily driver. But, the search for a proper tool continued for some time.

Introducing unoon
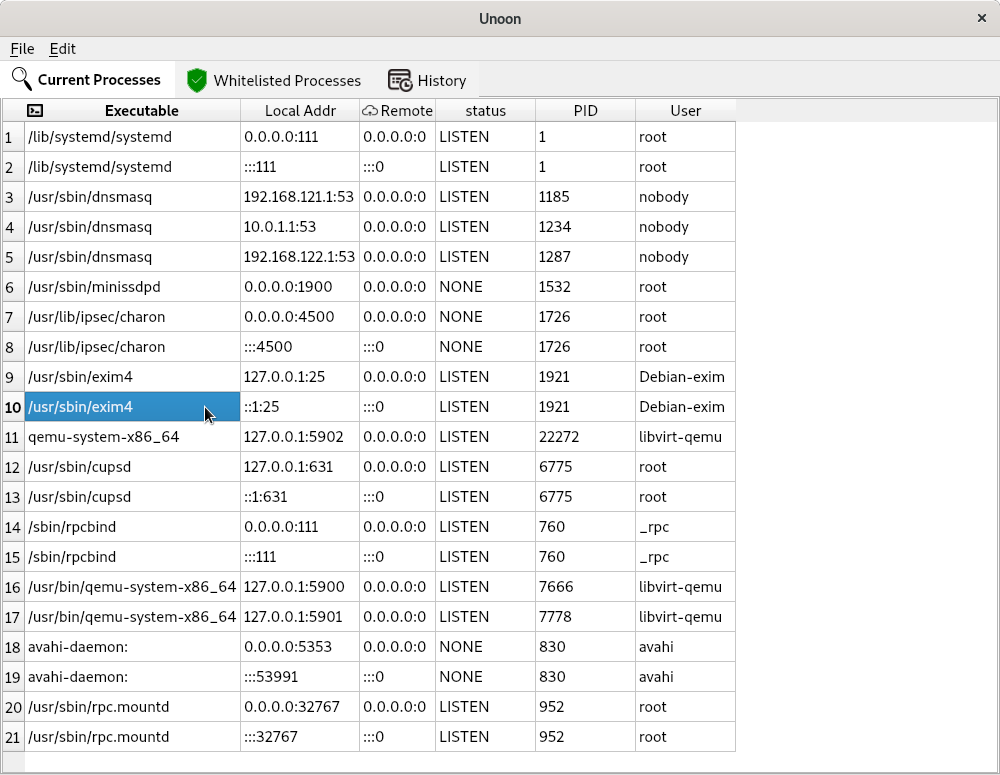
Unoon main screen

Unoon is a desktop tool that I started writing for monitoring network connections for my system. It has two parts, the backend is written in Go and that monitor and adds details to a local Redis instance (this should be password protected).

I started writing this backend in Rust, but then I had to rewrite it in Go as I wanted to reuse parts of my code from another project so that I can track all DNS queries from the system. This helps to make sense of the data; otherwise, we will see some random IP numbers in the UI.

The frontend is written using PyQt5. Around 14 years ago, I released my first ever released tool using PyQt, and it is still my favorite library to create a desktop application.

Using the development version of unoon

The README has the build steps. You have to start the backend as a daemon, the easiest option is to run it inside of a tmux shell. At first, it will show all the currently running processes in the first “Current processes” tab. If you add any executable (via the absolute path) in the Edit->whitelists dialog and then save (and then restart the UI app), those will turn up the whitelisted processes.
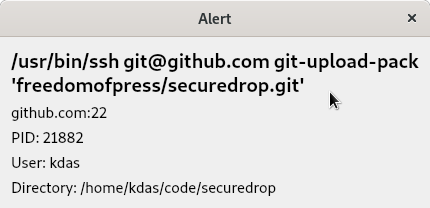
Unoon alert

For any new process making network calls, you will get an alert dialog. In the future, we will have the option to block hosts/ips via this alert dialog.
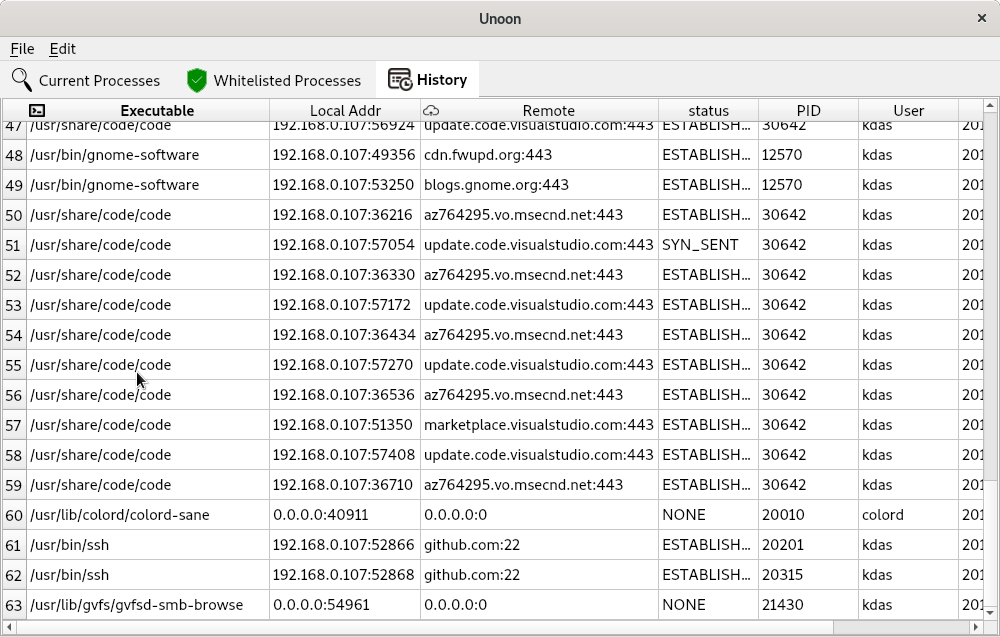
Unoon history

The history tabs will show all alerts history in the runtime. Again, we will have to save this information in a local database, so that we can have better statistics shown to the users.

You can move between different tabs/tables via Alt+1 or Alt+2 and Alt+3 key combinations.

I will add more options to create better-whitelisted processes. There is also ongoing work to mark any normal process as a whitelisted one from the UI (by right-clicking).

Last week, Micah and I managed to spend some late-night hotel room hacking on this tool.

How can you help?

You can start by testing the code base, and provide suggestions on how to improve the tool. Help in UX (major concern) and patches are always welcome.

A small funny story

A few weeks back, on a Sunday late night, I was demoing the very initial version of the tool to Saptak. While we were talking about the tool, suddenly, an entry popped up in the UI /usr/bin/ssh, to a random host. A little bit of search showed that the IP belongs to an EC2 instance. For the next 40 minutes, we both were trying to debug to find out what happened and if the system was already compromised or not. Luckily I was talking about something else before, and to demo something (we totally forgot that topic), I was running Wireshark on the system. From there, we figured that the IP belongs to github.com. It took some more time to figure out that one of my VS Code extension was updating the git, and was using ssh. This is when I understood that I need to show the real domain names on the UI than random IP addresses.
PyQt5 thread example

PyQt is the Python binding for Qt library. To write Qt5 code, we use PyQt5 module. Like many others, my first introduction to GUI application development was using PyQt. Back in foss.in 2005 a talk from Sirtaj introduced me to PyQt, and later fall in love with it.

I tried to help in a GUI application after 8 years (I think), a lot of things have changed in between. But, Qt/PyQt still seems to be super helpful when it comes to ease of development. Qt has one of the best documentation out there for any Open Source project.

Many students start developing GUI tools by replacing one of the command line tool they use. Generally the idea is very simple, take some input in the GUI, and then process it (using a subprocess call) on a button click, and then show the output. The subprocess call happens over a simple method, means the whole GUI gets stuck till the function call finishes. We can fix this issue by using a QThread. In the below example, we will just write a frontend for git clone command and then will do the same using QThread.

Setting up project directory

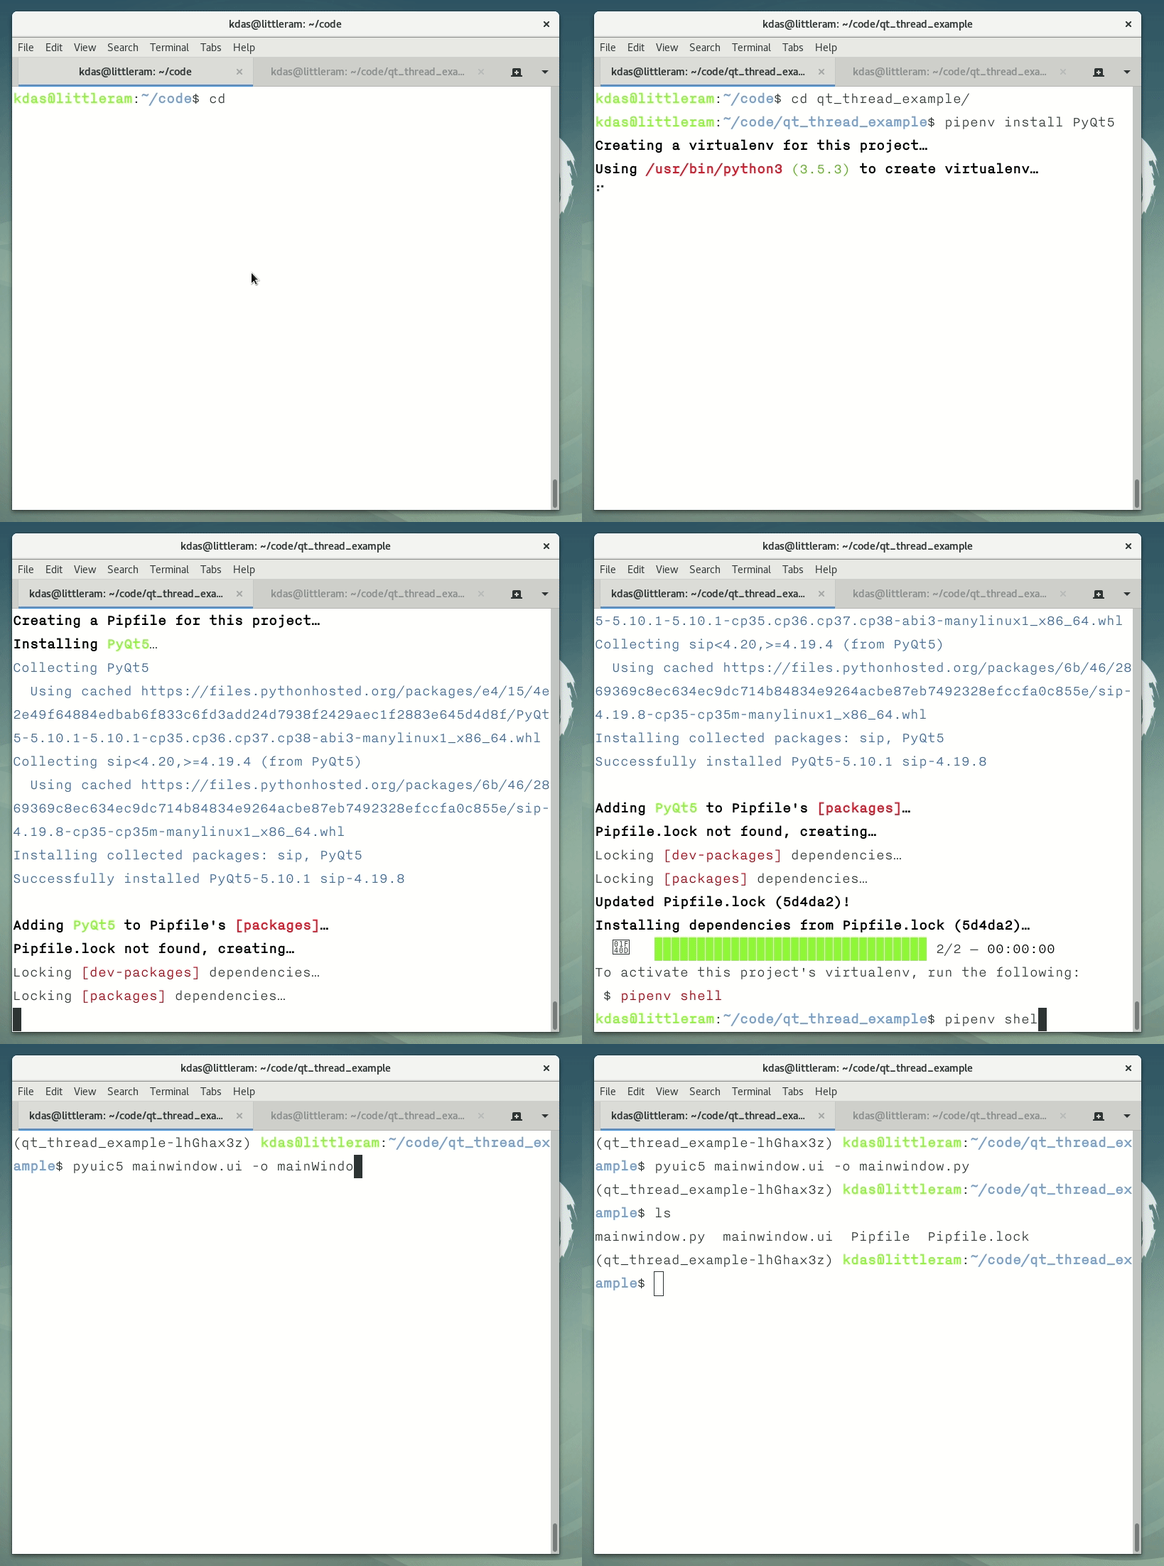
I have used qt creator to create a simple MainWindow form and saved it as mainwindow.ui in the project directory. Then, used pipenv to create a virtualenv and also installed the pyqt5 module. Next, used the pyuic5 command to create a Python file from UI file.

The code does not have error checks, the subprocess documentation should give you enough details about how to add them.

Doing git clone without any thread

The following code creates a temporary directory, and then git clones any given git repository into that.

#!/usr/bin/python3

import sys
import tempfile
import subprocess
from PyQt5 import QtWidgets

from mainwindow import Ui_MainWindow


class ExampleApp(QtWidgets.QMainWindow, Ui_MainWindow):

    def __init__(self, parent=None):
        super(ExampleApp, self).__init__(parent)
        self.setupUi(self)
        # Here we are telling to call git_clone method when
        # someone clicks on the pushButton.
        self.pushButton.clicked.connect(self.git_clone)

    # Here is the actual method which does git clone
    def git_clone(self):
        git_url = self.lineEdit.text()  # Get the git URL
        tmpdir = tempfile.mkdtemp()  # Creates a temporary directory
        cmd = "git clone {0} {1}".format(git_url, tmpdir)
        subprocess.check_output(cmd.split())  # Execute the command
        self.textEdit.setText(tmpdir)  # Show the output to the user


def main():
    app = QtWidgets.QApplication(sys.argv)
    form = ExampleApp()
    form.show()
    app.exec_()


if __name__ == '__main__':
    main()

Doing git clone with a thread

In the below example we added a new CloneThread class, it has a run method, which gets called when the thread starts. At the end of the run, we are emitting a signal to inform the main thread that the git clone operation has finished.

#!/usr/bin/python3

import sys
import tempfile
import subprocess
from PyQt5 import QtWidgets
from PyQt5.QtCore import QThread, pyqtSignal

from mainwindow import Ui_MainWindow


class CloneThread(QThread):
    signal = pyqtSignal('PyQt_PyObject')

    def __init__(self):
        QThread.__init__(self)
        self.git_url = ""

    # run method gets called when we start the thread
    def run(self):
        tmpdir = tempfile.mkdtemp()
        cmd = "git clone {0} {1}".format(self.git_url, tmpdir)
        subprocess.check_output(cmd.split())
        # git clone done, now inform the main thread with the output
        self.signal.emit(tmpdir)


class ExampleApp(QtWidgets.QMainWindow, Ui_MainWindow):

    def __init__(self, parent=None):
        super(ExampleApp, self).__init__(parent)
        self.setupUi(self)
        self.pushButton.setText("Git clone with Thread")
        # Here we are telling to call git_clone method when
        # someone clicks on the pushButton.
        self.pushButton.clicked.connect(self.git_clone)
        self.git_thread = CloneThread()  # This is the thread object
        # Connect the signal from the thread to the finished method
        self.git_thread.signal.connect(self.finished)

    def git_clone(self):
        self.git_thread.git_url = self.lineEdit.text()  # Get the git URL
        self.pushButton.setEnabled(False)  # Disables the pushButton
        self.textEdit.setText("Started git clone operation.")  # Updates the UI
        self.git_thread.start()  # Finally starts the thread

    def finished(self, result):
        self.textEdit.setText("Cloned at {0}".format(result))  # Show the output to the user
        self.pushButton.setEnabled(True)  # Enable the pushButton


def main():
    app = QtWidgets.QApplication(sys.argv)
    form = ExampleApp()
    form.show()
    app.exec_()


if __name__ == '__main__':
    main()

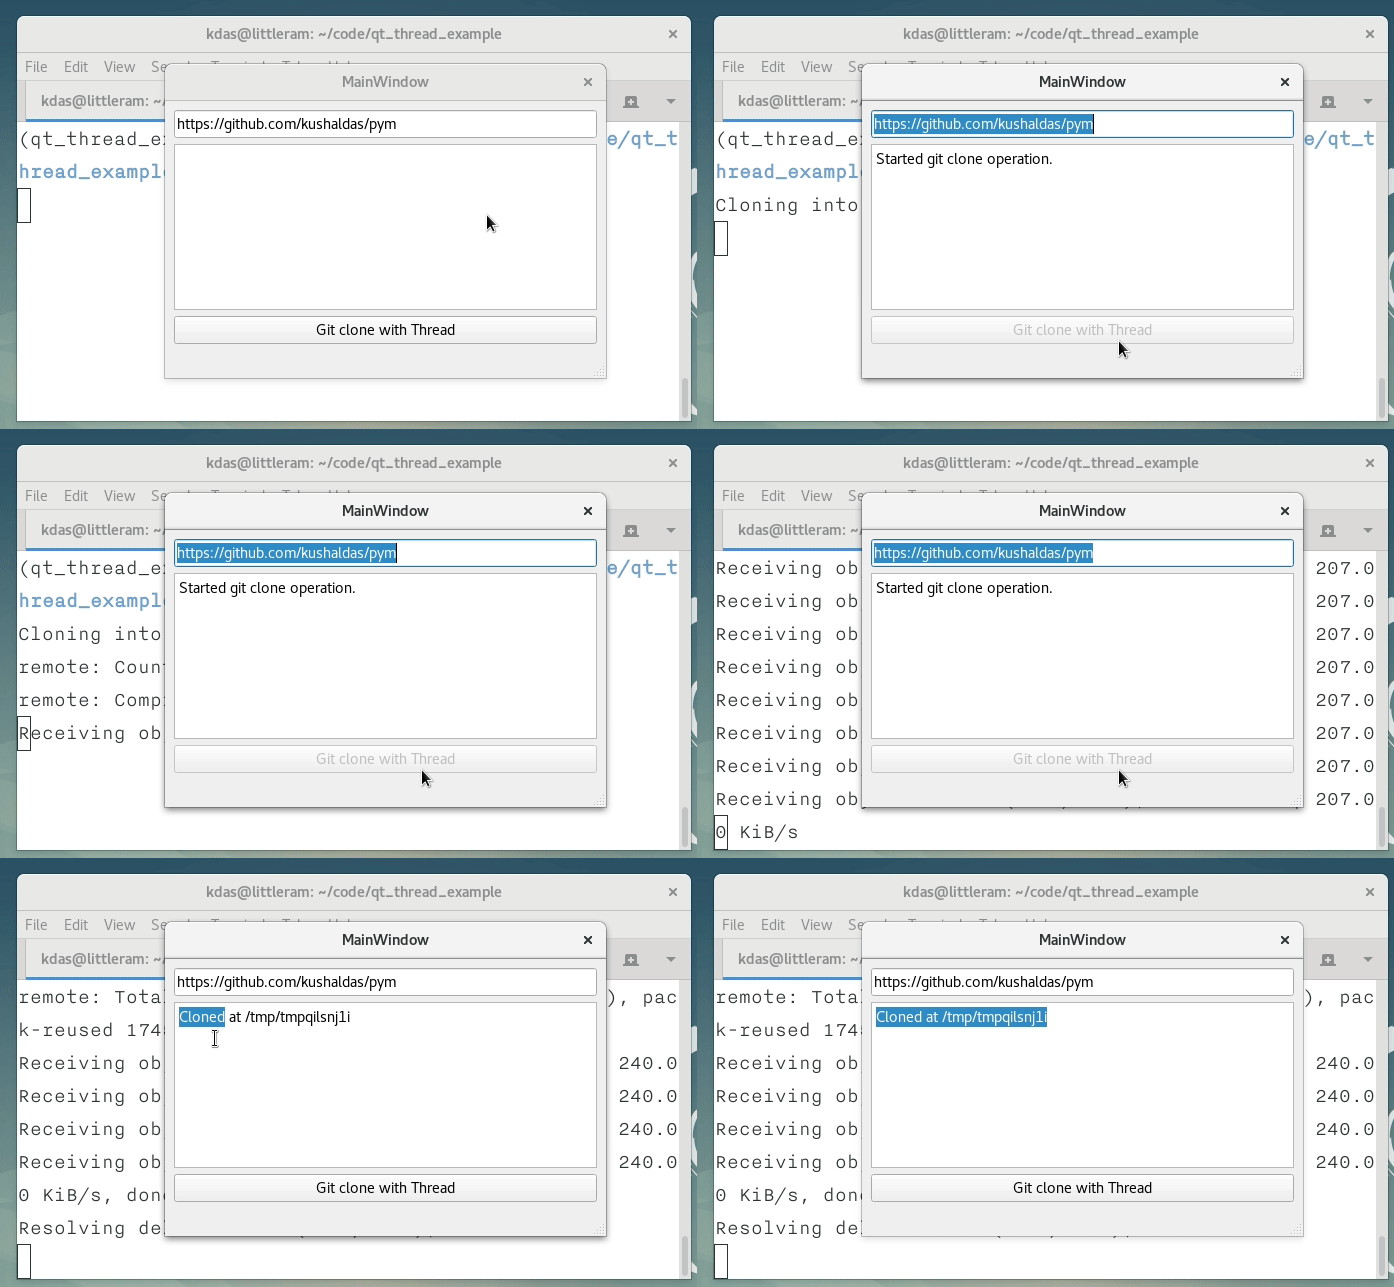
The example looks like the above GIF. You can find the source code here. You can find a bigger example in the journalist_gui of the SecureDrop project.