Kushal Das

FOSS and life. Kushal Das talks here.

kushal76uaid62oup5774umh654scnu5dwzh4u2534qxhcbi4wbab3ad.onion

Using hexchat on Flatpak on Qubes OS AppVM

Flatpak is a system for building, distributing, and running sandboxed desktop applications on Linux. It uses BubbleWrap in the low level to do the actual sandboxing. In simple terms, you can think Flatpak as a as a very simple and easy way to use desktop applications in containers (sandboxing). Yes, containers, and, yes, it is for desktop applications in Linux. I was looking forward to use hexchat-otr in Fedora, but, it is not packaged in Fedora. That is what made me setup an AppVM for the same using flatpak.

I have installed the flatpak package in my Fedora 29 TemplateVM. I am going to use that to install Hexchat in an AppVM named irc.

Setting up the Flatpak and Hexchat

The first task is to add flathub as a remote for flatpak. This is a store where upstream developers package their application and publish.

flatpak remote-add --if-not-exists flathub https://flathub.org/repo/flathub.flatpakrepo

And then, I installed the Hexchat from the store. I also installed the version of the OTR plugin required.

$ flatpak install flathub io.github.Hexchat
<output snipped>

$ flatpak install flathub io.github.Hexchat.Plugin.OTR//18.08
Installing in system:
io.github.Hexchat.Plugin.OTR/x86_64/18.08 flathub 6aa12f19cc05
Is this ok [y/n]: y
Installing: io.github.Hexchat.Plugin.OTR/x86_64/18.08 from flathub
[####################] 10 metadata, 7 content objects fetched; 268 KiB transferr
Now at 6aa12f19cc05.

Making sure that the data is retained after reboot

All of the related files are now available under /var/lib/flatpak. But, as this is an AppVM, this will get destroyed when I will reboot. So, I had to make sure that I can keep those between reboots. We can use the Qubes bind-dirs for this in the TemplateVMs, but, as this is particular for this VM, I just chose to use simple shell commands in the /rw/config/rc.local file (make sure that the file is executable).

But, first, I moved the flatpak directory under /home.

sudo mv /var/lib/flatpak /home/

Then, I added the following 3 lines in the /rw/config/rc.local file.

# For flatpak
rm -rf /var/lib/flatpak
ln -s /rw/home/flatpak /var/lib/flatpak

This will make sure that the flatpak command will find the right files even after reboot.

Running the application is now as easy as the following command.

flatpak run io.github.Hexchat

Feel free to try out other applications published in Flathub, for example, Slack or the Mark Text
Building wheels and Debian packages for SecureDrop on Qubes OS

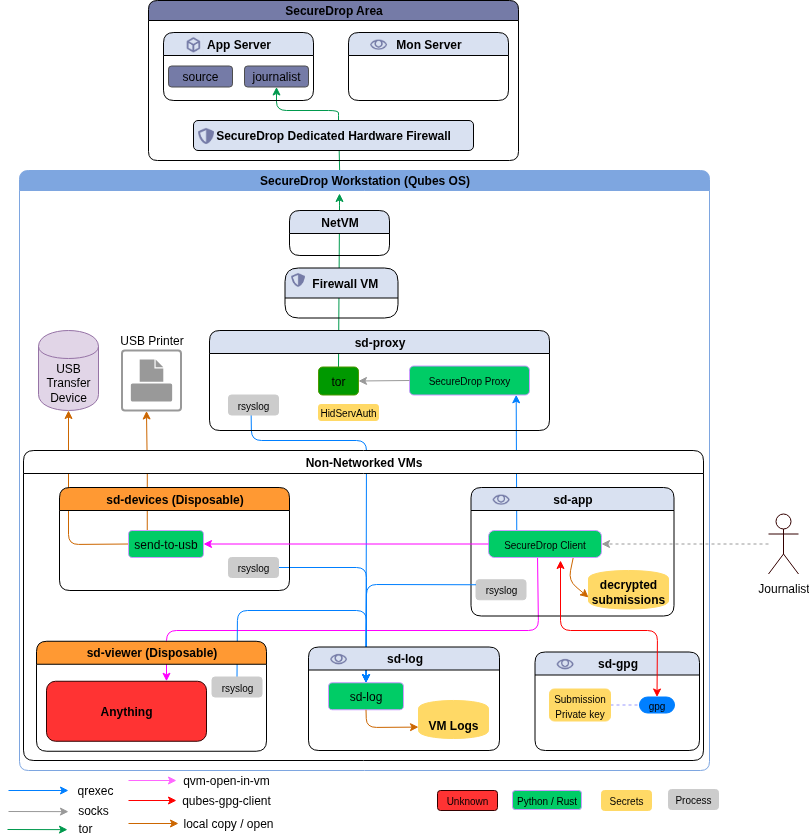
For the last couple of months, the SecureDrop team is working on a new set of applications + system for the journalists, which are based on Qubes OS, and desktop application written particularly for Qubes. A major portion of the work is on the Qubes OS part, where we are setting up the right templateVMs and AppVMs on top of those templateVMs, setting up the qrexec services and right configuration to allow/deny services as required.

The other major work was to develop a proxy service (on top of Qubes qrexec service) which will allow our desktop application (written in PyQt) to talk to a SecureDrop server. This part finally gets into two different Debian packages.

  1. The securedrop-proxy package: which contains only the proxy tool
  2. The securedrop-client: which contains the Python SDK (to talk to the server using proxy) and desktop client tool

The way to build SecureDrop server packages

The legacy way of building SecureDrop server side has many steps and also installs wheels into the main Python site-packages. Which is something we plan to remove in future. While discussing about this during PyCon this year, Donald Stufft suggested to use dh-virtualenv. It allows to package a virtualenv for the application along with the actual application code into a Debian pacakge.

The new way of building Debian packages for the SecureDrop on Qubes OS

Creating requirements.txt file for the projects

We use pipenv for the development of the projects. pipenv lock -r can create a requirements.txt, but, it does not content any sha256sums. We also wanted to make sure that doing these steps become much easier. We have added a makefile target in our new packaging repo, which will first create the standard requirements.txt and then it will try to find the corresponding binary wheel sha256sums from a list of wheels+sha256sums, and before anything else, it verifies the list (signed with developers' gpg keys).

PKG_DIR=~/code/securedrop-proxy make requirements

If it finds any missing wheels (say new dependency or updated package version), it informs the developer, the developer then can use another makefile target to build the new wheels, the new wheels+sources do get synced to our simple index hosted on s3. The hashes of the wheels+sources also get signed and committed into the repository. Then, the developer retries to create the requirements.txt for the project.

Building the package

We also have makefile targets to build the Debian package. It actually creates a directory structure (only in parts) like rpmbuild does in home directory, and then copies over the source tarball, untars, copies the debian directory from the packaging repository, and then reverifies each hashes in the project requirements file with the current signed (and also verified) list of hashes. If everything looks good, then it goes to build the final Debian package. This happens by the following environment variable exported in the above mention script.

DH_PIP_EXTRA_ARGS="--no-cache-dir --require-hashes"

Our debian/rules files make sure that we use our own packaging index for building the Debian package.

#!/usr/bin/make -f

%:
	dh $@ --with python-virtualenv --python /usr/bin/python3.5 --setuptools --index-url https://dev-bin.ops.securedrop.org/simple

For example, the following command will build the package securedrop-proxy version 0.0.1.

PKG_PATH=~/code/securedrop-proxy/dist/securedrop-proxy-0.0.1.tar.gz PKG_VERSION=0.0.1 make securedrop-proxy

The following image describes the whole process.

We would love to get your feedback and any suggestions to improve the whole process. Feel free to comment in this post, or by creating issues in the corresponding Github project.

Source of colors in Qubes devices menu items

Have you ever wondered how the device lock icon colors come in the device applet of Qubes OS? I saw those everyday, but, never bothered to think much. The guess was the VM where the devices are attached (because those names are there in the list). Yesterday, I was asked for a proper answer by Nina, I decided to confirm the idea I had in my mind.

The way I am learning about internals of Qubes OS, is by reading the source code of the tools/services (I do ask questions to developers on IRC too). As most of the tools are wriiten in Python, it is super easy to read and follow. The code base is also very to read+understand.

In this case, the USB devices get the color from the label of sys-usb VM. This is the special VM to which all of the USB devices get attached by default and label is the color attached to the VM (window decoration and other places). The PCI devices get the color of dom0, thus black by default.

Just for fun, I changed the color to Purple, a few more colors in life always help :)

PyPI and gpg signed packages

Yesterday night, on #pypa IRC channel, asked about uploading detached gpg signatures for the packages. According to , twine did not upload the signature, even with passing -s as an argument. I tried to do the same in test.pypi.org, and at first, I felt the same, as the package page was not showing anything. As I started reading the source of twine to figure out what is going on, I found that it uploads the signature as part of the metadata of package. The JSON API actually showed that the release is signed. Later, and explained that we just have to add .asc at the end of the url of the package to download the detached signature.

During the conversation, mentioned that only 4% of the total packages are actually gpg signed. And gpg is written in C and also a GPL licensed software, so, it can not be packaged inside of CPython (as pip is packaged inside of CPython). The idea of a future PyPI where all packages must be signed (how will still have to discussed) was also discussed in the IRC channel. We also get to know that we can delete any file/relase from PyPI, but, we can not reload those files again. One has to do a new release. This is also very important incase you want to upload signatures, you will have to do that at the time of uploading the package.

also wrote about the idea of signing the packages a few years ago.

Introducing rpm-macros-virtualenv 0.0.1

Let me introduce rpm-macros-virtualenv 0.0.1 to you all.

This is a small set of RPM macros, which can be used by the spec files to build and package any Python application along with a virtualenv. Thus, removing the need of installing all dependencies via dnf/rpm repository. One of the biggest usecase will be to help to install latest application code and all the latest dependencies into a virtualenv and also package the whole virtualenv into the RPM package.

This will be useful for any third part vendor/ISV, who would want to package their Python application for Fedora/RHEL/CentOS along with the dependencies. But, remember not to use this for any package inside of Fedora land as this does not follow the Fedora packaging guidelines.

This is the very initial release, and it will get a lot of updates in the coming months. The project idea is also not new, Debian already has dh-virtualenv doing this for a long time.

How to install?

I will be building an rpm package, for now download the source code and the detached signature to verify it against my GPG key.

wget https://kushaldas.in/packages/rpm-macros-virtualenv-0.0.1.tar.gz
wget https://kushaldas.in/packages/rpm-macros-virtualenv-0.0.1.tar.gz.asc
gpg2 --verify rpm-macros-virtualenv-0.0.1.tar.gz.asc rpm-macros-virtualenv-0.0.1.tar.gz

Untar the directory, and then copy the macros.python-virtualenv file to the RPM macros directory in your system.

tar -xvf rpm-macros-virtualenv-0.0.1.tar.gz
cd rpm-macros-virtualenv-0.0.1/
sudo cp macros.python-virtualenv /usr/lib/rpm/macros.d/

How to use?

Here is a minimal example.

# Fedora 27 and newer, no need to build the debug package
%if 0%{?fedora} >= 27 || 0%{?rhel} >= 8
%global debug_package %{nil}
%endif
# Use our interpreter for brp-python-bytecompile script
%global __python /opt/venvs/%{name}/bin/python3


%prep
%setup -q

%build
%pyvenv_create
%{__pyvenvpip3} install --upgrade pip
%pyvenv_build

%install
%pyvenv_create
%{__pyvenvpip3} install --upgrade pip
%pyvenv_install
ln -s /opt/venvs/%{name}/bin/examplecommand $RPM_BUILD_ROOT%{_bindir}/examplecommand

%files
%doc README.md LICENSE
/opt/venvs/%{name}/*

As you can see, in both %build and in %install, first we have to call %pyvenv_install, that will create our virtualenv. Then we are installing the latest pip in that environment.

Then in the %build, we are calling %pyvenv_build to create the wheel.

In the %install section, we are calling %pyvenv_install macro to install the project, this command will also install all the required dependencies (from the requirements.txt of the project) by downloading them from https://pypi.org.

If you have any command/executable which gets installed in the virtualenv, you should create a symlink to that from $RPM_BUILD_ROOT/usr/bin/ directory in the %install section.

Now, I have an example in the git repository, where I have taken the Ansible 2.7.1 spec file from Fedora, and converted it to these macros. I have build the package for Fedora 25 to verify that this works.

Fedora 29 on Qubes OS

I spent most of my life using Fedora as my primary operating system on my desktop/laptops. I use CentOS on my servers, sometimes even Fedora, and a few special cases, I use *BSD systems.

But, for the last one year I am running Qubes OS as my primary operating system on my laptop. That enables me to still keep using Fedora in the AppVMs as I want, and I can also have different work VMs in Debian/Ubuntu or even Windows as required. Moving to a newer version of Fedora is just about installing the new template and rebooting any AppVM with the newest template.

Fedora 29 will release on 30th October, and Qubes team already built a template for the same and pushed to the testing repository. You can install it by the following command.

$ sudo qubes-dom0-update qubes-template-fedora-29 --enablerepo=qubes-templates-itl-testing

After this, I just installed all the required packages and setup the template as I want using my Qubes Ansible project. It took only a few minutes to move all of my development related VMs into Fedora 29 and this still keeps the option open to go back to Fedora 28 the moment I want. This is one of the beauty of Qubes OS and of course there are the regular security aspects too.

If you are a software developer using Linux, and also care about security practices, give Qubes OS a try. It has also a very active and helpful user community. I am sure it will not disappoint you.

Using Ansible to maintain your Qubes system

From the time I have started using Qubes OS, How to create and setup new AppVMs in an efficient way? remained an open question for me. I was mostly using the command line tool to create any new AppVMs and then manually setting all the properties after creation. I also did the package installations and other setup inside of the VMs manually.

If you never heard of Qubes before, you should check it out. Qubes takes a different approach to security, security by compartmentalization, different applications are separated by Qubes (VMs) . The base is running Fedora and then all other VMs are on top of Xen. It also provides a very tight integration of the tools to give a pleasant experience.

When I asked about how people maintain different VMs or templateVMs (from which the normal VMs spawn off), the answer was mostly bash scripts. The tools provided by the Qubes team are friendly to scripting. Though the official way to managing VMs is done by Salt project.

As we (at Freedom of the Press Founation) are working towards a Qubes based desktop client for SecureDrop, we also started using Salt to maintain the states of the VMs. I personally found Salt to be very confusing and a bit difficult to learn.

From the mailing list I also found out about https://github.com/Rudd-O/ansible-qubes, but, as I started reading the README, I figured that Salt is being used here too in the background. That made me rethink about the Ansible as a choice to maintain my Qubes.

Last weekend I pinged Trishna for some pointers on writing new plugins for Ansible, and later at night I also talked with Toshio about the Ansible plugins + modules.

Introducing Qubes Ansible

The result of those chats is Qubes Ansible. It has a qubesos module and a qubes connection plugin for Ansible.

I already have a PR opened to add the connection plugin into Ansible.

The actual module will still require a lot of work to become feature complete with the existing command line tools and also with the Salt. This project is under active development.

Good thing is that I am getting feedback+patches from the #qubes IRC channel (on Freenode). From the Qubes development team, marmarek provided some real valuable input to make the plugin easier to use.

Example playbook

---
- hosts: localhost
  connection: local

  tasks:
    - name: Make sure the development VM is present
      qubesos:
        guest: development2
        state: present
        properties:
          memory: 1200
          maxmem: 1400
          netvm: 'sys-firewall'
          template: 'debian-9'
          label: "blue"

    - name: Run the VM
      qubesos:
        guest: development2
        state: running

You can use the above playbook to create a development2 AppVM with the exact properties you want. The examples page has all the available options documented.

If you are using Qubes, please give it a try, and tell us how can we improve your experience of maintaining the system with Ansible. You can provide feedback in a Github issue or talk directly in the #qubes IRC channel.

vcrpy for web related tests

Couple of weeks ago, Jen pointed me to vcrpy. This is a Python implementation of Ruby’s library with same name.

What is vcrpy?

It is a Python module which helps to write faster and simple tests involving HTTP requests. It records all the HTTP interactions in plain text files (by default in a YAML file). This helps to write deterministic tests, and also to run them in offline.

It works well with the following Python modules.

  • requests
  • aiohttp
  • urllib3
  • tornado
  • urllib2
  • boto3

Usage example

Let us take a very simple test case.

import unittest
import requests

class TestExample(unittest.TestCase):

    def test_httpget(self):
        r = requests.get("https://httpbin.org/get?name=vcrpy&lang=Python")
        self.assertEqual(r.status_code, 200)
        data = r.json()
        self.assertEqual(data["args"]["name"], "vcrpy")
        self.assertEqual(data["args"]["lang"], "Python")


if __name__ == "__main__":
    unittest.main()

In the above code, we are making a HTTP GET request to the https://httpbin.org site and examining the returned JSON data. Running the test takes around 1.75 seconds in my computer.

$ python test_all.py
.
------------------------------------------------------------------
Ran 1 test in 1.752s

OK

Now, we can add vcrpy to this project.

import unittest
import vcr
import requests

class TestExample(unittest.TestCase):

    @vcr.use_cassette("test-httpget.yml")
    def test_httpget(self):
        r = requests.get("https://httpbin.org/get?name=vcrpy&lang=Python")
        self.assertEqual(r.status_code, 200)
        data = r.json()
        self.assertEqual(data["args"]["name"], "vcrpy")
        self.assertEqual(data["args"]["lang"], "Python")

if __name__ == "__main__":
    unittest.main()

We imported vcr module, and added a decorator vcr.use_cassette to our test function. Now, when we will execute the test again, vcrpy will record the HTTP call details in the mentioned YAML file, and use the same for the future test runs.

$ python test_all.py
.
------------------------------------------------------------------
Ran 1 test in 0.016s

OK

You all can also notice the time taken to run the test, around 0.2 second.

Read the project documentation for all the available options.

Job alert: Associate Site Reliability Engineer at FPF

We (at Freedom of the Press Foundation) are looking for an Associate Site Reliability Engineer.

This position is open to junior and entry-level applicants, and we recognize the need to provide on-the-job mentoring and support to help you familiarize yourself with the technology stack we use. In addition to the possibility of working in our New York or San Francisco offices, this position is open to remote work within American time zones.

Skills and Experience

  • Familiarity with remote systems administration of bare-metal or virtualized Linux servers.
  • Comfortable with shell and programming languages commonly used in an SRE context (e.g., Python, Go, Bash, Ruby).
  • Strong interest in honing skills required to empower a distributed software development and operations team through automation and systems maintenance.

For more details, please visit the job posting.

Are you thinking if you should apply or not?

YES, APPLY!. You are ready to apply for this position. You don’t have to ask anyone to confirm if you are ready or not. Unless you apply, you don’t have a chance to get the job.

So, the first step is to apply for the position, and then you can think about Impostor syndrome. We all have it. Some people will admit that in public, some people will not.

Using podman for containers

Podman is one of the newer tool in the container world, it can help you to run OCI containers in pods. It uses Buildah to build containers, and runc or any other OCI compliant runtime. Podman is being actively developed.

I have moved the two major bots we use for dgplug summer training (named batul and tenida) under podman and they are running well for the last few days.

Installation

I am using a Fedora 28 system, installation of podman is as simple as any other standard Fedora package.

$ sudo dnf install podman

While I was trying out podman, I found it was working perfectly in my DigitalOcean instance, but, not so much on the production vm. I was not being able to attach to the stdout.

When I tried to get help in #podman IRC channel, many responded, but none of the suggestions helped. Later, I gave access to the box to Matthew Heon, one of the developer of the tool. He identified the Indian timezone (+5:30) was too large for the timestamp buffer and thus causing this trouble.

The fix was pushed fast, and a Fedora build was also pushed to the testing repo.

Usage

To learn about different available commands, visit this page.

First step was to build the container images, it was as simple as:

$ sudo podman build -t kdas/imagename .

I reused my old Dockerfiles for the same. After this, it was just simple run commands to start the containers.