Kushal Das

FOSS and life. Kushal Das talks here.

kushal76uaid62oup5774umh654scnu5dwzh4u2534qxhcbi4wbab3ad.onion

Tracking my phone's silent connections

My phone has more friends than me. It talks to more peers (computers) than the number of human beings I talk on an average. In this age of smartphones and mobile apps for A-Z things, we are dependent on these technologies. However, at the same time, we don’t know much of what is going on in the computers equipped with powerful cameras, GPS device, microphone we are carrying all the time. All these apps are talking to their respective servers (or can we call them masters?), but, there is no easy way to track them.

These questions bothered me for a long time: I wanted to see the servers my phone is connecting to, and I want to block those connections as I wish. However, I never managed to work on this. A few weeks ago, I finally sat down to start working to build up a system by reusing already available open source projects and tools to create the system, which will allow me to track what my phone is doing. Maybe not in full details, but, at least shed some light on the network traffic from the phone.

Initial trial

I tried to create a wifi hotspot at home using a Raspberry Pi and then started capturing all the packets from the device using standard tools (dumpcap) and later reading through the logs using Wireshark. This procedure meant that I could only capture when I am connected to the network at home. What about when I am not at home?

Next round

This time I took a bit different approach. I chose algo to create a VPN server. Using WireGuard, it became straightforward to connect my iPhone to the VPN. This process also allows capturing all the traffic from the phone very easily on the VPN server. A few days in the experiment, Kashmir started posting her experiment named Life Without the Tech Giants, where she started blocking all the services from 5 big technology companies. With her help, I contacted Dhruv Mehrotra, who is a technologist behind the story. After talking to him, I felt that I am going in the right direction. He already posted details on how they did the blocking, and you can try that at home :)

Looking at the data after 1 week

After capturing the data for the first week, I moved the captured pcap files into my computer. Wrote some Python code to put the data into a SQLite database, enabling me to query the data much faster.

Domain Name System (DNS) data

The Domain Name System (DNS) is a decentralized system which helps to translate the human memory safe domain names (like kushaldas.in) into Internet Protocol (IP) addresses (like 192.168.1.1 ). Computers talk to each other using these IP addresses, we, don’t have to worry to remember so many names. When the developers develop their applications for the phone, they generally use those domain names to specify where the app should connect.

If I plot all the different domains (including any subdomain) which got queried at least 10 times in a week, we see the following graph.

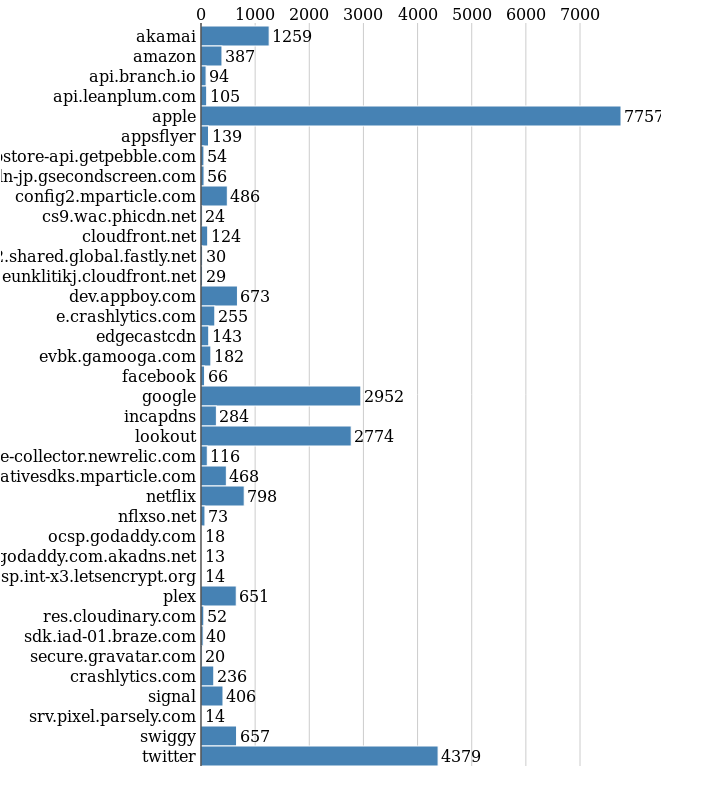
The first thing to notice is how the phone is trying to find servers from Apple, which makes sense as this is an iPhone. I use the mobile Twitter app a lot, so we also see many queries related to Twitter. Lookout is a special mention there, it was suggested to me by my friends who understand these technologies and security better than me. The 3rd position is taken by Google, though sometimes I watch Youtube videos, but, the phone queried for many other Google domains.

There are also many queries to Akamai CDN service, and I could not find any easy way to identify those hosts, the same with Amazon AWS related hosts. If you know any better way, please drop me a note.

You can see a lot of data analytics related companies were also queried. dev.appboy.com is a major one, and thankfully algo already blocked that domain in the DNS level. I don’t know which app is trying to connect to which all servers, I found about a few of the apps in my phone by searching about the client list of the above-mentioned analytics companies. Next, in coming months, I will start blocking those hosts/domains one by one and see which all apps stop working.

Looking at data flow

The number of DNS queries is an easy start, but, next I wanted to learn more about the actual servers my phone is talking to. The paranoid part inside of me was pushing for discovering these servers.

If we put all of the major companies the phone is talking to, we get the following graph.

Apple is leading the chart by taking 44% of all the connections, and the number is 495225 times. Twitter is in the second place, and Edgecastcdn is in the third. My phone talked to Google servers 67344 number of times, which is like 7 times less than the number of times Apple itself.

In the next graph, I removed the big players (including Google and Amazon). Then, I can see that analytics companies like nflxso.net and mparticle.com have 31% of the connections, which is a lot. Most probably I will start with blocking these two first. The 3 other CDN companies, Akamai, Cloudfront, and Cloudflare has 8%, 7%, and 6% respectively. Do I know what all things are these companies tracking? Nope, and that is scary enough that one of my friend commented “It makes me think about throwing my phone in the garbage.”

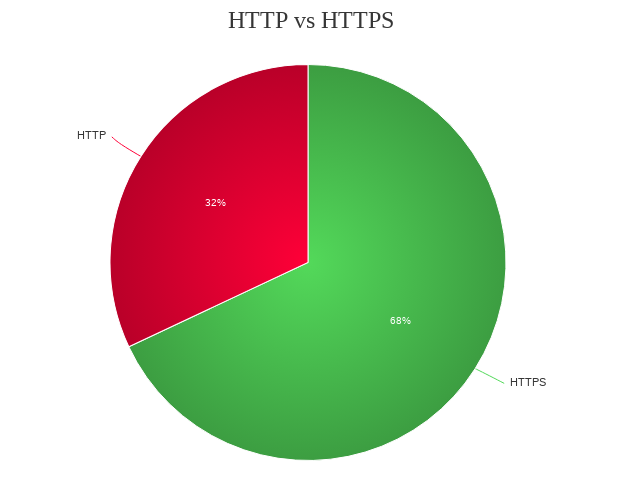
What about encrypted vs unencrypted traffic? What all protocols are being used? I tried to find the answer for the first question, and the answer looks like the following graph. Maybe the number will come down if I try to refine the query and add other parameters, that is a future task.

What next?

As I said earlier, I am working on creating a set of tools, which then can be deployed on the VPN server, that will provide a user-friendly way to monitor, and block/unblock traffic from their phone. The major part of the work is to make sure that the whole thing is easy to deploy, and can be used by someone with less technical knowledge.

How can you help?

The biggest thing we need is the knowledge of “How to analyze the data we are capturing?”. It is one thing to make reports for personal user, but, trying to help others is an entirely different game altogether. We will, of course, need all sorts of contributions to the project. Before anything else, we will have to join the random code we have, into a proper project structure. Keep following this blog for more updates and details about the project.

Note to self

Do not try to read data after midnight, or else I will again think a local address as some random dynamic address in Bangkok and freak out (thank you reverse-dns).

When I was sleepy

Back in 2005 I joined my first job, in a software company in Bangalore. It was a backend of a big foreign bank. We trained heavily on different parts of software development during the first few months. At the same time, I had an altercation with the senior manager (about some Java code) who was in charge of the new joinees and their placement within the company. The result? Everyone else got a team but me, and I had to roam around within the office to find an empty seat and wait there till the actual seat owner came back. I managed to spend a lot of days in the cafeteria on the rooftop. But, then they made new rules that one can not sit there either, other than at lunch time.

So, I went asking around, talking to all the different people in the office (there were 500+ folks iirc) if they know any team who would take on a fresher. I tried to throw in words like Linux, open source to better my chances. And then one day, I heard that the research and development team was looking for someone with Linux and PHP skills. I went in to have a chat with the team, and they told me the problem (it was actually on DSpace, a Java based documentation/content repository system), and after looking at my resume decided to give me a desktop for couple of weeks. I managed to solve the problem in next few days, and after a week or so, I was told that I will join the team. There were couple of super senior managers and I was the only kid on that block. Being part of this team allowed me to explore different technologies and programming languages.

I will later write down my experiences in more detail, but for today, I want to focus on one particular incident. The kind of incident, which all system administrators experience at least once in their life (I guess). I got root access to the production server of the DSpace installation within a few weeks. I had a Windows desktop, and used putty to ssh in to the server. As this company was backend of the big bank, except for a few senior managers, no one else had access to Internet on their systems. There were 2 desktops in the kiosk in the ground floor, and one had to stand in a long queue to get a chance to access Internet.

One day I came back from the lunch (a good one), and was feeling a bit sleepy. I had taken down the tomcat server, pushed the changes to the application, and then wanted to start the server up again. Typed the whole path to startup.sh (I don’t remember the actual name, I’m just guessing it was startup.sh) and hit Enter. I was waiting for the long screens of messages this startup script spewed as it started up, but instead, I got back the prompt quickly. I was wondering what went wrong. Then, looking at the monitor very closely, I suddenly realised that I was planning to delete some other file and I had written rm at the beginning of the command prompt, forgotten it, and then typed the path of the startup.sh. Suddenly I felt the place get very hot and stuffy; I started sweating and all blood drained from my face in the next few moments. I was at panic level 9. I was wondering what to do. I thought about the next steps to follow. I still had a small window of time to fix the service. Suddenly I realized that I can get a copy of the script from the Internet (yay, Open Source!). So, I picked up a pad and a pen, ran down to the ground floor, and stood in the queue to get access to a computer with Internet. After getting the seat, I started writing down the whole startup.sh on the pad and double checked it. Ran right back up to my cubicle, feverishly typed in the script, (somehow miraculously without any typo in one go.) As I executed the script, I saw the familiar output, messages scrolling up, screen after joyful screen. And finally as it started up, I sighed a huge sigh of relief. And after the adrenalin levels came down, I wrote an incident report to my management, and later talked about it during a meeting.

From that day on, before doing any kind of destructive operation, I double check the command prompt for any typo. I make sure, that I don’t remove anything randomly and also make sure that I have my backups is place.

That missing paragraph

In my last blog post, I wrote about a missing paragraph. I did not keep that text anywhere, I just deleted it while reviewing the post. Later Jason asked me in the comments to actually post that paragraph too.

So, I will write about it. 2018 was an amazing year, all told;, good, great, and terrible moments all together. Things were certain highs , and a few really low moments. Some things take time to heal, some moments make a life long impact.

The second part of 2018 went downhill at a pretty alarming rate, personally. Just after coming back from PyCon US 2018, from the end of May to the beginning of December, within 6 months we lost 4 family members. On the night of 30th May, my uncle called, telling me that my dad was admitted to the hospital, and the doctor wanted to talk to me. He told me to come back home as soon as possible. There was a very real chance that I wouldn’t be able to talk to him again. Anwesha and I, managed to reach Durgapur by 9AM and dad passed away within a few hours. From the time of that phone call, my brain suddenly became quite detached, very calm and thinking about next steps. Things to be handled, official documents to be taken care of, what needs to be done next.

I felt a few times that I’dburst into tears, but, the next thing that sprang to mind was that if I started crying, that would affect my mother and rest of the family too. Somehow, I managed not to cry and every time I got emotionally overwhelmed, I started thinking about next logical steps. I actually made sure, I did not talk about the whole incident much, until recently after things settled down. I also spent time in my village and then in Kolkata.

In the next 4 months, there have been 3 more deaths. Every time the news came, I did not show any reaction, but, it hurt.

Our education system is what supposed to help us grow in life. But, I feel it is more likely, that school is just training for the society to work cohesively and to make sure that the machines are well oiled. Nothing prepares us to deal with real life incidents. Moreover, death is a taboo subject with most of us.

Coming back to the effect of these demises, for a moment it created a real panic in my brain. What if I just vanish tomorrow? In my mind, our physical bodies are some amazing complex robots / programs. When one fails, the rest of them try to cope , try to fill in the gaps. But, the nearby endpoints never stay the same. I am working as usual, but, somehow my behavior has changed. I know that I have a long lasting problem with emails, but, that has grown a little out of hand in the last 5 months. I am putting in a lot of extra effort to reply to the emails I actually managed to notice. Before that, I was opening the editor to reply, but my mind blanked, and I could not type anything.

I don’t quite know how to end the post. The lines above are almost like a stream of consciousness in my mind and I don’t even know if they make sense in the order I put them in. But, at the same time, it makes sense to write it down. At the end of the day, we are all human, we make mistakes, we all have emotions, and often times it is okay to let it out.

In a future post, I will surely write another post talking about the changes I am bringing in my life to cope.

2018 blog review

Last year, I made sure that I spend more time in writing, mostly by waking up early before anyone else in the house. The total number of posts was 60, but, that number came down to 32 in 2018. The number of page views were though 88% of 2017.

I managed to wake up early in most of the days, but, I spent that time in reading and experimenting with various tools/projects. SecureDrop, Tor Project, Qubes OS were in top of that list. I am also spending more time with books, though now the big problem is to find space at home to keep those books properly.

I never wrote regularly through out the year. If you see the dates I published, you will find that sometimes I managed to publish regularly for a month and then again vanished for sometime.

There was a whole paragraph here about why I did not write and vanish, but, then I deleted the paragraph before posting.

You can read the last year’s post on the same topic here.

Flatpak application shortcuts on Qubes OS

In my last blog post, I wrote about Flatpak applications on Qubes OS AppVMs. Later, Alexander Larsson pointed out that running the actual application from the command line is still not user friendly, and Flatpak already solved it by providing proper desktop files for each of the application installed by Flatpak.

How to enable the Flatpak application shortcut in Qubes OS?

The Qubes documentation has detailed steps on how to add a shortcut only for a given AppVM or make it available from the template to all VMs. I decided to add it from the template, so that I can click on the Qubes Setting menu and add it for the exact AppVM. I did not want to modify the required files in dom0 by hand. The reason: just being lazy.

From my AppVM (where I have the Flatpak application installed), I copied the desktop file and also the icon to the template (Fedora 29 in this case).

qvm-copy /var/lib/flatpak/app/io.github.Hexchat/current/active/export/share/applications/io.github.Hexchat.desktop
qvm-copy /var/lib/flatpa/app/io.github.Hexchat/current/active/export/share/icons/hicolor/48x48/apps/io.github.Hexchat.png

Then in the template, I moved the files to their correct locations. I also modified the desktop file to mark that this is a Flatpak application.

sudo cp ~/QubesIncoming/xchat/io.github.Hexchat.desktop /usr/share/applications/io.github.Hexchat.desktop
sudo cp ~/QubesIncoming/xchat/io.github.Hexchat.png /usr/share/icons/hicolor/48x48/

After this, I refreshed, and then added the entry from the Qubes Settings, and, then the application is available in the menu.

Using hexchat on Flatpak on Qubes OS AppVM

Flatpak is a system for building, distributing, and running sandboxed desktop applications on Linux. It uses BubbleWrap in the low level to do the actual sandboxing. In simple terms, you can think Flatpak as a as a very simple and easy way to use desktop applications in containers (sandboxing). Yes, containers, and, yes, it is for desktop applications in Linux. I was looking forward to use hexchat-otr in Fedora, but, it is not packaged in Fedora. That is what made me setup an AppVM for the same using flatpak.

I have installed the flatpak package in my Fedora 29 TemplateVM. I am going to use that to install Hexchat in an AppVM named irc.

Setting up the Flatpak and Hexchat

The first task is to add flathub as a remote for flatpak. This is a store where upstream developers package their application and publish.

flatpak remote-add --if-not-exists flathub https://flathub.org/repo/flathub.flatpakrepo

And then, I installed the Hexchat from the store. I also installed the version of the OTR plugin required.

$ flatpak install flathub io.github.Hexchat
<output snipped>

$ flatpak install flathub io.github.Hexchat.Plugin.OTR//18.08
Installing in system:
io.github.Hexchat.Plugin.OTR/x86_64/18.08 flathub 6aa12f19cc05
Is this ok [y/n]: y
Installing: io.github.Hexchat.Plugin.OTR/x86_64/18.08 from flathub
[####################] 10 metadata, 7 content objects fetched; 268 KiB transferr
Now at 6aa12f19cc05.

Making sure that the data is retained after reboot

All of the related files are now available under /var/lib/flatpak. But, as this is an AppVM, this will get destroyed when I will reboot. So, I had to make sure that I can keep those between reboots. We can use the Qubes bind-dirs for this in the TemplateVMs, but, as this is particular for this VM, I just chose to use simple shell commands in the /rw/config/rc.local file (make sure that the file is executable).

But, first, I moved the flatpak directory under /home.

sudo mv /var/lib/flatpak /home/

Then, I added the following 3 lines in the /rw/config/rc.local file.

# For flatpak
rm -rf /var/lib/flatpak
ln -s /rw/home/flatpak /var/lib/flatpak

This will make sure that the flatpak command will find the right files even after reboot.

Running the application is now as easy as the following command.

flatpak run io.github.Hexchat

Feel free to try out other applications published in Flathub, for example, Slack or the Mark Text

Building wheels and Debian packages for SecureDrop on Qubes OS

For the last couple of months, the SecureDrop team is working on a new set of applications + system for the journalists, which are based on Qubes OS, and desktop application written particularly for Qubes. A major portion of the work is on the Qubes OS part, where we are setting up the right templateVMs and AppVMs on top of those templateVMs, setting up the qrexec services and right configuration to allow/deny services as required.

The other major work was to develop a proxy service (on top of Qubes qrexec service) which will allow our desktop application (written in PyQt) to talk to a SecureDrop server. This part finally gets into two different Debian packages.

  1. The securedrop-proxy package: which contains only the proxy tool
  2. The securedrop-client: which contains the Python SDK (to talk to the server using proxy) and desktop client tool

The way to build SecureDrop server packages

The legacy way of building SecureDrop server side has many steps and also installs wheels into the main Python site-packages. Which is something we plan to remove in future. While discussing about this during PyCon this year, Donald Stufft suggested to use dh-virtualenv. It allows to package a virtualenv for the application along with the actual application code into a Debian pacakge.

The new way of building Debian packages for the SecureDrop on Qubes OS

Creating requirements.txt file for the projects

We use pipenv for the development of the projects. pipenv lock -r can create a requirements.txt, but, it does not content any sha256sums. We also wanted to make sure that doing these steps become much easier. We have added a makefile target in our new packaging repo, which will first create the standard requirements.txt and then it will try to find the corresponding binary wheel sha256sums from a list of wheels+sha256sums, and before anything else, it verifies the list (signed with developers' gpg keys).

PKG_DIR=~/code/securedrop-proxy make requirements

If it finds any missing wheels (say new dependency or updated package version), it informs the developer, the developer then can use another makefile target to build the new wheels, the new wheels+sources do get synced to our simple index hosted on s3. The hashes of the wheels+sources also get signed and committed into the repository. Then, the developer retries to create the requirements.txt for the project.

Building the package

We also have makefile targets to build the Debian package. It actually creates a directory structure (only in parts) like rpmbuild does in home directory, and then copies over the source tarball, untars, copies the debian directory from the packaging repository, and then reverifies each hashes in the project requirements file with the current signed (and also verified) list of hashes. If everything looks good, then it goes to build the final Debian package. This happens by the following environment variable exported in the above mention script.

DH_PIP_EXTRA_ARGS="--no-cache-dir --require-hashes"

Our debian/rules files make sure that we use our own packaging index for building the Debian package.

#!/usr/bin/make -f

%:
	dh $@ --with python-virtualenv --python /usr/bin/python3.5 --setuptools --index-url https://dev-bin.ops.securedrop.org/simple

For example, the following command will build the package securedrop-proxy version 0.0.1.

PKG_PATH=~/code/securedrop-proxy/dist/securedrop-proxy-0.0.1.tar.gz PKG_VERSION=0.0.1 make securedrop-proxy

The following image describes the whole process.

We would love to get your feedback and any suggestions to improve the whole process. Feel free to comment in this post, or by creating issues in the corresponding Github project.

Source of colors in Qubes devices menu items

Have you ever wondered how the device lock icon colors come in the device applet of Qubes OS? I saw those everyday, but, never bothered to think much. The guess was the VM where the devices are attached (because those names are there in the list). Yesterday, I was asked for a proper answer by Nina, I decided to confirm the idea I had in my mind.

The way I am learning about internals of Qubes OS, is by reading the source code of the tools/services (I do ask questions to developers on IRC too). As most of the tools are wriiten in Python, it is super easy to read and follow. The code base is also very to read+understand.

In this case, the USB devices get the color from the label of sys-usb VM. This is the special VM to which all of the USB devices get attached by default and label is the color attached to the VM (window decoration and other places). The PCI devices get the color of dom0, thus black by default.

Just for fun, I changed the color to Purple, a few more colors in life always help :)

PyPI and gpg signed packages

Yesterday night, on #pypa IRC channel, asked about uploading detached gpg signatures for the packages. According to , twine did not upload the signature, even with passing -s as an argument. I tried to do the same in test.pypi.org, and at first, I felt the same, as the package page was not showing anything. As I started reading the source of twine to figure out what is going on, I found that it uploads the signature as part of the metadata of package. The JSON API actually showed that the release is signed. Later, and explained that we just have to add .asc at the end of the url of the package to download the detached signature.

During the conversation, mentioned that only 4% of the total packages are actually gpg signed. And gpg is written in C and also a GPL licensed software, so, it can not be packaged inside of CPython (as pip is packaged inside of CPython). The idea of a future PyPI where all packages must be signed (how will still have to discussed) was also discussed in the IRC channel. We also get to know that we can delete any file/relase from PyPI, but, we can not reload those files again. One has to do a new release. This is also very important incase you want to upload signatures, you will have to do that at the time of uploading the package.

also wrote about the idea of signing the packages a few years ago.

Introducing rpm-macros-virtualenv 0.0.1

Let me introduce rpm-macros-virtualenv 0.0.1 to you all.

This is a small set of RPM macros, which can be used by the spec files to build and package any Python application along with a virtualenv. Thus, removing the need of installing all dependencies via dnf/rpm repository. One of the biggest usecase will be to help to install latest application code and all the latest dependencies into a virtualenv and also package the whole virtualenv into the RPM package.

This will be useful for any third part vendor/ISV, who would want to package their Python application for Fedora/RHEL/CentOS along with the dependencies. But, remember not to use this for any package inside of Fedora land as this does not follow the Fedora packaging guidelines.

This is the very initial release, and it will get a lot of updates in the coming months. The project idea is also not new, Debian already has dh-virtualenv doing this for a long time.

How to install?

I will be building an rpm package, for now download the source code and the detached signature to verify it against my GPG key.

wget https://kushaldas.in/packages/rpm-macros-virtualenv-0.0.1.tar.gz
wget https://kushaldas.in/packages/rpm-macros-virtualenv-0.0.1.tar.gz.asc
gpg2 --verify rpm-macros-virtualenv-0.0.1.tar.gz.asc rpm-macros-virtualenv-0.0.1.tar.gz

Untar the directory, and then copy the macros.python-virtualenv file to the RPM macros directory in your system.

tar -xvf rpm-macros-virtualenv-0.0.1.tar.gz
cd rpm-macros-virtualenv-0.0.1/
sudo cp macros.python-virtualenv /usr/lib/rpm/macros.d/

How to use?

Here is a minimal example.

# Fedora 27 and newer, no need to build the debug package
%if 0%{?fedora} >= 27 || 0%{?rhel} >= 8
%global debug_package %{nil}
%endif
# Use our interpreter for brp-python-bytecompile script
%global __python /opt/venvs/%{name}/bin/python3


%prep
%setup -q

%build
%pyvenv_create
%{__pyvenvpip3} install --upgrade pip
%pyvenv_build

%install
%pyvenv_create
%{__pyvenvpip3} install --upgrade pip
%pyvenv_install
ln -s /opt/venvs/%{name}/bin/examplecommand $RPM_BUILD_ROOT%{_bindir}/examplecommand

%files
%doc README.md LICENSE
/opt/venvs/%{name}/*

As you can see, in both %build and in %install, first we have to call %pyvenv_install, that will create our virtualenv. Then we are installing the latest pip in that environment.

Then in the %build, we are calling %pyvenv_build to create the wheel.

In the %install section, we are calling %pyvenv_install macro to install the project, this command will also install all the required dependencies (from the requirements.txt of the project) by downloading them from https://pypi.org.

If you have any command/executable which gets installed in the virtualenv, you should create a symlink to that from $RPM_BUILD_ROOT/usr/bin/ directory in the %install section.

Now, I have an example in the git repository, where I have taken the Ansible 2.7.1 spec file from Fedora, and converted it to these macros. I have build the package for Fedora 25 to verify that this works.