Kushal Das

FOSS and life. Kushal Das talks here.

kushal76uaid62oup5774umh654scnu5dwzh4u2534qxhcbi4wbab3ad.onion

Updates on Unoon in December 2019

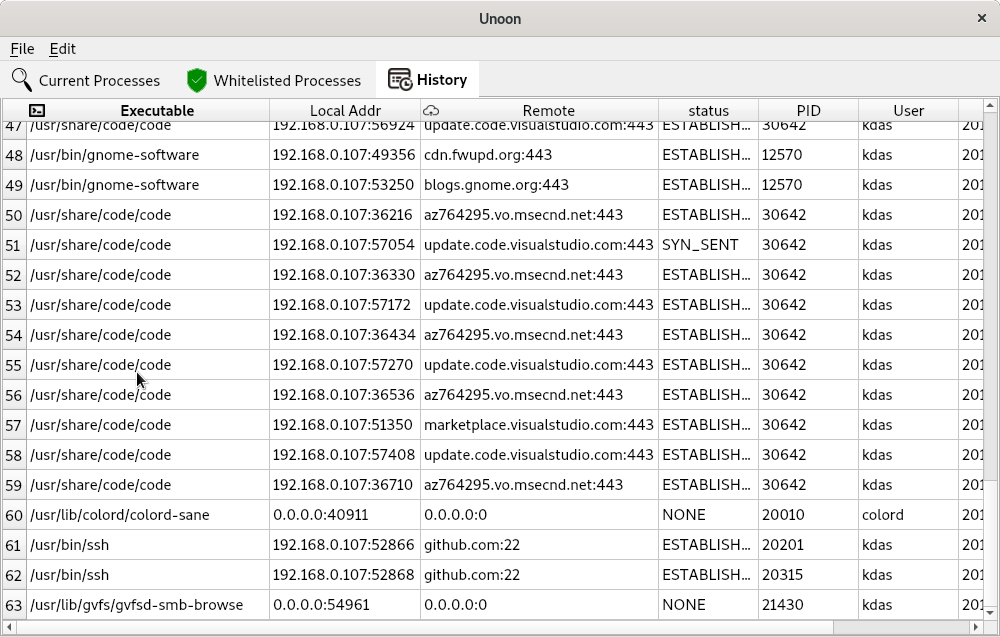
This Saturday evening, I sat with Unoon project after a few weeks, I was continuously running it, but, did not resume the development effort. This time Bhavin also joined me. Together, we fixed a location of the whitelist files issue, and unoon now also has a database (using SQLite), which stores all the historical process and connection information. In the future, we will provide some way to query this information.

As usual, we learned many new things about different Linux processes while doing this development. One of the important ones is about running podman process, and how the user id maps to the real system. Bhavin added a patch that fixes a previously known issue of crashing due to missing user name. Now, unoon shows the real user ID when it can not find the username in the /etc/passwd file.

You can read about Unoon more in my previous blog post.

Unoon, a tool to monitor network connections from my system

I always wanted to have a tool to monitor the network connections from my laptop/desktop. I wanted to have alerts for random processes making network connections, and a way to block those (if I want to).

Such a tool can provide peace of mind in a few cases. A reverse shell is one the big one, just in case if I manage to open any random malware (read downloads) on my regular Linux system, I want to be notified about the connections it will make. The same goes for trying out any new application. I prefer to use Qubes OS based VMs testing random binaries and applications, and it is also my daily driver. But, the search for a proper tool continued for some time.

Introducing unoon

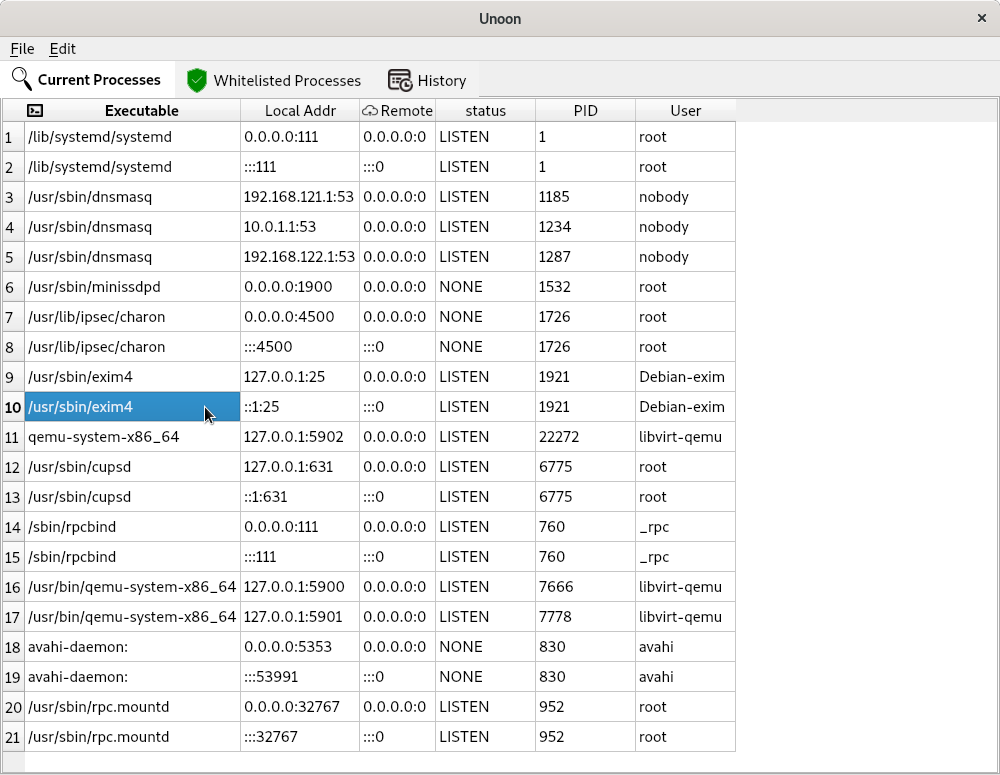
Unoon main screen

Unoon is a desktop tool that I started writing for monitoring network connections for my system. It has two parts, the backend is written in Go and that monitor and adds details to a local Redis instance (this should be password protected).

I started writing this backend in Rust, but then I had to rewrite it in Go as I wanted to reuse parts of my code from another project so that I can track all DNS queries from the system. This helps to make sense of the data; otherwise, we will see some random IP numbers in the UI.

The frontend is written using PyQt5. Around 14 years ago, I released my first ever released tool using PyQt, and it is still my favorite library to create a desktop application.

Using the development version of unoon

The README has the build steps. You have to start the backend as a daemon, the easiest option is to run it inside of a tmux shell. At first, it will show all the currently running processes in the first “Current processes” tab. If you add any executable (via the absolute path) in the Edit->whitelists dialog and then save (and then restart the UI app), those will turn up the whitelisted processes.

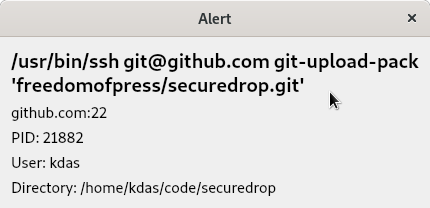
Unoon alert

For any new process making network calls, you will get an alert dialog. In the future, we will have the option to block hosts/ips via this alert dialog.

Unoon history

The history tabs will show all alerts history in the runtime. Again, we will have to save this information in a local database, so that we can have better statistics shown to the users.

You can move between different tabs/tables via Alt+1 or Alt+2 and Alt+3 key combinations.

I will add more options to create better-whitelisted processes. There is also ongoing work to mark any normal process as a whitelisted one from the UI (by right-clicking).

Last week, Micah and I managed to spend some late-night hotel room hacking on this tool.

How can you help?

You can start by testing the code base, and provide suggestions on how to improve the tool. Help in UX (major concern) and patches are always welcome.

A small funny story

A few weeks back, on a Sunday late night, I was demoing the very initial version of the tool to Saptak. While we were talking about the tool, suddenly, an entry popped up in the UI /usr/bin/ssh, to a random host. A little bit of search showed that the IP belongs to an EC2 instance. For the next 40 minutes, we both were trying to debug to find out what happened and if the system was already compromised or not. Luckily I was talking about something else before, and to demo something (we totally forgot that topic), I was running Wireshark on the system. From there, we figured that the IP belongs to github.com. It took some more time to figure out that one of my VS Code extension was updating the git, and was using ssh. This is when I understood that I need to show the real domain names on the UI than random IP addresses.

Testing Fedora MariaDB layered image using gotun

Testing Fedora MariaDB layered image testing using gotun

Yesterday Adam Miller announced the availability of the latest Fedora Layered Image release. The following container images are available in the Fedora registry:

  • registry.fedoraproject.org/f25/cockpit:130-1.3.f25docker
  • registry.fedoraproject.org/f25/cockpit:130
  • registry.fedoraproject.org/f25/cockpit
  • registry.fedoraproject.org/f25/kubernetes-node:0.1-3.f25docker
  • registry.fedoraproject.org/f25/kubernetes-node:0.1
  • registry.fedoraproject.org/f25/kubernetes-node
  • registry.fedoraproject.org/f25/mariadb:10.1-2.f25docker
  • registry.fedoraproject.org/f25/mariadb:10.1
  • registry.fedoraproject.org/f25/mariadb
  • registry.fedoraproject.org/f25/kubernetes-apiserver:0.1-3.f25docker
  • registry.fedoraproject.org/f25/kubernetes-apiserver:0.1
  • registry.fedoraproject.org/f25/kubernetes-apiserver
  • registry.fedoraproject.org/f25/kubernetes-master:0.1-5.f25docker
  • registry.fedoraproject.org/f25/kubernetes-master:0.1
  • registry.fedoraproject.org/f25/kubernetes-master
  • registry.fedoraproject.org/f25/flannel:0.1-3.f25docker
  • registry.fedoraproject.org/f25/flannel:0.1
  • registry.fedoraproject.org/f25/flannel
  • registry.fedoraproject.org/f25/kubernetes-proxy:0.1-3.f25docker
  • registry.fedoraproject.org/f25/kubernetes-proxy:0.1
  • registry.fedoraproject.org/f25/kubernetes-proxy
  • registry.fedoraproject.org/f25/etcd:0.1-5.f25docker
  • registry.fedoraproject.org/f25/etcd:0.1
  • registry.fedoraproject.org/f25/etcd
  • registry.fedoraproject.org/f25/toolchain:1-2.f25docker
  • registry.fedoraproject.org/f25/toolchain:1
  • registry.fedoraproject.org/f25/toolchain

Now, I am going to show how we can add a set of tests for the MariaDB container under gotun on a Fedora Atomic host. I will be firing up the job in the Fedora Infra Cloud.

Because of the nature of the Atomic host, I decided to write a set of tests in golang and build a static binary which can be executed inside of the Atomic host. This way we do not have to worry about any dependency in the host.

$ ldd tunirtests.test
	not a dynamic executable

Source code of the test

The following is the source for mysql_test.go.

package main

import (
	"testing"
	"database/sql"
	 _ "github.com/go-sql-driver/mysql"
)

func TestMariadb(t *testing.T) {
	db, err := sql.Open("mysql", "user:password@/dbname")
	if err != nil {
		t.Fatal("Can not connect to mariadb", err.Error())
	}
	defer db.Close()
	stmt := "CREATE TABLE IF NOT EXISTS funny (id int(5) NOT NULL AUTO_INCREMENT, name varchar(250), PRIMARY KEY(id))"
	_, err = db.Exec(stmt)
	if err != nil {
		t.Fatal("Can not create table", err.Error())
	}

	_, err = db.Exec("INSERT INTO funny VALUES (?,?)",1,"kushal")
	if err != nil {
		t.Fatal("Can not insert data", err.Error())
	}
	_, err = db.Exec("INSERT INTO funny VALUES (?,?)",2,"Python")
	if err != nil {
		t.Fatal("Can not insert data", err.Error())
	}
	rows, err := db.Query("SELECT * from funny")
	for rows.Next() {
		var uid int
		var name string
		err := rows.Scan(&uid, &name)
		if err != nil {
			t.Fatal("Error in selecting data", err.Error())
		}
		if uid == 1 {
			if name != "kushal" {
				t.Fatal("Oops, data mismatch", name)
			}
		}
	}

}

As you can see above that I have hardcoded username, password and dub name in the source. This is because while starting the Mariadb container, I can pass those values to the container using environment variables.

I am creating a table, inserting 2 rows in it. Then selecting those rows back to the tool.

the gotun job test file

The following is the content of the mariadb.txt file.

curl -O https://kushal.fedorapeople.org/tunirtests.test
sudo docker run -d --name mariadb_database -e MYSQL_USER=user -e MYSQL_PASSWORD=password -e MYSQL_DATABASE=dbname -p 3306:3306 registry.fedoraproject.org/f25/mariadb
SLEEP 30
chmod +x tunirtests.test
./tunirtests.test -test.run TestMariadb -test.v

At first, I am downloading the binary test file from my Fedora people space. We can also push it to the VM from the host using COPY directive. Next, I am running the docker command to fire up the container with all the required environment variables. After that, I am sleeping for 30 seconds as it takes time to get that container ready for usage. In the last line, I am executing the binary to test the container. Now, we can add more fancy command line arguments to the docker run command (like a data volume), and then test those too. But, I am going to keep those as an exercise for the reader :)

If you have any comment, feel free to drop me a mail, or tweet to @kushaldas.

The final output from the test is also given below.

./gotun --job mariadb
Starts a new Tunir Job.

Server ID: 9c4168ae-d8c4-4534-a53c-c2a291d4f6c5
Let us wait for the server to be in running state.
Time to assign a floating pointip.
Polling for a successful ssh connection.

Polling for a successful ssh connection.

Polling for a successful ssh connection.

Polling for a successful ssh connection.

Polling for a successful ssh connection.

Executing:  curl -O https://kushal.fedorapeople.org/tunirtests.test
Executing:  sudo docker run -d --name mariadb_database -e MYSQL_USER=user -e MYSQL_PASSWORD=password -e MYSQL_DATABASE=dbname -p 3306:3306 registry.fedoraproject.org/f25/mariadb
Sleeping for  30
Executing:  chmod +x tunirtests.test
Executing:  ./tunirtests.test -test.run TestMariadb -test.v
---------------


Result file at: /tmp/tunirresult_586858839


Job status: true


command: curl -O https://kushal.fedorapeople.org/tunirtests.test
status:true

  %!T(MISSING)otal    %!R(MISSING)eceived %!X(MISSING)ferd  Average Speed   Time    Time     Time  Current
                                 Dload  Upload   Total   Spent    Left  Speed
100 4347k  100 4347k    0     0  3722k      0  0:00:01  0:00:01 --:--:-- 3725k


command: sudo docker run -d --name mariadb_database -e MYSQL_USER=user -e MYSQL_PASSWORD=password -e MYSQL_DATABASE=dbname -p 3306:3306 registry.fedoraproject.org/f25/mariadb
status:true

Unable to find image 'registry.fedoraproject.org/f25/mariadb:latest' locally
Trying to pull repository registry.fedoraproject.org/f25/mariadb ... 
sha256:9a2c3bc162b6b1a1c286302c3e635d77c6e31cbca5d354ed0a839c659e1ecfdc: Pulling from registry.fedoraproject.org/f25/mariadb
be44cf43edd1: Pull complete 
a87762b3425a: Pull complete 
Digest: sha256:9a2c3bc162b6b1a1c286302c3e635d77c6e31cbca5d354ed0a839c659e1ecfdc
Status: Downloaded newer image for registry.fedoraproject.org/f25/mariadb:latest
e9c72f1f41b1ec763418f969359c3319bdc4c95d8123fc3b5e6617768b90d00f


command: chmod +x tunirtests.test
status:true


command: ./tunirtests.test -test.run TestMariadb -test.v
status:true

=== RUN   TestMariadbConnect
--- PASS: TestMariadbConnect (0.20s)
PASS


Total Number of Tests:4
Total NonGating Tests:0
Total Failed Non Gating Tests:0

Success.
Keeping the tools simple

When I talk about programming or teach in a workshop, I keep repeating one motto: Try to keep things simple. Whenever I looked at the modern complex systems which are popular among the users, generally they are many simple tools working together solving a complex problem.

The Unix philosophy

Back in college days, I read about the Unix philosophy. It is a set of ideas and philosophical approaches to the software development. From the Wikipedia page, we can find four points.

  • Make each program do one thing well. To do a new job, build afresh rather than complicate old programs by adding new "features".
  • Expect the output of every program to become the input to another, as yet unknown, program. Don't clutter output with extraneous information. Avoid stringently columnar or binary input formats. Don't insist on interactive input.
  • Design and build software, even operating systems, to be tried early, ideally within weeks. Don't hesitate to throw away the clumsy parts and rebuild them.
  • Use tools in preference to unskilled help to lighten a programming task, even if you have to detour to build the tools and expect to throw some of them out after you've finished using them.

Do one thing

The first point is something many people decide to skip. The idea of a perfect system which can do everything leads to a complex over engineered software which takes many years to land in production. The first causality is the user of the system, then the team who has to maintain the system up & running. A simple system with proper documentation also attracts number of users. These first users also become your community. They try out the new features, provide valuable feedback. If you are working on an Open Source project, creating that community around your project is always important for the sustainability of the project.

Pipe and redirection between tools

Piping and redirection in Linux shells were another simple magic I learned during the early days in college. How a tool like grep can take the input stream and provide an output, which in turn can be used in the next tool, was one of the best thing I found in the terminal. As a developer, I spend a lot of time in the terminals, and we use piping and redirection in daily life many times.

Build and try and repeat

I think all of the modern agile followers know this point very well. Unless you are allowing your users to try out your tool and allow them to provide feedback, your tool will not be welcomed by the users. We, the programmers have this attitude that every problem can be solved by code, and our ideas are always the correct. No, that is not the case at all. Go out in the world, show your tool to as many people as possible, take feedback. Rewrite and rebuild your tool as required. If you wait for 3 years and hope that someone will force your tool to the users, that will not go well in long run.

Do One Thing and Do It Well

The whole idea of Do One Thing and Do It Well has been discussed many times. Search the term in your favorite search engine, and you will surely find many documents explaining the idea in details. Following this idea while designing tools or systems helped me till date. Tunir or gotun tried to follow the same ideas as much as possible. They are build to execute some command on a remote system and act accordingly to the exit codes. I think this is the one line description of both the tools. To verify if the tool is simple or not, I keep throwing the tool to the new users and go through the feedback.

Last night we received a mail from Dusty Mabe in the Fedora Cloud list, to test the updates-testing tree for Fedora Atomic. At the end of the email, he also gave the command to execute to rebase to the updates-testing tree.

# rpm-ostree rebase fedora-atomic/25/x86_64/testing/docker-host 

With that as input from upstream, it was just adding the command in one line on top of the current official Fedora Atomic tests, and followed by a reboot command and wait for the machine to come back online.

sudo rpm-ostree rebase fedora-atomic/25/x86_64/testing/docker-host
@@ sudo reboot
SLEEP 120
curl -O http://infrastructure.fedoraproject.org/infra/autocloud/tunirtests.tar.gz
tar -xzvf tunirtests.tar.gz
...

This helped me to find the regression in atomic command within the next few minutes while I was working on something else. As I reported the issue to the upstream, they are already working to find a solution (some discussion here). The simplicity of the tool helped me to get things done faster in this case.

Please let me know what do you think about this particular idea about designing software in the comments below.

Working over ssh in Python

Working with the remote servers is a common scenario for most of us. Sometimes, we do our actual work over those remote computers, sometimes our code does something for us in the remote systems. Even Vagrant instances on your laptop are also remote systems, you still have to ssh into those systems to get things done.

Setting up of the remote systems

Ansible is the tool we use in Fedora Infrastructure. All of our servers are configured using Ansible, and all of those playbooks/roles are in a public git repository. This means you can also setup your remote systems or servers in the exact same way Fedora Project does.

I also have many friends who manage their laptops or personal servers using Ansible. Setting up new development systems means just a run of a playbook for them. If you want to start doing the same, I suggest you have a look at the lightsaber built by Ralph Bean.

Working on the remote systems using Python

There will be always special cases where you will have to do something on a remote system from your application directly than calling an external tool (read my previous blog post on the same topic). Python has an excellent module called Paramiko to help us out. This is a Python implementation of SSHv2 protocol.

def run(host='127.0.0.1', port=22, user='root',
                  command='/bin/true', bufsize=-1, key_filename='',
                  timeout=120, pkey=None):
    """
    Excecutes a command using paramiko and returns the result.
    :param host: Host to connect
    :param port: The port number
    :param user: The username of the system
    :param command: The command to run
    :param key_filename: SSH private key file.
    :param pkey: RSAKey if we want to login with a in-memory key
    :return:
    """
    client = paramiko.SSHClient()
    client.set_missing_host_key_policy(paramiko.AutoAddPolicy())

    client.connect(hostname=host, port=port,
            username=user, key_filename=key_filename, banner_timeout=10)
    chan = client.get_transport().open_session()
    chan.settimeout(timeout)
    chan.set_combine_stderr(True)
    chan.get_pty()
    chan.exec_command(command)
    stdout = chan.makefile('r', bufsize)
    stdout_text = stdout.read()
    status = int(chan.recv_exit_status())
    client.close()
    return stdout_text, status

The above function is a modified version of the run function from Tunir codebase. We are creating a new client, and then connecting to the remote system. If you have an in-memory implementation of the RSA Key, then you can use the pkey parameter the connect method, otherwise, you can provide the full path to the private key file as shown in the above example. I also don’t want to verify or store the host key, the second line of the function adds a policy to make sure of that.

Working on the remote systems using Golang

Now, if you want to do the same in golang, it will not be much different. We will use golang’s crypto/ssh package. The following is taken from gotun project. Remember to fill in the proper error handling as required by your code. I am just copy-pasting the important parts from my code as an example.

func (t TunirVM) FromKeyFile() ssh.AuthMethod {
	file := t.KeyFile
	buffer, err := ioutil.ReadFile(file)
	if err != nil {
		return nil
	}

	key, err := ssh.ParsePrivateKey(buffer)
	if err != nil {
		return nil
	}
	return ssh.PublicKeys(key)
}

sshConfig := &ssh.ClientConfig{
	User: viper.GetString("USER"),
	Auth: []ssh.AuthMethod{
		vm.FromKeyFile(),
	},
}

connection, err := ssh.Dial("tcp", fmt.Sprintf("%s:%s", ip, port), sshConfig)
session, err = connection.NewSession()
defer session.Close()
output, err = session.CombinedOutput(actualcommand)

Creating an ssh connection to a remote system using either Python or Golang is not that difficult. Based on the use case choose to either have that power in your code or reuse an existing powerful tool like Ansible.

New features in Gotun

Gotun is a written from scratch golang port of Tunir. Gotun can execute tests on remote systems, or it can run tests on OpenStack and AWS.

Installation from git

If you have a working golang setup, then you can use the standard go get command to install the latest version of gotun.

$ go get github.com/kushaldas/gotun

Configure based on YAML files

Gotun expects job configuration in a YAML file. The following is an example of a job for OpenStack.

---
BACKEND: "openstack"
NUMBER: 3

OS_AUTH_URL: "URL"
OS_TENANT_ID: "Your tenant id"
OS_USERNAME: "USERNAME"
OS_PASSWORD: "PASSWORD"
OS_REGION_NAME: "RegionOne"
OS_IMAGE: "Fedora-Atomic-24-20161031.0.x86_64.qcow2"
OS_FLAVOR: "m1.medium"
OS_SECURITY_GROUPS:
    - "group1"
    - "default"
OS_NETWORK: "NETWORK_POOL_ID"
OS_FLOATING_POOL: "POOL_NAME"
OS_KEYPAIR: "KEYPAIR NAME"
key: "Full path to the private key (.pem file)"

You can also point the OS_IMAGE to a local qcow2 image, which then will be uploaded to the cloud, and used. After the job is done, the image will be removed.

Multiple VM cluster on OpenStack

The OpenStack based jobs also support multiple VM(s). In the above example, we are actually creating three instances from the image mentioned.

Job file syntax

Gotun supports the same syntax of the actual tests of Tunir. Any line starting with ## means those are non-gating tests, even if they fail, the job will continue. For a cluster based job, use vm1, vm2 and similar numbers to mark which VM to be used for the command.

Rebuild of the instances on OpenStack

For OpenStack based jobs, gotun adds a new directive, REBUILD_SERVERS, which will rebuild all the instances. In case one of your tests does something destructive to any instance, using this new directive you can now rebuild all the instances, and start from scratch. The following is the tests file and output from one such job.

echo "hello asd" > ./hello.txt
vm1 sudo cat /etc/machine-id
mkdir {push,pull}
ls -l ./
pwd
REBUILD_SERVERS
sudo cat /etc/machine-id
ls -l ./
pwd
$ gotun --job fedora
Starts a new Tunir Job.

Server ID: e0d7b55a-f066-4ff8-923c-582f3c9be29b
Let us wait for the server to be in running state.
Time to assign a floating pointip.
Polling for a successful ssh connection.

Polling for a successful ssh connection.

Polling for a successful ssh connection.

Polling for a successful ssh connection.

Polling for a successful ssh connection.

Polling for a successful ssh connection.

Polling for a successful ssh connection.

Polling for a successful ssh connection.

Server ID: a0b810e6-0d7f-4c9e-bc4d-1e62b082673d
Let us wait for the server to be in running state.
Time to assign a floating pointip.
Polling for a successful ssh connection.

Polling for a successful ssh connection.

Polling for a successful ssh connection.

Polling for a successful ssh connection.

Polling for a successful ssh connection.

Polling for a successful ssh connection.

Executing:  echo "hello asd" > ./hello.txt
Executing:  vm1 sudo cat /etc/machine-id
Executing:  mkdir {push,pull}
Executing:  ls -l ./
Executing:  pwd
Going to rebuild: 209.132.184.241
Polling for a successful ssh connection.

Polling for a successful ssh connection.

Polling for a successful ssh connection.

Polling for a successful ssh connection.

Polling for a successful ssh connection.

Going to rebuild: 209.132.184.242
Polling for a successful ssh connection.

Polling for a successful ssh connection.

Polling for a successful ssh connection.

Polling for a successful ssh connection.

Polling for a successful ssh connection.

Executing:  sudo cat /etc/machine-id
Executing:  ls -l ./
Executing:  pwd

Result file at: /tmp/tunirresult_180507156


Job status: true


command: echo "hello asd" > ./hello.txt
status:true


command: sudo cat /etc/machine-id
status:true

e0d7b55af0664ff8923c582f3c9be29b


command: mkdir {push,pull}
status:true


command: ls -l ./
status:true

total 4
-rw-rw-r--. 1 fedora fedora 10 Jan 25 13:58 hello.txt
drwxrwxr-x. 2 fedora fedora  6 Jan 25 13:58 pull
drwxrwxr-x. 2 fedora fedora  6 Jan 25 13:58 push


command: pwd
status:true

/var/home/fedora


command: sudo cat /etc/machine-id
status:true

e0d7b55af0664ff8923c582f3c9be29b


command: ls -l ./
status:true

total 0


command: pwd
status:true

/var/home/fedora


Total Number of Tests:8
Total NonGating Tests:0
Total Failed Non Gating Tests:0

Success.
Using Ansible inside a job is now easier

Before running any actual test command, gotun creates a file called current_run_info.json in the job directory, we can now use that to create inventory file for Ansible. Then we can mark any Ansible playbook as a proper test in the job description.

#!/usr/bin/env python3
import json

data = None
with open("current_run_info.json") as fobj:
    data = json.loads(fobj.read())

user = data['user']
host1 = data['vm1']
host2 = data['vm2']
key = data['keyfile']

result = """{0} ansible_ssh_host={1} ansible_ssh_user={2} ansible_ssh_private_key_file={3}
{4} ansible_ssh_host={5} ansible_ssh_user={6} ansible_ssh_private_key_file={7}""".format(host1,host1,user,key,host2,host2,user,key)
with open("inventory", "w") as fobj:
    fobj.write(result)

The above-mentioned script is an example, we are reading the JSON file created by the gotun, and then writing to a new inventory file to be used by an Ansible playbook. The documentation has one example of running atomic-host-tests inside gotun.

You have any question, come and ask in the #fedora-cloud channel. You can contact me over twitter too.

Shonku, a static blogging tool

I moved my blog into a static blog more than a year back using Nikola. It was a good move, writing was simple again. I spend more time in writing my blogs than thinking about formating or themes. But someplace back in my mind I was still looking for something even simpler. May be a minimalistic Nikola.

Just before PyCon US I started writing a new tool with this approach. I named it after Professor Shonku, my childhood hero. His logs from his diary was the source of the all stories :)

Shonku is written in golang, still many issues needs to be fixed but it can be used. I moved my blog into shonku few weeks back and things seems to be normal.

  • Posts in Markdown
  • Can have themes

The above two are the initial features I kept in mind while developing it. You can see a different theme here, the source of the theme can be found here.

The documentation will require more love. I am working on it slowly. The building/installation instructions work nicely, if you find any issue or want to make any feature request, please file an issue in github.

To try it out you can download a binary or build it from the source.

$ sha256sum shonku.bin

82476d8e4006da88bf09e1333597f8c0c1a31b3ddf2281aae54ee51e4eb43469 shonku.bin

Using golang with Eucalyptus

Here is an example code to start a new instance in your Eucalyptus cloud using golang. We are using goamz library.

package main

import (
	"fmt"
	"github.com/mitchellh/goamz/aws"
	"github.com/mitchellh/goamz/ec2"
	"net/http"
)

func main() {
	DefaultClient := &http.Client{
		Transport: &http.Transport{
			Proxy: http.ProxyFromEnvironment,
		},
	}

	auth := aws.Auth{"AKI98", "5KZb4GbQ", ""}
	mec2 := ec2.NewWithClient(
		auth,
		aws.Region{EC2Endpoint: "http://euca-ip:8773/services/Eucalyptus"},
		DefaultClient,
	)

	options := ec2.RunInstances{
		ImageId:      "emi-F5433303",
		InstanceType: "m1.xlarge",
		KeyName:      "foo",
	}
	resp, _ := mec2.RunInstances(&options)

	fmt.Println(resp)

}

Searching my blog

More than a month back, I added a small scale search engine which indexes only my blog entries, you can access it either using search box in the page or from [search] (http://search.kushaldas.in).

It is still very initial stage of the service, the indexer is in Python and the web service is written using golang (less then 200 lines, includes few lines of html too).

I still have to work on the ranking algorithm, right now it is very generic.

FAS OpenID authentication with golang

Fedora accounts system provides OpenID authentication. If you are using python-fedora to do authentication in your webapp, you already know what I am talking about. I wanted to do the same, but from a webservice written in golang. I found a few working openid solutions in golang but none of them provides the sreg and other extensions which FAS supports.

I pushed patched openid.go in my github which by default supports all the extensions for FAS. We have an example which shows how to access the Verify function and the output. Now you can have FAS authentication if your app too :)

id, err := openid.Verify(
    fullUrl,
    discoveryCache, nonceStore)