Kushal Das

FOSS and life. Kushal Das talks here.

kushal76uaid62oup5774umh654scnu5dwzh4u2534qxhcbi4wbab3ad.onion

Releasing Tumpa for Mac

I am happy to announce the release of Tumpa (The Usability Minded PGP Application) for Mac. This release contains the old UI (and the UI bugs), but creates RSA4096 keys by default. Right now Tumpa will allow the following:

  • Create new RSA4096 OpenPGP key. Remember to click on the “Authentication” subkey checkbox if you want to use the key for ssh.
  • Export the public key.
  • You can reset the Yubikey from the smartcard menu.
  • Allows to upload the subkeys to Yubikey (4 or 5).
  • Change the user pin/admin pin of the Yubikey.
  • Change the name and public key URL of the Yubikey.

The keys are stored at ~/.tumpa/ directory, you can back it up in an encrypted USB drive.

You can download the dmg file from my website.

$ wget https://kushaldas.in/tumpa-0.1.3.dmg
$ sha256sum ./tumpa-0.1.3.dmg 
6204cf3253fbe41ada91429684fccc0df87257f85345976d9468c8adf131c591  ./tumpa-0.1.3.dmg

Download & install from the dmg in the standard drag & drop style. If you are using one of the new M1 box, remember to click on “Open in Rosetta” for the application.

Tumpa opening on Mac

Click on “Open”.

Here is a GIF recorded on Linux, the functions are same in Mac.

Tumpa gif

Saptak (my amazing comaintainer) is working on a new website. He is also leading the development of the future UI, based on usability reports. We already saw a few UI issues on Mac (specially while generating a new key), those will be fixed in a future release.

Feel free to open issues as you find, find us in #tumpa channel on Libera.chat IRC network.

Johnnycanencrypt 0.6.0 released

A few days ago I released 0.6.0 of Johnnycanencrypt. It is a Python module written in Rust for OpenPGP using the amazing sequoia-pgp library. It allows you to access/use Yubikeys (without gpg-agent) directly from your code.

This release took almost an year. Though most of the work was done before, but I was not in a state to do a release.

Major changes

  • We can now sign and decrypt using both Curve25519 and RSA keys on the smartcard (we support only Yubikeys)
  • Changing of the password of the secret keys
  • Updating expiry date of the subkeys
  • Adding new user ID(s)
  • Revoking user ID(s)

I also released a new version of Tumpa which uses this. An updated package for Debian 11.

Using onion services over unix sockets and nginx

I have explained before about how to create Onion services, this provides an easy solution to expose any service from inside of your home network to the Internet, in a secured manner (authorized services). But, in all of those examples I used an IP/port combination to expose/talk to the internal service. Instead you can also use unix sockets to do the same.

To do so, use the following style in your torrc file, this example is from my blog.

HiddenServiceDir /var/lib/tor/hidden/
HiddenServiceVersion 3
HiddenServicePort 80 unix:/var/run/tor-hs-kushal.sock
HiddenServicePort 443 unix:/var/run/tor-hs-kushal-https.sock

And the corresponding nginx configuration parts:

server {
    listen unix:/var/run/tor-hs-kushal.sock;

    server_name kushal76uaid62oup5774umh654scnu5dwzh4u2534qxhcbi4wbab3ad.onion;
    access_log /var/log/nginx/kushal_onion-access.log;

    location / {
        return 301 https://$host$request_uri;
    }

}

server {
    listen unix:/var/run/tor-hs-kushal-https.sock ssl http2;

    server_name kushal76uaid62oup5774umh654scnu5dwzh4u2534qxhcbi4wbab3ad.onion;
    access_log /var/log/nginx/kushal_onion-access.log;
    ...

Now if you start tor and also nginx pointing to the same unix domain, things will go fine. But, nginx will fail to restart, you will have to remove the socket files by hand to restart. This happens due to a bug in nginx. You can edit the restart process and fix this issue.

systemctl restart nginx

Add the following the configuration file in the correct location (between the comments):

### Editing /etc/systemd/system/nginx.service.d/override.conf
### Anything between here and the comment below will become the new contents of the file

### Editing /etc/systemd/system/nginx.service.d/override.conf Anything between here and the comment below will become the new contents of the file
[Service]
ExecStop=
ExecStop=-/sbin/start-stop-daemon --quiet --stop --retry TERM/5 --pidfile /run/nginx.pid

### Lines below this comment will be discarded

If you go and read the original ExecStop value, you will find that it is using SIGQUIT, but that does not remove the socket files, only a SIGTERM does. You can read more in the []upstream bug](https://trac.nginx.org/nginx/ticket/753).

After this nginx should be able to restart without any trouble.

Thank you reader who emailed and asked for this.

Continuing the journey at SUNET

SUNET logo

From this week I started working for SUNET as a public interest technologist. We are under Vetenskapsrådet, this also means from now on I am a central government employee in Sweden.

I will be helping out various in open source projects and services provided SUNET, focusing on privacy and security. I will also continue working on all of the upstream projects I maintain, including SecureDrop.

Reproducible wheel buidling failure on CircleCI container

At SecureDrop project we have Python wheels built for Python 3.7 on Buster in a reproducible way. We use the same wheels inside of the Debian packages. The whole process has checks to verify the sha256sums based on gpg signatures, and at the end we point pip to a local directory to find all the dependencies.

Now, I am working to update the scripts so that we can build wheels for Ubuntu Focal, and in future we can use those wheels in the SecureDrop server side packages. While working on this, in the CI I suddenly noticed that all wheels started failing on the reproducibility test on Buster. I did not make any change other than the final directory path, so was wondering what is going on. Diffoscope helped to find out the difference:

│ -6 files, 34110 bytes uncompressed, 9395 bytes compressed:  72.5%
│ +6 files, 34132 bytes uncompressed, 9404 bytes compressed:  72.4%
├── six-1.11.0.dist-info/METADATA
│ @@ -9,14 +9,15 @@
│  Platform: UNKNOWN
│  Classifier: Programming Language :: Python :: 2
│  Classifier: Programming Language :: Python :: 3
│  Classifier: Intended Audience :: Developers
│  Classifier: License :: OSI Approved :: MIT License
│  Classifier: Topic :: Software Development :: Libraries
│  Classifier: Topic :: Utilities
│ +License-File: LICENSE
│  
│  .. image:: http://img.shields.io/pypi/v/six.svg
│     :target: https://pypi.python.org/pypi/six
│  
│  .. image:: https://travis-ci.org/benjaminp/six.svg?branch=master
│      :target: https://travis-ci.org/benjaminp/six
├── six-1.11.0.dist-info/RECORD
│ @@ -1,6 +1,6 @@
│  six.py,sha256=A08MPb-Gi9FfInI3IW7HimXFmEH2T2IPzHgDvdhZPRA,30888
│  six-1.11.0.dist-info/LICENSE,sha256=Y0eGguhOjJj0xGMImV8fUhpohpduJUIYJ9KivgNYEyg,1066
│ -six-1.11.0.dist-info/METADATA,sha256=vfvF0GW2vCjz99oMyLbw15XSkmo1IxC-G_339_ED4h8,1607
│ +six-1.11.0.dist-info/METADATA,sha256=Beq9GTDD6nYVwLYrN3oOcts0HSPHotfRWQ_Zn8_9a7g,1629
│  six-1.11.0.dist-info/WHEEL,sha256=Z-nyYpwrcSqxfdux5Mbn_DQ525iP7J2DG3JgGvOYyTQ,110
│  six-1.11.0.dist-info/top_level.txt,sha256=_iVH_iYEtEXnD8nYGQYpYFUvkUW9sEO1GYbkeKSAais,4
│  six-1.11.0.dist-info/RECORD,,

It seems somehow the packages were picking up metadata about the LICENSE file. After looking into the environment, I found virtualenv is pulling latest setuptools into the virtualenv. Thus breaking the reproducibility. It was a quick fix. Yes, we do pin setuptools and pip in our wheels repository.

Next, the extension based wheels started failing, and I was going totally crazy to find out why there is some ABI change. I still don't know the correct reason, but noticed that the circleci/python:3.7-buster container image (and the upstream Python container) is using different flags to build the extensions than Debian Buster on vm/bare metal. For example, below on the top we have the command line from the container and then inside of the normal Debian Buster.

creating build/temp.linux-x86_64-3.7/lib/sqlalchemy/cextension
gcc -pthread -Wno-unused-result -Wsign-compare -DNDEBUG -g -fwrapv -O3 -Wall -fPIC -I/home/circleci/project/.venv/include -I/usr/local/include/python3.7m -c lib/sqlalchemy/cextension/processors.c -o build/temp.linux-x86_64-3.7/lib/sqlalchemy/cextension/processors.o
gcc -pthread -shared build/temp.linux-x86_64-3.7/lib/sqlalchemy/cextension/processors.o -L/usr/local/lib -lpython3.7m -o build/lib.linux-x86_64-3.7/sqlalchemy/cprocessors.cpython-37m-x86_64-linux-gnu.so
building 'sqlalchemy.cresultproxy' extension
gcc -pthread -Wno-unused-result -Wsign-compare -DNDEBUG -g -fwrapv -O3 -Wall -fPIC -I/home/circleci/project/.venv/include -I/usr/local/include/python3.7m -c lib/sqlalchemy/cextension/resultproxy.c -o build/temp.linux-x86_64-3.7/lib/sqlalchemy/cextension/resultproxy.o
gcc -pthread -shared build/temp.linux-x86_64-3.7/lib/sqlalchemy/cextension/resultproxy.o -L/usr/local/lib -lpython3.7m -o build/lib.linux-x86_64-3.7/sqlalchemy/cresultproxy.cpython-37m-x86_64-linux-gnu.so
building 'sqlalchemy.cutils' extension
gcc -pthread -Wno-unused-result -Wsign-compare -DNDEBUG -g -fwrapv -O3 -Wall -fPIC -I/home/circleci/project/.venv/include -I/usr/local/include/python3.7m -c lib/sqlalchemy/cextension/utils.c -o build/temp.linux-x86_64-3.7/lib/sqlalchemy/cextension/utils.o
gcc -pthread -shared build/temp.linux-x86_64-3.7/lib/sqlalchemy/cextension/utils.o -L/usr/local/lib -lpython3.7m -o build/lib.linux-x86_64-3.7/sqlalchemy/cutils.cpython-37m-x86_64-linux-gnu.so


creating build/temp.linux-x86_64-3.7/lib/sqlalchemy/cextension
x86_64-linux-gnu-gcc -pthread -DNDEBUG -g -fwrapv -O2 -Wall -g -fstack-protector-strong -Wformat -Werror=format-security -Wdate-time -D_FORTIFY_SOURCE=2 -fPIC -I/home/kdas/code/securedrop-debian-packaging/.venv/include -I/usr/include/python3.7m -c lib/sqlalchemy/cextension/processors.c -o build/temp.linux-x86_64-3.7/lib/sqlalchemy/cextension/processors.o
x86_64-linux-gnu-gcc -pthread -shared -Wl,-O1 -Wl,-Bsymbolic-functions -Wl,-z,relro -Wl,-z,relro -g -fstack-protector-strong -Wformat -Werror=format-security -Wdate-time -D_FORTIFY_SOURCE=2 build/temp.linux-x86_64-3.7/lib/sqlalchemy/cextension/processors.o -o build/lib.linux-x86_64-3.7/sqlalchemy/cprocessors.cpython-37m-x86_64-linux-gnu.so
building 'sqlalchemy.cresultproxy' extension
x86_64-linux-gnu-gcc -pthread -DNDEBUG -g -fwrapv -O2 -Wall -g -fstack-protector-strong -Wformat -Werror=format-security -Wdate-time -D_FORTIFY_SOURCE=2 -fPIC -I/home/kdas/code/securedrop-debian-packaging/.venv/include -I/usr/include/python3.7m -c lib/sqlalchemy/cextension/resultproxy.c -o build/temp.linux-x86_64-3.7/lib/sqlalchemy/cextension/resultproxy.o
x86_64-linux-gnu-gcc -pthread -shared -Wl,-O1 -Wl,-Bsymbolic-functions -Wl,-z,relro -Wl,-z,relro -g -fstack-protector-strong -Wformat -Werror=format-security -Wdate-time -D_FORTIFY_SOURCE=2 build/temp.linux-x86_64-3.7/lib/sqlalchemy/cextension/resultproxy.o -o build/lib.linux-x86_64-3.7/sqlalchemy/cresultproxy.cpython-37m-x86_64-linux-gnu.so
building 'sqlalchemy.cutils' extension
x86_64-linux-gnu-gcc -pthread -DNDEBUG -g -fwrapv -O2 -Wall -g -fstack-protector-strong -Wformat -Werror=format-security -Wdate-time -D_FORTIFY_SOURCE=2 -fPIC -I/home/kdas/code/securedrop-debian-packaging/.venv/include -I/usr/include/python3.7m -c lib/sqlalchemy/cextension/utils.c -o build/temp.linux-x86_64-3.7/lib/sqlalchemy/cextension/utils.o
x86_64-linux-gnu-gcc -pthread -shared -Wl,-O1 -Wl,-Bsymbolic-functions -Wl,-z,relro -Wl,-z,relro -g -fstack-protector-strong -Wformat -Werror=format-security -Wdate-time -D_FORTIFY_SOURCE=2 build/temp.linux-x86_64-3.7/lib/sqlalchemy/cextension/utils.o -o build/lib.linux-x86_64-3.7/sqlalchemy/cutils.cpython-37m-x86_64-linux-gnu.so
installing to build/bdist.linux-x86_64/wheel

If you want to see the difference in the flags, you can try out the following command:

python3 -m sysconfig

Look for PY_CFLAGS and related flags in the command output. Reproducibility depends on the environment, and we should not expect the latest container image (with the latest Python 3.7.x release) creating the same thing like in Debian Buster, but the failure started recently, we did not notice this a few months. Also, this means in future we should enable reproducibility tests on nightlies in CI.

Get a TLS certificate for your onion service

For a long time, I wanted to have a certificate for the onion address of my blog. Digicert was the only CA who was providing those certificates with an Extended Validation. Those are costly and suitable for an organization to get, but not for me personally, especially due to the cost.

TLS certificate working

A few days ago, on IRC, I found out that Harica is providing Domain validation for the onion sites for around €30 per year. I jumped in to get one. At the same time, ahf was also getting his certificate. He helped me with the configuration for nginx.

How to get your own certificate?

  • Make sure you have your site running as Tor v3 onion service
  • Create an account at https://cm.harica.gr/
  • Goto server certificates on the left bar, and make a new request for your domain, provide the onion address as requested in the form.
  • It will give you the option to upload a CSR Certificate Signing Request. You can generate one by openssl req -newkey rsa:4096 -keyout kushaldas.in.onion.key -out csr.csr. For the common name, provide the same onion address.
  • After the click on the website, it will ask you to download a file and put it in your web root inside of .well-known/pki-validation/ directory. Make sure that you can access the file over Tor Browser.
  • When you click the final submission button, the system will take some time to verify the domain. After payment, you should be able to download the certificate with the full chain (the file ending with .p7b). There are 3 options on the webpage, so please remember to download the correct file :)
  • You will have to convert it into PEM format, I used the command ahf showed me: openssl pkcs7 -inform pem -in kushaldas.in.p7b -print_certs -out kushaldas.in.onion.chain.pem -outform pem

Setting up nginx

This part will be the same as any other standard nginx configuration. The following is what I use. Please uncomment the Strict-Transport-Security header line only after you are sure everything is working fine.

server {
	listen unix:/var/run/tor-hs-kushal.sock;

    server_name kushal76uaid62oup5774umh654scnu5dwzh4u2534qxhcbi4wbab3ad.onion;
    access_log /var/log/nginx/kushal_onion-access.log;

    location / {
	return 301 https://$host$request_uri;
    }

}

server {
    listen unix:/var/run/tor-hs-kushal-https.sock ssl http2;

    server_name kushal76uaid62oup5774umh654scnu5dwzh4u2534qxhcbi4wbab3ad.onion;
    access_log /var/log/nginx/kushal_onion-access.log;

    ssl_certificate /etc/pki/kushaldas.in.onion.chain.pem;
	ssl_certificate_key /etc/pki/kushaldas.in.onion.open.key;

    #add_header Strict-Transport-Security "max-age=63072000; includeSubdomains";
	add_header X-Frame-Options DENY;
	add_header X-Content-Type-Options nosniff;
    # Turn on OCSP stapling as recommended at
    # https://community.letsencrypt.org/t/integration-guide/13123
    # requires nginx version >= 1.3.7
    ssl_stapling on;
    ssl_stapling_verify on;

    # modern configuration. tweak to your needs.
    ssl_protocols TLSv1.2;
    ssl_ciphers 'ECDHE-ECDSA-AES256-GCM-SHA384:ECDHE-RSA-AES256-GCM-SHA384:ECDHE-ECDSA-CHACHA20-POLY1305:ECDHE-RSA-CHACHA20-POLY1305:ECDHE-ECDSA-AES128-GCM-SHA256:ECDHE-RSA-AES128-GCM-SHA256:ECDHE-ECDSA-AES256-SHA384:ECDHE-RSA-AES256-SHA384:ECDHE-ECDSA-AES128-SHA256:ECDHE-RSA-AES128-SHA256';
    ssl_prefer_server_ciphers on;

	index index.html;
	root /var/www/kushaldas.in;

	location / {
		try_files $uri $uri/ =404;
	}
}

I also have the following configuration in the /etc/tor/torrc file to use the unix socket files.

HiddenServiceDir /var/lib/tor/hs-kushal/
HiddenServiceVersion 3
HiddenServicePort 80 unix:/var/run/tor-hs-kushal-me.sock
HiddenServicePort 443 unix:/var/run/tor-hs-kushal-https.sock

In case you want to know more about why do you need the certificate for your onion address, the Tor Project has a very nice explanation.

Defending against side channel attacks via dependencies

Yesterday Alex Birsan posted a blog explaining how he made a supply chain attack on various companies via dependencies. I was waiting for this blog from last August when we noticed the mentioned packages on PyPI (and removed). I reached out to Alex to figure out more about the packages, and he said he will write a blog post.

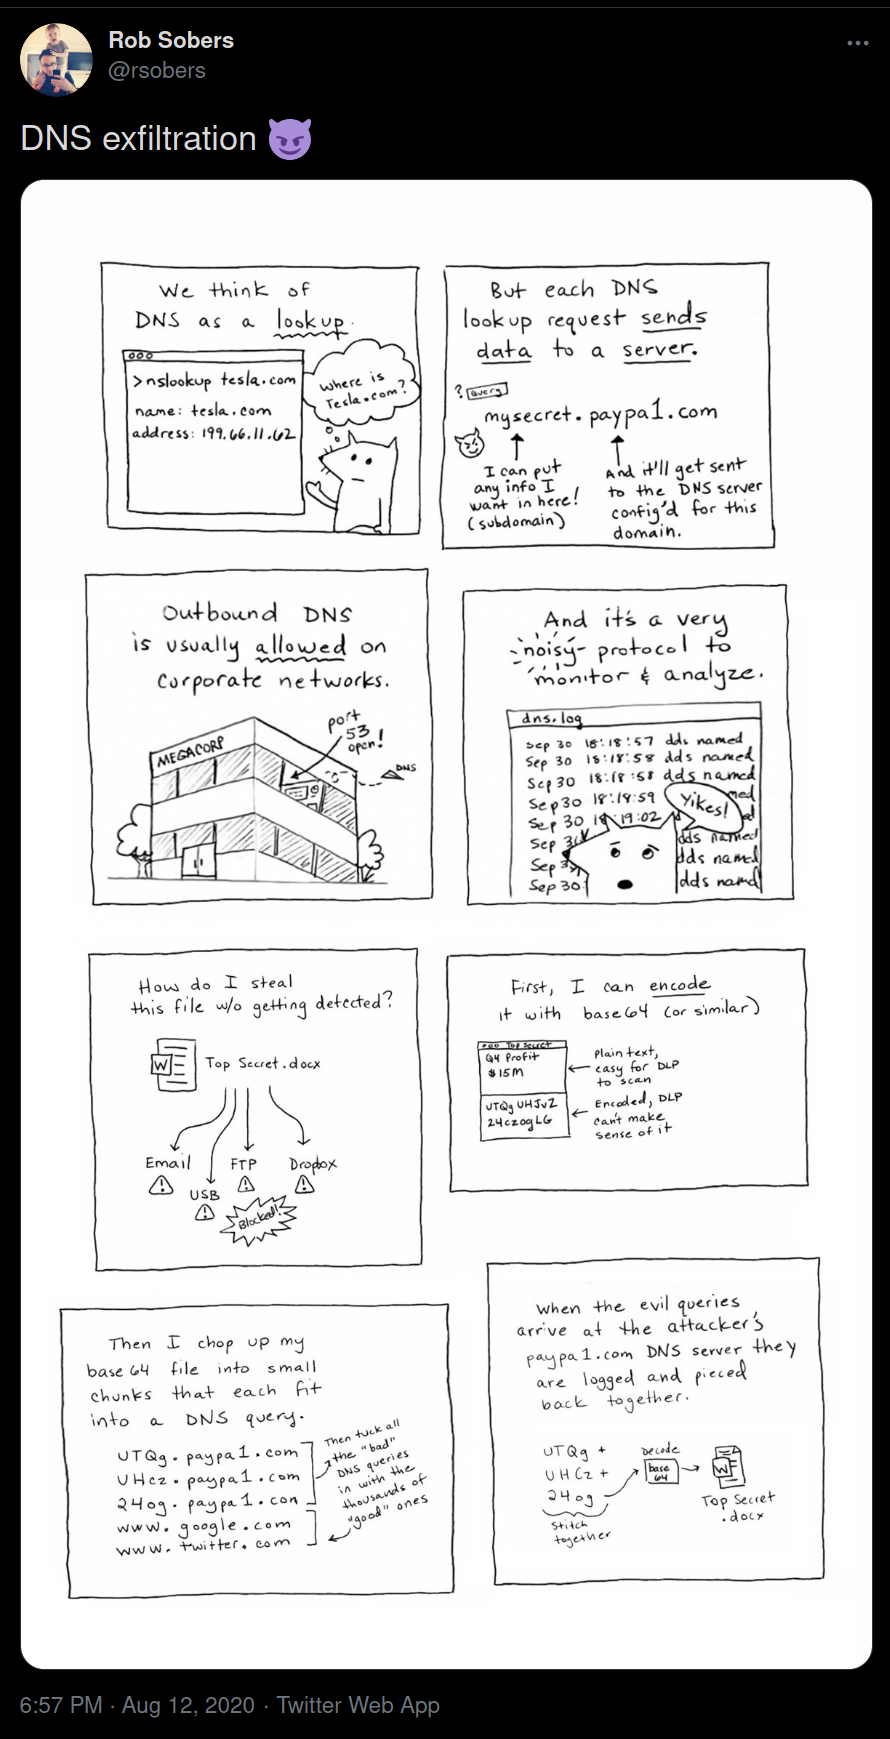
This is the same time when @rsobers also tweeted about how any similar attack works via DNS.

dns data exfiltration

At SecureDrop project, we spend a lot of time figuring out a way to defend against similar attacks. My PyCon US 2019 talk explained the full process. In simple words, we are doing the following:

  • Verify the source of every python dependency before adding/updating them. This is a manual step done by human eyes.
  • Build wheels from the verified source and store them into a package repository along with OpenPGP signed sha256sums.
  • Before building the Debian package, make sure to verify the OpenPGP signature, and also install only from the known package repository using verified (again via OpenPGP signature) wheel hashes (from the wheels we built ourselves).

Now, in the last few months, we modified these steps, and made it even easier. Now, all of our wheels are build from same known sources, and all of the wheels are then built as reproducible and stored in git (via LFS). The final Debian packages are again reproducible. Along with this and the above mentioned OpenPGP signature + package sha256sums verification via pip. We also pass --no-index the argument to pip now, to make sure that all the dependencies are getting picked up from the local directory.

Oh, and I also forgot to mention that all of the project source tarballs used in SecureDrop workstation package building are also reproducible. If you are interested in using the same in your Python project (or actually for any project's source tarball), feel free to have a look at this function.

There is also diff-review mailing list (very low volume), where we post a signed message of any source package update we review.

Introducing Tumpa, to make OpenPGP simple with smartcards

Generating OpenPGP keys in an offline air-gapped system and then moving them into a smart card is always a difficult task for me. To remember the steps and command-line options of gpg2 correctly and then following them in the same order is difficult, and I had trouble enough number of times in doing so when I think about someone who is not into the command line that much, how difficult these steps are for them.

While having a chat with Saptak a few weeks ago, we came up with the idea of writing a small desktop tool to help. I started adding more features into my Johnnycanencrypt for the same. The OpenPGP operations are possible due to the amazing Sequoia project.

Introducing Tumpa

The work on the main application started during the holiday break, and today I am happy to release 0.1.0 version of Tumpa to make specific OpenPGP operations simple to use. It uses Johnnycanencrypt inside, and does not depend on the gpg.

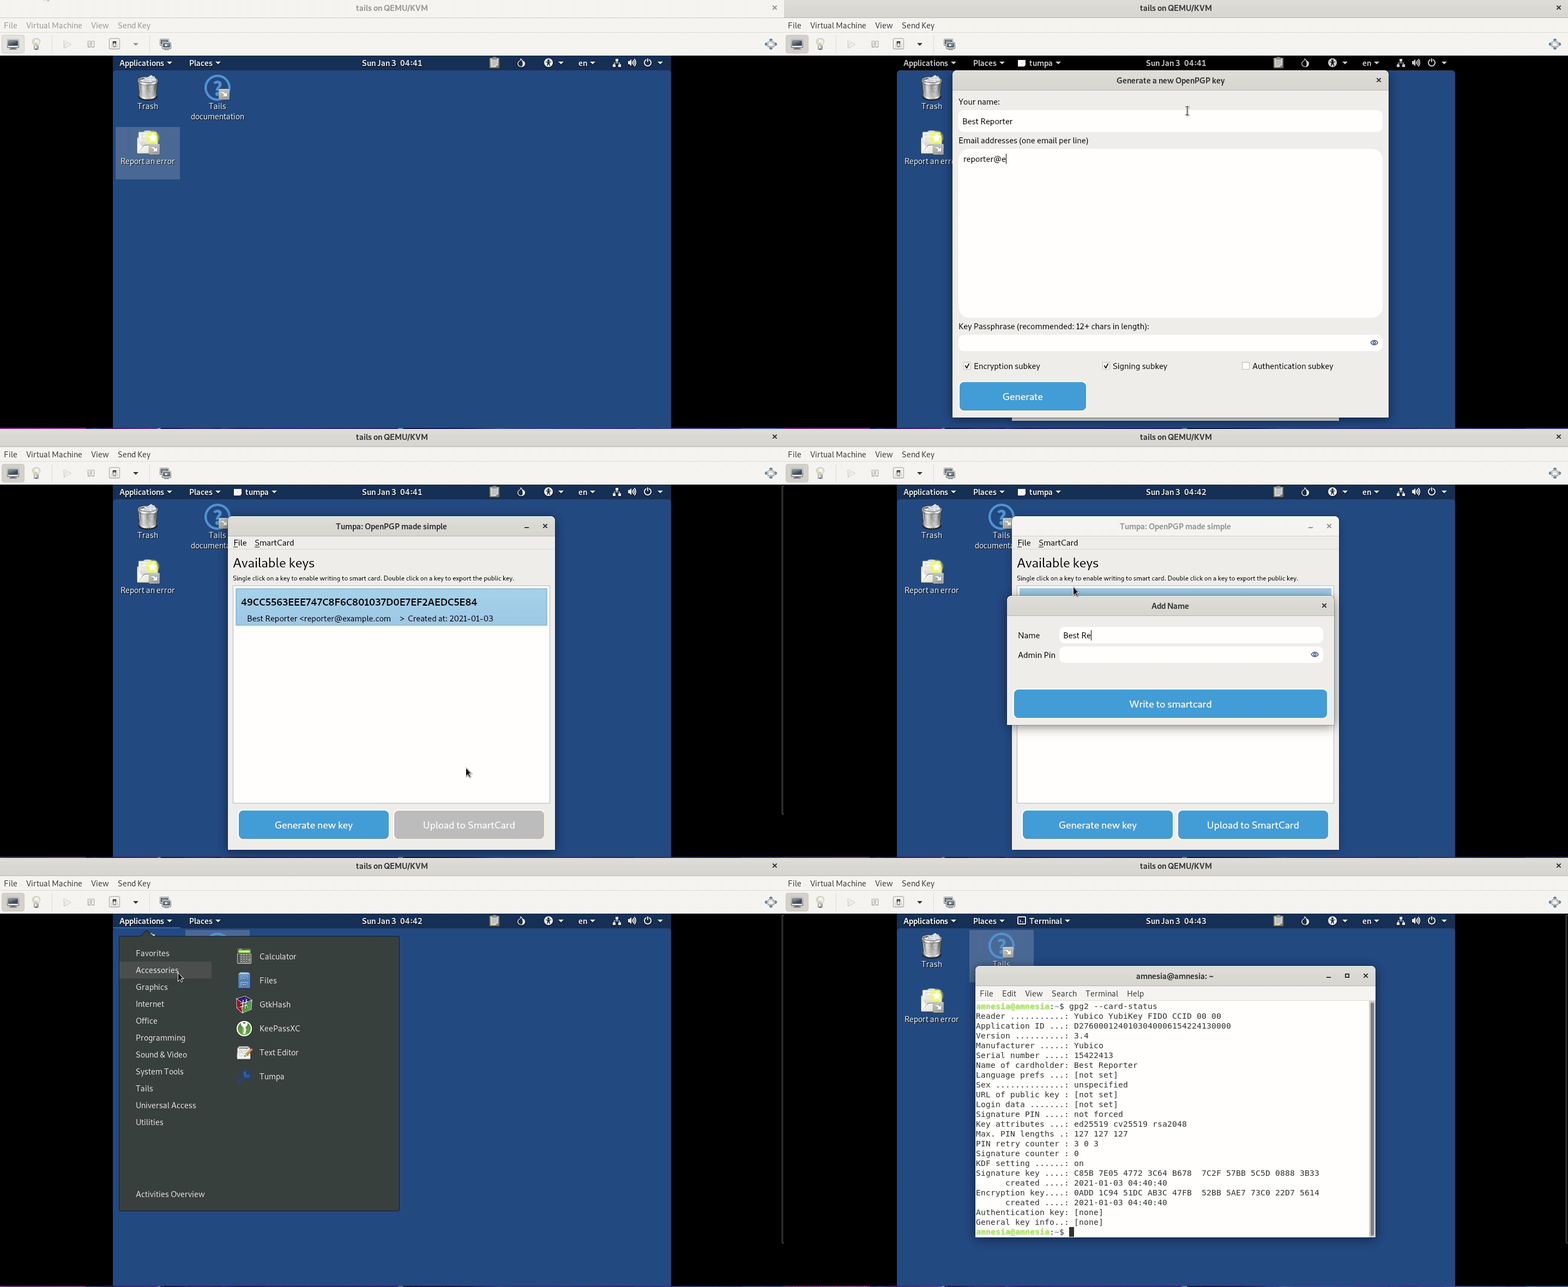
Here is a small demo of the application running in a Tails (VM) environment. I am creating a new OpenPGP key with encryption and signing subkeys, and then putting them into a Yubikey. We are also setting the card holder's name via our tool.

Tumpa demo

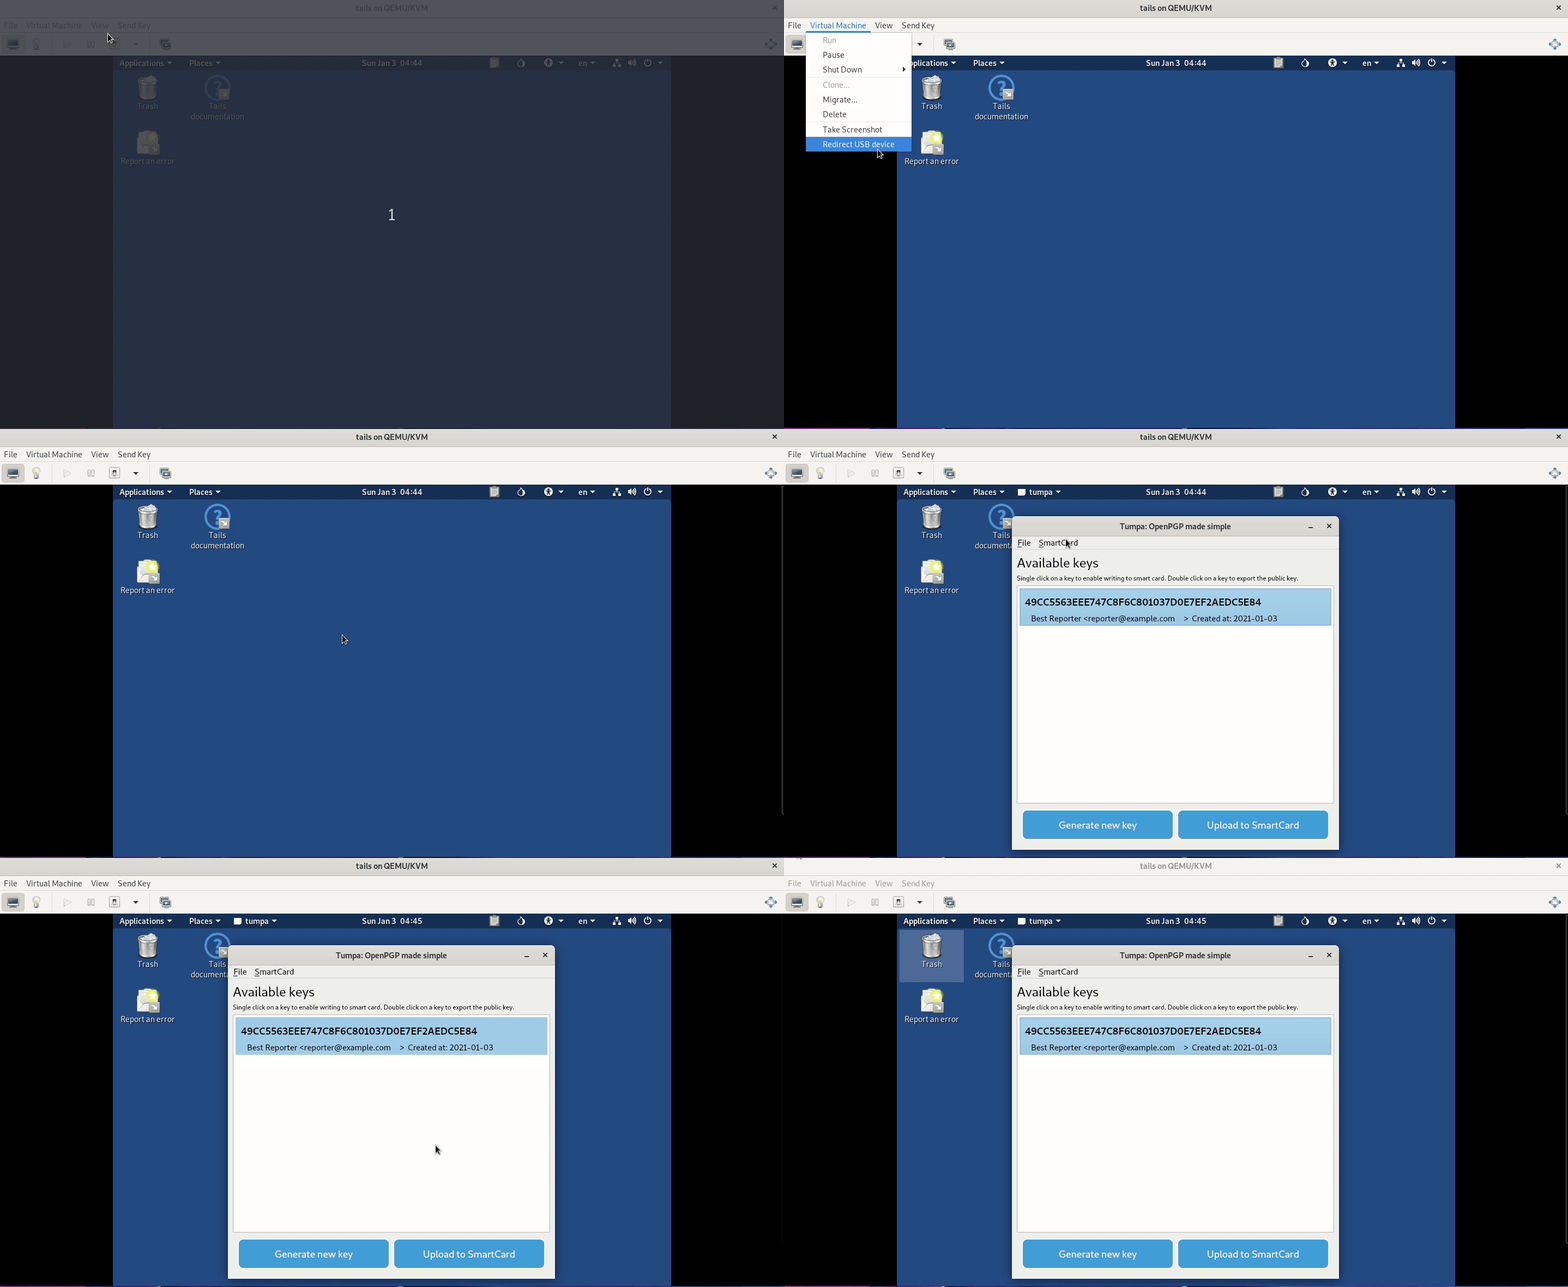
We can also reset any Yubikey with just a click.

Reset Yubikey

You can download the Debian Buster package for Tails from the release page from Github. You can run from the source in Mac or Fedora too. But, if you are doing any real key generation, then you should try to do it in an air-gapped system.

You can install the package as dpkg -i ./tumpa_0.1.0+buster+nmu1_all.deb inside of Tails.

What are the current available features?

  • We can create a new OpenPGP key along with selected subkeys using Curve25519. By default, the tool will add three years for the expiration of the subkeys.
  • We can move the subkeys to a smart card. We tested only against Yubikeys as that is what we have.
  • We can set the name and public key URL on the card.
  • We can set the user pin and the admin pin of the smart card
  • We can reset a Yubikey.
  • We can export the public key for a selected key.

What is next?

A lot of work :) This is just the beginning. There are a ton of features we planned, and we will slowly add those. The UI also requires a lot of work and touch from a real UX person.

The default application will be very simple to use, and we will also have many advanced features, say changing subkey expiration dates, creating new subkeys, etc. for the advanced users.

We are also conducting user interviews (which takes around 20 minutes of time). If you have some time to spare to talk to us and provide feedback, please feel free to ping us via Twitter/mastodon/IRC.

We are available on #tumpa channel on Freenode. Come over and say hi :)

There are a lot of people I should thank for this release. Here is a quick list at random. Maybe I miss many names here, but you know that we could not do this without your help and guidance.

  • Sequoia team for all the guidance on OpenPGP.
  • Milosch Meriac for providing the guidance (and a ton of hardware).
  • Vincent Breitmoser, for keep explaining OpenKeyChain codebase to me to understand smart card operations
  • Anwesha Das for fixing the CI failures for Johnnycanencrypt, and documentation PRs.
  • Harlo and Micah, for all the amazing input for months.
  • Saptak Sengupta for being the amazing co-maintainer.

Updates from Johnnycanencrypt development in last few weeks

In July this year, I wrote a very initial Python module in Rust for OpenPGP, Johnnycanencrypt aka jce. It had very basic encryption, decryption, signing, verification, creation of new keys available. It uses https://sequoia-pgp.org library for the actual implementation.

I wanted to see if I can use such a Python module (which does not call out to the gpg2 executable) in the SecureDrop codebase.

First try (2 weeks ago)

Two weeks ago on the Friday, when I sat down to see if I can start using the module, within a few minutes, I understood it was not possible. The module was missing basic key management, more more refined control over creation, or expiration dates.

On that weekend, I wrote a KeyStore using file-based keys as backend and added most of the required functions to try again.

The last Friday

I sat down again; this time, I had a few friends (including Saptak, Nabarun) on video along with me, and together we tried to plug the jce inside SecureDrop container for Focal. After around 4 hours, we had around 5 failing tests (from 32) in the crypto-related tests. Most of the basic functionality was working, but we are stuck for the last few tests. As I was using the file system to store the keys (in simple .sec or .pub files), it was difficult to figure out the existing keys when multiple processes were creating/deleting keys in the same KeyStore.

Next try via a SQLite based KeyStore

Next, I replaced the KeyStore with an SQLite based backend. Now multiple processes can access the keys properly. With a few other updates, now I have only 1 failing test (where I have to modify the test properly) in that SecureDrop Focal patch.

While doing this experiment, I again found the benefits of writing the documentation of the library as I developed. Most of the time, I had to double-check against it to make sure that I am doing the right calls. I also added one example where one can verify the latest (10.0) Tor Browser download via Python.

In case you already use OpenPGP encryption in your tool/application, or you want to try it, please give jce a try. Works on Python3.7+. I tested on Linux and macOS, and it should work on Windows too. I have an issue open on that, and if you know how to do that, please feel free to submit a PR.